The importance of reliable data storage is obvious to any level of user. Especially nowadays, when the amount of stored data is growing at an extra rate, regardless of whether this data is personal (the photo and video collections) or corporate (financial and project documentation, scientific research results, etc.). One of the tools to help solve the data storage problem to a certain extent is based on the creation of RAID disk arrays. In this article we will explain how to create a software RAID in Linux.
Contents
- RAID conception and types
- LVM or mdadm – what is the best to use
- How to create the software RAID 1 in Linux using mdadm
- How to rename RAID array in Linux?
- How to check the status of a RAID array in Linux?
- How to add, remove or replace the drive in a Linux software RAID array
- What to do if the RAID array suddenly became inactive or does not work after a reboot?
- What to do if RAID array doesn't work and nothing helps?
- How to delete mdadm RAID array in Linux?
RAID conception and types
RAID is Redundant Array of Independent Disks (although a free interpretation is probably more correct: an array of redundant independent disks) is a hardware or software subsystem in which stored data is distributed (often with redundancy) across multiple hard disks (physical or virtual). A hardware RAID subsystem is the most efficient, both from the reliability and performance standpoints. However, software RAID can be very useful and Linux has all components needed to create a software RAID system.
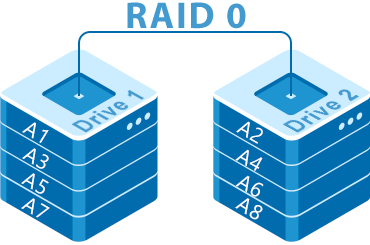
With RAID 0, two or more disks are used only to increase performance by separating read/write data between them. There is virtually no “redundancy” here.
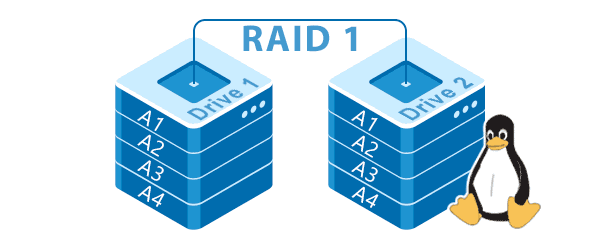
RAID 1 is the first level that provides redundancy. This mode is often called “mirroring” because data is duplicated on all disks in the array. Reliability is increased, but write performance is reduced because the same data is written multiple times. RAID 1 requires at least two disks.
The feature of RAID 4 is a separate disk for writing parity information. Therefore, the weak point of this subsystem is the wait time for writing to this particular disk. For this reason it is recommended to use RAID 5 in all cases except those in which the use of RAID 4 is extremely necessary and justified.
RAID 5 separates both data and parity information during writes. For this reason RAID 5 was considered the most efficient and economical level until new developments in this area such as RAID 5EE, RAID 6, RAID 10 and the combined RAID 1+0, RAID 5+0, RAID 1+5 levels were introduced. But for now, Linux does not supports the RAID 0+1 level.
At least three disks are required for RAID 5.
Software RAID support has been available in the Linux kernel since version 2.0, although the first version was hardly suitable for practical use: its capabilities were very limited and it contained a fair number of bugs. The situation has improved since 2.4 kernels and today’s RAID implementations in Linux are suitable for practical use.
LVM or mdadm – what is the best to use
Many users who already have experience with Linux often ask themselves is it better to create RAID using the MDADM utility or it is better to use the LVM technology.
LVM is a data volume management system for Linux. It allows you to create logical volumes over physical partitions (or even unpartitioned hard disks) which will appear in the system itself as ordinary partitions. The main advantages of LVM are that, first, you can create one group of logical volumes over any number of physical partitions, and second, logical volumes can be easily resized at runtime. Furthermore, LVM also supports snapshots, copying of partitions on the fly, and RAID-1-like mirroring.
At the same time, mdadm is a utility to create and manage software RAID arrays on Linux previously known as mdctl. MDADM is short for Multiple Disk and Device Management. In other words, it was originally designed to work with RAID arrays only.
To be able to choose the technology that works best for you, read the article «Comparison and difference between RAID lvm and mdadm» In this article, you will find features of each technology and a detailed comparison of them.
How to create the software RAID 1 in Linux using mdadm
3.1 What is mdadm?
The Linux operating system uses the mdadm utility for creating any level of RAID arrays. At the same time, mdadm can also increase or decrease the array size, check the RAID status, and so on.
In some distributions, it is installed by default. But most often, you will need to install it yourself. Accordingly, before proceeding to the RAID array creation we will install mdadm.
3.2 The mdadm installing
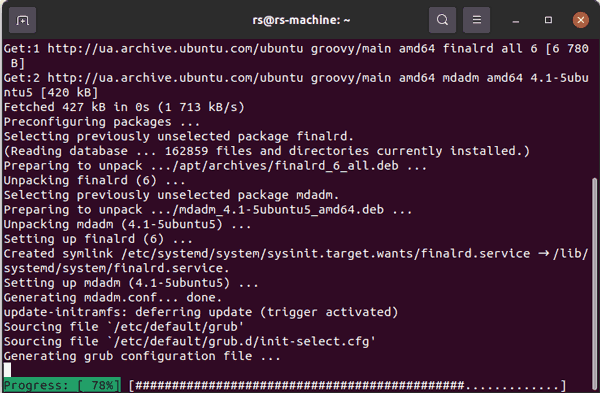
The mdadm utility installation process is following:
Step 1: Open a terminal. To do this, on the desktop, press the key combination “Ctrl + Alt + T“
Step 2: Run the command:
$sudo apt install mdadm
Note: if you have a CentOS/Fedora/RedHat distribution — use the command:
$sudo yum install mdadm
Once the installation process is finished, you can start to prepare the disks.
In fact, mdadm can perform 7 groups of operations:
- Create – creates a RAID array of multiple disks (with a superblock on each device).
- Assemble – assembles (previously created) array and activates it. Disks to be assembled may be specified explicitly or searched automatically. mdadm will verify whether components will form a valid array.
- Build – combining disks into an array (without superblocks). For such arrays mdadm does not distinguish between creation and subsequent build. It is also impossible to check if the necessary devices were specified in the correct order. Do not use this mode if you do not know what it is for.
- Manage – Manage the array: add new free disks (spares) and remove faulty devices.
- Follow/Monitor – Monitor one or more md-devices and react to their status. This only makes sense for RAID 1, 4, 5, 6 or multipath arrays, as only they can have different states. raid0 or linear can have no missing, spare or failed disks, so there is nothing to monitor.
- Grow – expanding or shrinking (shrinking) the array, or otherwise reforming it (reshape). For the moment, it supports changing the active size of components in RAID levels 1/4/5/6, as well as changing the number of active devices in RAID1.
- Misc – other operations with independent disks. For example, viewing and modifying array superblocks and stopping active arrays.
Below we will talk about how to use the mdadm.
3.3 Preparing the disks
The first thing to do is to display the list of disks connected to your computer. To do this, run the command:
$ sudo lsblk
In the list that appears, find the ones you want to create an array from and remember their designations. In our case, they are sdb, sdb, sdd.
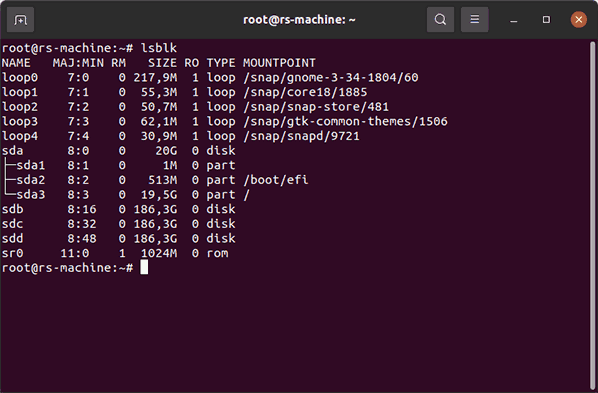
Important: To avoid destroying the data on the system disk, take a good look at the disk partitions.
In many cases, the sda drive is the system drive, so check it carefully to make sure you do not lose important data.
A great solution is to place your RAID array on disk partitions rather than disks. Firstly, when placing the array on disks, you should keep in mind, that the operating system may modify or overwrite the superblock. Secondly, when placing the RAID array on disks, there could be replacement problems if any of the disks were to fail.
The problem is that it is very difficult to find an identical drive for replacement due to even identical models can vary depending on the batch or manufacture date. If the new drive turns out to be a few megabytes smaller, the data recovery process will fail.
If the new drive is larger, it will not use the extra space. Accordingly, there is no point in overpaying.
In the case of RAID array on partitions, everything is much simpler – you just delete the old partition and create exactly the same new one.
Leave some free space at the end of the disk (at least 100 MB). It makes it much easier to choose a disk to replace because it compensates for the difference in disk capacity.
Once you have selected the disks for creating the new RAID array, you need to do the following manipulations:
Step 1: Delete all information about the previous RAID configurations on each drive. Use the following command to do this:
$ sudo mdadm --zero-superblock --force /dev/sd{b,c,d}
*where b,c,d are the drive letters from which the RAID array will be created.
Important: This command will destroy all data on the selected disks. So take care to move important information to a safe place.
Step 2: Create a partition table on each disk. Use the commands to do this:
$ sudo parted /dev/sdb mklabel msdos

$ sudo parted /dev/sdc mklabel msdos

$ sudo parted /dev/sdd mklabel msdos
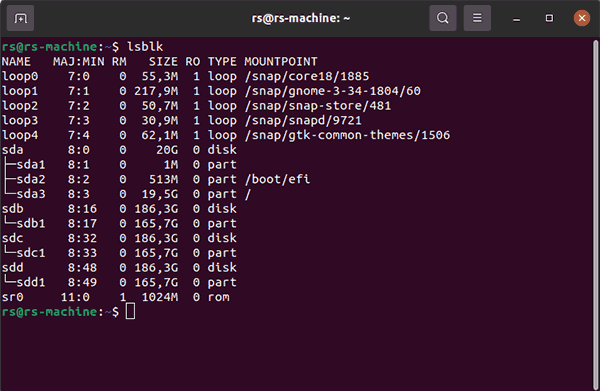
Step 3: Create a partition on each disk. Use the commands:
$ sudo parted /dev/sdb mkpart primary ext4 2048 180Gb

$ sudo parted /dev/sdc mkpart primary ext4 2048 180Gb

$ sudo parted /dev/sdd mkpart primary ext4 2048 180Gb
*where sdb, sdc, and sdd are your drives, ext4 is the partition file system type, 2048 is the cluster size, and 180Gb is the partition size.
3.4 Creating Software RAID in Linux
When the disks are prepared you can create software RAID. To do this, perform the following command in the terminal:
$ sudo mdadm --create /dev/md2 --level=0 --raid-devices=2 /dev/sdb1 /dev/sdc1
*where /dev/md2 is the RAID array to be created, –level=0 is the RAID level, –raid-devices=2 is the number of disks to be used in the array, and /dev/sdb1, /dev/sdc1 is the disks and partitions from which your RAID array will be created.

If you want to create a RAID 1 array, then instead of –level=0 write –level=1.
The result should be a command:
$ sudo mdadm --create --verbose /dev/md2 --level=1 --raid-devices=2 /dev/sdb1 /dev/sdc1
Accordingly, the command to create a RAID 5 array would look like this:
$ sudo mdadm --create --verbose /dev/md2 --level=5 --raid-devices=3 /dev/sdb1 /dev/sdc1 /dev/sdd1
Note: If you are creating a RAID1 array to boot from syslinux – you should know that a restriction in syslinux v4.07 requires the metadata value to be 1.0, not the default 1.2
3.5 Creating the RAID 10 in Linux
The mdadm utility also allows you to create a RAID 10 array. The disks are prepared in the same way as for normal RAID types, and the command to create it is as follows:
$ mdadm --create /dev/md2 --level=10 --raid-devices=4 /dev/sd[b-e]1
*where –level=10 indicates creating the new RAID 10 array, and /dev/sd[b-e]1 — stands for the first partition on disks b, c, d, and e. If you have other disks you can write them alternately as /dev/sda1 /dev/sdb1 /dev/sdc1 /dev/sdd1 or /dev/sd[a-d]1 to make the command little shorter.
You can also create two RAID 1 arrays and then combine them into a RAId 0 using the folowing command:
$sudo mdadm --create /dev/md2 --level=0 --raid-devices=2 /dev/md1 /dev/md2
*where /dev/md2 is your new RAID 10 array, –level=0 is an indication that we are combining two RAID 1 arrays into one RAID 0, and /dev/md1 /dev/md2 specifies which arrays should be combined into RAID 0.
3.6 Finishing the synchronization process
As soon as you start creating the selected type of array, the process of assembling and disks synchronizing will start.
To check the current state of disk synchronization run a command:
$ sudo cat /proc/mdstat

If you want to update information about disk synchronization status – run this command again.
Once the synchronization process is complete you can start creating the file system.
3.7 Creating a file system for a RAID Array
Before you start using a RAID array, create a file system on it. To do this, use the command:
$ sudo mkfs.ext4 /dev/md2
*where .ext4 is the type of file system you want to create, and /dev/md2 is your RAID array.
You can use any other file system instead of .ext4. It all depends on your needs.
3.8 Mounting the array file system
After you have created a new file system, it must be properly mounted. To do this, run the command:
$ sudo mount /dev/md2 /mnt
*where /dev/md2 is your array, and /mnt is the directory you want to mount the filesystem to.
You can also create your own mount point. To do this, perform the following commands:
$ sudo mkdir /raid
*this command creates a new directory called “raid” to which the RAID array will be mounted.
$ sudo mount /dev/md2 /raid
*this command will mount your array to /raid
Now your RAID array is completely ready to work.
3.9 Saving and Configuring RAID autostart
After creating the RAID array, and mounting the file system, there is one more thing to do. The point is that if you restart the system, the entire array will have to be reassembled.
First of all, you need to make sure that the next time you boot the operating system — all the settings will be active. To do this, save the RAID array using the command:
$ sudo mdadm --detail --scan --verbose | sudo tee -a /etc/mdadm/mdadm.conf

Then you need to update initframs to support the array. To do this perform the command:
$ sudo update-initramfs -u
Now you need to mount RAID automatically on reboot. It can be done by editing the “fstab” file.
Fstab is a file in the file system table. There are two ways to do this correctly: using vim editor, or using nano editor.
3.9.1 “fstab” editing with the vim editor
To set up automatic RAID mounting with the vim editor do the following:
Step 1: Open the “fstab” file using the VIM editor.
$ sudo vi /etc/fstab
Step 2: In the last line of the resulting file write your RAID as follows:
/dev/md2 /raid ext4 errors=remount-ro 0 0
*where /dev/md2 is your array, /raid is the mount point, errors=remount-ro is the command to remount in case of errors.
Important: Use the “Tab” key instead of the space bar. It will allow you to write the array parameters correctly, specifying the values in the appropriate fields of the file.
To save your changes and exit vim – :wq! and press “Enter ” to confirm.
Now your array will be automatically built when you reboot your operating system.
3.9.2 “fstab” editing with nano editor
The essence of this method is to add the UUID of the RAID array to the “fstab” file. Follow these steps:
Step 1: Find out the UUID of your RAID array. To do this, perform the command:
mnt$ sudo blkid /dev/md2
Then select and copy the UUID of your RAID array with “Ctrl+C” key shortcut.

Step 2: Open your “fstab” file with the nano editor. Use the command:
$ sudo nano /etc/fstab
Step 3: After the transition, write the UUID of your array in the fstab file as follows:
UUID=your-array-id /mnt/raid ext4 defaults 0 0
*where UUID=your-array-id — is the UUID you copied, /mnt/raid is your RAID array, ext4 — is your array file system, defaults — means use the defaults for your array, 0 0 — is the dump and pass defaults, which tells it how to scan the array for errors.

Save the changes and reboot your computer. Your RAID should build automatically.
If you then call “update-initramfs -u” or “dpkg-reconfigure mdadm” (i.e. update the boot image) in Debian, the partition names will be put into the mdadm.conf file and you will not be able to boot from the array.
It is due to the fact that the hard disks will be reconfigured (the desired partitions will have different names). In multi-disk systems, the disk names may change from boot to boot.
It is not necessary to add or remove hard disks to solve this problem. It is sufficient to write the output of the command “mdadm –detail –scan” (without –verbose) into /etc/mdadm/mdadm.conf
In doing so the mdadm.conf file will contain the UUIDs of the partitions making up each RAID array. When the system boots, mdadm will find the desired partitions regardless of their symbolic UUID names.
How to rename RAID array in Linux?
If you need to rename your RAID array you need to stop it first. It can be done with a command:
$ sudo mdadm --stop /dev/md2
If you get a message when trying to stop the RAID array that it is busy with another process check if any logged-in users are still in the desired directory on that disk. Especially check if the root shell you are using was running when your normal user’s current directory was on that disk. Switch to that user’s shell (maybe just quit your root shell), and move to another location.
After the RAID is stopped rename it using the command:
$ sudo mdadm --assemble --update=name --name=0 /dev/md2 /dev/sdc /dev/sdd
*where –name=0 is the array number, and /dev/sdc /dev/sdd is the list of disks included in the array.
To save the new configuration, repeat step 3.8.2
How to check the status of a RAID array in Linux?
Monitoring the status of a RAID array is an important aspect that allows you to detect problems with the array at an early stage and thereby prevent data loss.
There are several ways to check the RAID array status:
1. Checking the mdstat file. It is a constantly changing file that shows the state of your RAID array. You can check it with a command:
$ sudo watch cat /proc/mdstat
The normal state of the array is displayed as [UU]. If any of the disks fails this designation will change to [_U], the number of active disks will be displayed as 2/1 (that is only one of two disks is active) and the status line will show the recovery process in percentage. An example of a degraded array is shown below:

2. The second way is to check the integrity of the software RAID. The command used is as follows:
$ sudo echo 'check' > /sys/block/md2/md/sync_action
*where md2 is your array.
If the result of checking is “0” — then your RAID array is fine.
If you suddenly need to stop checking the array, use the command:
$ sudo echo 'idle' > /sys/block/md2/md/sync_action
3. If you need to display detailed information about the RAID array, use the command below:
$ sudo mdadm -D /dev/md2
This command will display not only the state of the RAID array, but also its creation date, RAID type, and more.
How to add, remove or replace the drive in a Linux software RAID array
6.1 How to add the drive to RAID array in Linux?
Suppose you have a working RAID 1 and you decide to expand your array by adding another working drive. To do this you should:
Step 1: Connect the drive with the power off, boot the Linux system, run a terminal with superuser permissions and perform the command
$ sudo mdadm /dev/md2 --add /dev/sdb
This command adds an empty disk to the array. This disk will now appear as hot-spare.
Step 2: To make the connected disk drive work, expand the raid array using the command
$ sudo mdadm --grow /dev/md2 --raid-devices=3
The rebuild process will start and the disk will be added to the array.
6.2 How to remove the drive from RAID array in Linux?
If you want to remove the drive from the array, it is just as easy. You only need to run two commands:
Step 1: Mark the drive as failed:
$ sudo mdadm /dev/md2 --fail /dev/sdc
Step 2: In the terminal type the command
$ sudo mdadm /dev/md2 -remove /dev/sdc
This command will remove the drive from the array. After the drive is removed, all data in the array is available for use.
If a drive has failed, it can be replaced with another drive without any problems. To do this, first you need to determine which disk failed. Perform in the terminal the following command:
$ sudo cat /proc/mdstat
The failed disk will be marked as [U_] When both disks are working, the output will be [UU].
To remove the faulty drive, use the command:
$ sudo mdadm /dev/md2 --remove /dev/sdc
After removing it, connect the new drive and add it to the array by pressing the command in the terminal:
$ sudo mdadm /dev/md2 --add /dev/sdd
The array rebuilding and reconfiguring will start automatically after adding a new drive.
What to do if the RAID array suddenly became inactive or does not work after a reboot?
Sometimes there are situations when a user has built the RAID array, saved some data, turned off the computer, and went to mind his own business. When he comes back, he turns on the computer and sees that the array is not working or has gone into an inactive state. The array can also become inactive if there is a hardware failure or power failure. All disks are marked as inactive, but there are no errors on the disks. That is, everything is set up correctly, but the array doesn’t work – all I/O requests are crashing. In this situation, you should stop the array and rebuild it again. To do this:
Step 1: Stop the array by entering the command:
$ sudo mdadm --stop /dev/md2
Step 2: rebuild array.
$ sudo mdadm --assemble --scan --force
Step 3: Mount array using the command:
$ sudo mount -a
After that, the array will be fully functioning again and all data on it will be available to the user.
If the array does not rebuild after reboot, it is likely that the auto-build array after reboot was not prescribed or was incorrectly configured. How to configure auto-build array after reboot was explained in the Paragraph 3.8 of this article. Just enter the above commands again and the array will build automatically after each reboot.
If the above commands did not help, there is one more way to restore the RAID functionality. The idea is to test each disk individually and then re-assemble the RAID array.
Step 1: Try to rebuild the RAID array again. Use the following command to do this:
$ sudo mdadm --assemble --scan
…mdadm will give you an array build error. That is normal.
Step 2: Display the status of your RAID array using the command:
$ sudo watch cat /proc/mdstat
You need it to remember the order of the disks in the array.
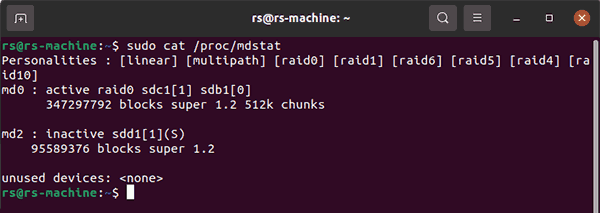
Important: Remember the order of the disks in your RAID array. You will need it when you reassemble your RAID array.
$ sudo mdadm --stop /dev/md2
*where md2 is your RAID array.

Step 4: Use the command
$ sudo mdadm -E /dev/sdc1
*where /dev/sdc1 — is your disk.
Repeat this command for each disk in the array. The result should indicate that the disk is active.

If the device displays “missing” then there is a problem with it.
Step 5: Replace problem disk with new one (power off your computer before), and then rebuild your RAID array using command:
$ sudo mdadm --create --verbose /dev/md2 --assume-clean --level=raid1 --raid-devices=3 --spare-devices=0 /dev/sdb1 /dev/sdc1 /dev/sdd1
Important: you have to write the disks in the order you wrote before.
After these steps, your RAID array will work again.
What to do if RAID array doesn’t work and nothing helps?
Unfortunately, sometimes there are situations when a RAID array stops working, and no manipulation can’t help. But, there is one more way to restore the array functionality and not to lose data.
The idea is to use the RS RAID Retrieve program which can reassemble your array in the most difficult situations and retrieve your data from it.
Once the data is in a safe place you can recreate the RAID array using the instructions above.
RS RAID Retrieve also allows you to make virtual copies of each disk and work with them. This approach ensures that if something goes wrong your data will be safe.
To retrieve data from disks you should:
Step 1:Download and install RS RAID Retrieve. Launch the application after installing. The built-in “RAID constructor” will open in front of you. Click “Next“

Data recovery from damaged RAID arrays
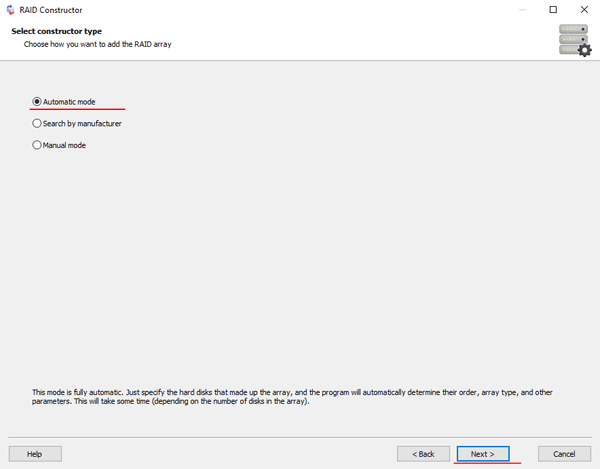
Step 2: Choose the method of adding a RAID array for scanning. RS RAID Retrieve offers three options to choose from:
- Automatic mode – allows you to simply specify the drives that made up the array, and the program will automatically determine their order, array type, and other parameters;
- Search by manufacturer – this option should be chosen if you know the manufacturer of your RAID controller. This option is also automatic and does not require any knowledge about the RAID array structure. Having the manufacturer’s information allows you to reduce the time to build the array, and is, therefore, faster than the previous option;
- Manual creation – this option is worth using if you know what type of RAID you are using. In this case, you can specify all parameters you know, and those which you do not know – the program will automatically determine
After you select the appropriate option – click “Next“.
Step 3: Select the disks that make up the RAID array and click “Next“. It will start the process of detecting the array configurations. When it is complete, click “Finish“.
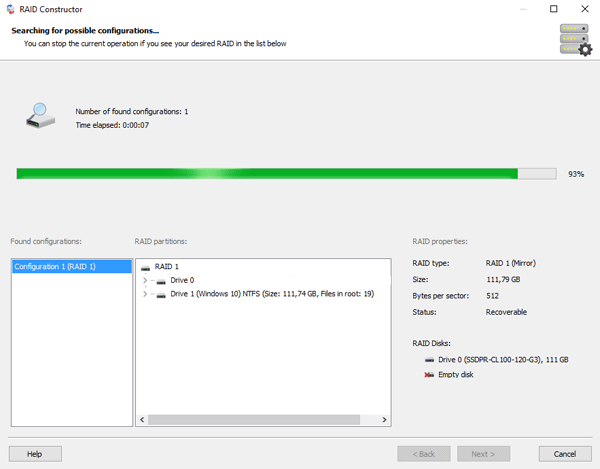
Step 4: After the constructor builds the array – it will appear as a regular drive. Double left-click on it. The File Recovery Wizard will open in front of you. Click “Next“
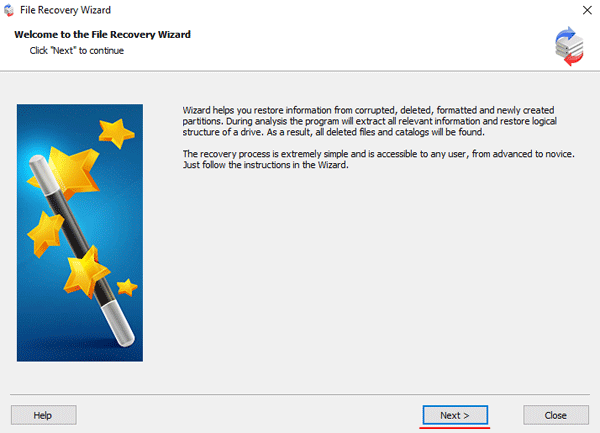
Step 5: RS RAID Retrieve will offer to scan your array for files to recover. You will have two options: a quick scan and a full analysis of the array. Select the desired option. Then select the file system type that was used on the array. If you do not know this information, check all available options, like on the screenshot. It is worth noting that RS RAID Retrieve supports ALL modern file systems.
Step 6: The array scanning process will start. When it finishes, you will see the previous structure of files and folders. Find the necessary files, right-click on them and select “Recovery“

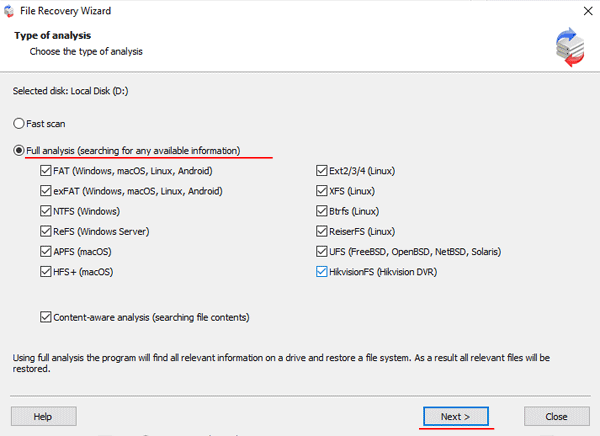
Step 7: Specify the location where the recovered files will be saved. This can be a hard drive, a ZIP-archive, or an FTP-server. Click “Next“
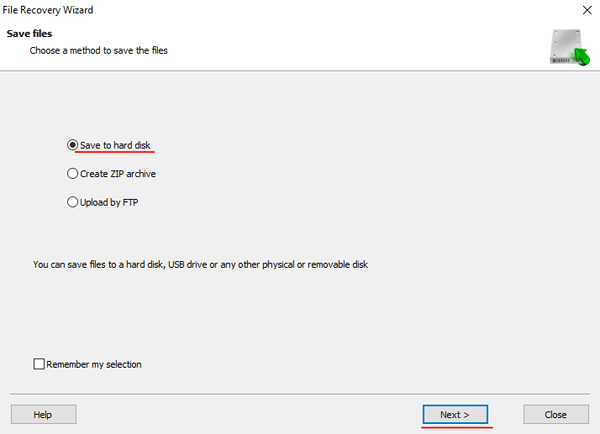
After clicking the “Next” button, the program will begin the recovery process. When it finishes – the selected files will be in the specified location.
After all, files are successfully restored – recreate the RAID array, and then copy the files back.
As you can see, the RAID data recovery process is quite simple and doesn’t require much PC knowledge, making RS RAID Retrieve the perfect application for professionals and novice users alike.
How to delete mdadm RAID array in Linux?
If you want to delete a RAID array permanently, follow the steps below:
Step 1: unmount it to stop the array
# umount /mnt
*where /mnt is RAID mount directory.
Step 2: to stop the RAID device
# mdadm --stop /dev/md2
Step 3: After that, clear all the superblocks on the drives from which it was built by using the following commands:
# mdadm --zero-superblock /dev/sd{b,c,d}
Now, your RAID array will be permanently deleted and you can use the hard drives as you decide.






Interesting approach.
I want to create RAID10 from 4 x 8Tb HDD
Could you please clear to me:
1. Is 2048 bytes the best cluster size for RAID10 in my case? Can i select 512 bytes cluster size for example? What’s the difference will it be?
2. How can i create a “at least 100mb less partiotion” if lsblk shows that i have 7.3T disk? Should i write size in GB or not?
3. Which partition table should i use for 8Tb disks (because msdos does not support such a large partitions)?