The value of information makes us think about methods to improve its safety. RAID 01 (also called RIAD 0+1) is one of those methods. In this article, we will learn how to create software RAID 01 in Windows 10, how it works, and how it differs from RAID 10.

Contents
- How RAID 01 (RAID 0+1) works?
- RAID 01 (RAID 0+1) vs. RAID 10 -- what is the difference?
- Which controller is better to use for RAID 01 (RAID 0+1)?
- How to create software RAID 01 (RAID 0+1) in Windows 10 using "Storage Spaces"?
- How to create a software RAID 01 (RAID 0+1) in Windows 10 using "Disk Management"?
- What to do if important data was lost?
How RAID 01 (RAID 0+1) works?
RAID 01 (RAID 0+1) is one type of combined RAID array. It allows you to implement the speed of RAID 0 and the reliability of RAID 1 in a single array. It can also be built on a software controller, which is also important. Before we start building RAID 01 in Windows 10, let’s look at how it works. It will make it much easier to understand the processes that take place in the operating system during its creation.
So, RAID 01 is a RAID 1 array with two RAID 0 arrays inside. The data stream is first copied and then each copy is striped and written to two (or more) disks. Hence, the minimum number of disks to implement RAID 01 is four.
A schematic representation of RAID 01 is as follows:
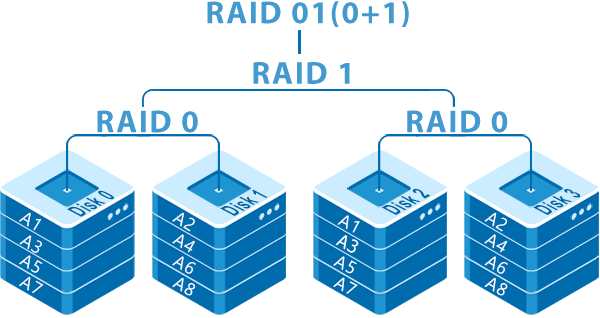
Thus, RAID 01 allows surviving the failure of any group of disks, which can consist of two or more drives.
It is worth noting that it is recommended to use the same number of disks for each group. It is explained by the fact, that since two identical copies of the data stream are created – the size of the whole array is limited to the size of the group with the minimum number of disks. Accordingly, using a larger number of disks will not make sense, as they will not be used.
RAID 01 (RAID 0+1) vs. RAID 10 — what is the difference?
Inexperienced users often confuse RAID 01 and RAID 10. The reason for this is the similarity in both name and realization. However, each of these types has its advantages. For example, RAID 01 will be faster than RAID 10. It is all about the two RAID 0 arrays on which each copy of the data is written. If you remember the principle of RAID 0 you know that speed is achieved by striping – data is divided into “stripes” and written to the drives at the same time. (You can read about the principle of RAID 0 in the article “RAID types“) In RAID 01 the minimum number of “stripes” is four. Accordingly, the more groups of disks the higher the speed will be.
In contrast RAID 10, the more disk groups, the slower the array becomes as the number of copies increases, but at the same time the higher the reliability. Therefore, if you want less reliability but more performance, use RAID 01, but if the opposite is true, RAID 10 is better for you.
The advantage of RAID 01:
- faster performance;
- data remains available as long as at least one group of disks is in working order;
Advantages of RAID 10:
- higher reliability level;
- better suited for software controllers;
Which controller is better to use for RAID 01 (RAID 0+1)?
The choice of the type of controller is also an important issue that cannot be avoided. First of all, it is worth saying that using a software controller will be a cheaper (practically free) but less productive solution.
That is because the software controller uses some resources of the processor to calculate and manage the data. It is especially true for RAID 01. Whereas RAID 10 is somewhat less CPU intensive (the data stream is striped only once and then the command is given to writing the copies to the appropriate disks) RAID 01 stripes the data in each disk group. Thus, weak computers can not provide the necessary performance.
Hardware controllers do not have this problem, since they have their own processor which distributes the information. But as a rule, they are much more expensive. Moreover, low-cost solutions are suitable for simple RAID types (e.g., RAID 1, RAID 5, etc.). For combined RAID types (which is our RAID 01) it is desirable to use higher quality hardware controllers, but they are usually more expensive. We would also like to note that hardware controllers are less sensitive to failures in the operating system than software controllers.

And of course, the higher the value of the information stored on the server, computer, or NAS — the better quality controllers are recommended.
It is also good idea to use an uninterruptible power supply since power surges, and sudden power outages can cause RAID 01 to fail. If you want to know more about the causes of RAID 01 failures, read the article “Causes of RAID Failures“
Based on all of the above, it can be concluded that a hardware controller is better suited for RAID 01. However, you can create a software RAID 01 yourself and check if the performance level suits you. Read the next paragraph of this article to find out how to do this.
How to create software RAID 01 (RAID 0+1) in Windows 10 using “Storage Spaces”?
The built-in functionality of the Windows operating system does not support creating a RAID 01 (RAID 0+1) array, but you can do something different and first create two RAID 0 arrays and then build a RAID 1 array from them.
First, create two RAID 0 arrays. To do this, follow these steps:
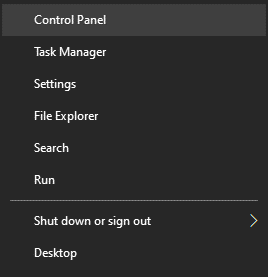
Step 1: Right-click on “Start” and choose “Control Panel“
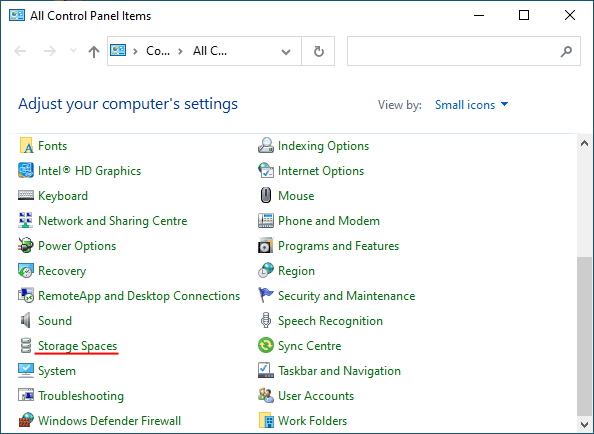
Step 2: In the window that appears, select “Storage spaces”
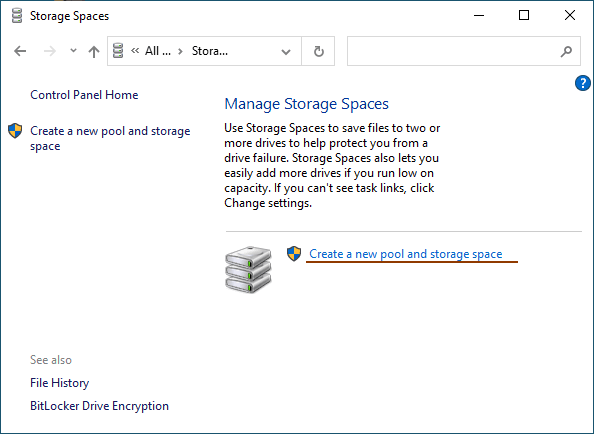
Step 3: Select “Create new pool and storage space“
Step 4: Select the disks you want to add to your RAID array.
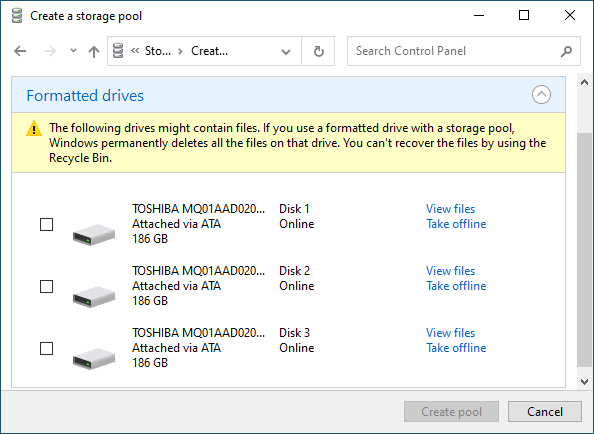
Important: All data on the disks that make up the RAID array will be deleted. So save all important files in advance to a different disk or external storage.
Once you have configured the array, you must give it a name and setup it correctly.
Step 5: In the “Name” field, enter a name for your RAID array.
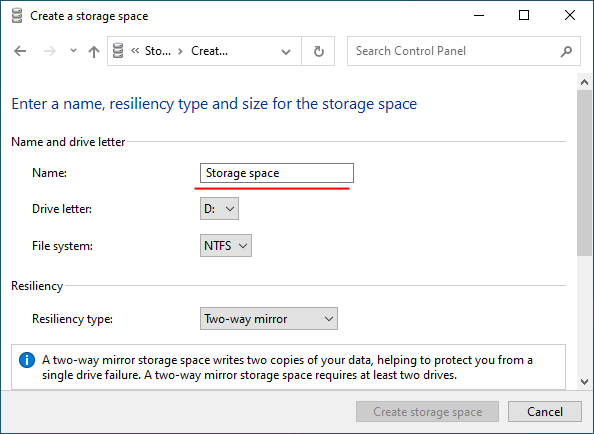
Step 6: Then select a letter and file system for the future RAID array
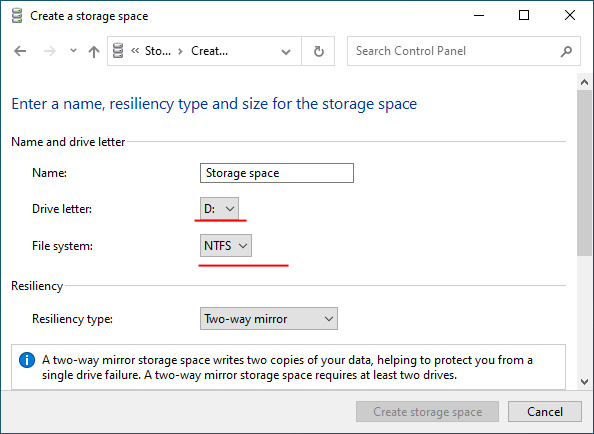
With this name and letter the array will be displayed on the Windows system.
Step 7: Now you have to choose the resiliency type.
- Simple (no resiliency) — is RAID 0;
- Two-way mirror –is RAID 1;
- Three-way mirror — is also RAID 1 (the only difference is the number of copies of the main hard drive);
- Parity — is RAID 5.
We are interested in the first option “Simple (no resiliency)“
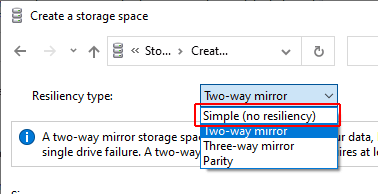
The program will automatically set the maximum available capacity of the disk array.
Usually, this value is a little lower than the actual amount of available data, and you can also set a larger disk space size.
Step 8: Click “Create Storage Space“

Once the wizard has set up your new RAID, it will be available as a separate drive in the “This PC” window. It will be no different than a regular hard drive, and you can do anything with it.
Perform the same operation for the remaining disks.
Once both arrays have been created — you can start to combine them into one RAID 1 array.
It is done in the same way as for RAID 0, but now select our arrays instead of regular disks and in the step of selecting resilience type choose “Two-way mirror” instead of the “Simple (no resiliency)”
Once the array creation process is complete, you will have a RAID 01 (RAID 0+1) array ready to go.
How to create a software RAID 01 (RAID 0+1) in Windows 10 using “Disk Management”?
The other way to create software RAID 10 in the Windows operating system is to use a built-in utility called “Disk Management“. Just like the previous one, this method is quite easy and does not require deep knowledge of the operating system. So, let’s start by creating two RAID 1 arrays:
Step 1: Right-click on “Start” and choose “Disk Management“
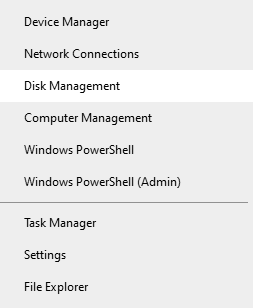
Step 2: The “Disk Management” utility will appear in front of you and displays all connected disks. Right-click and select “New Striped Volume“
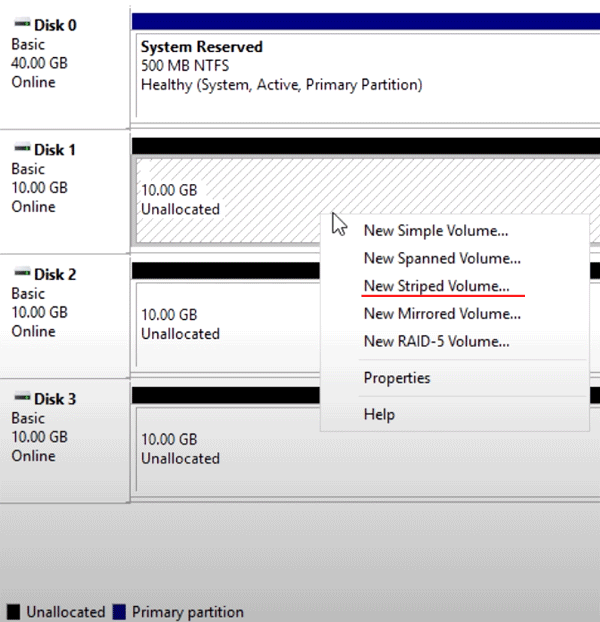
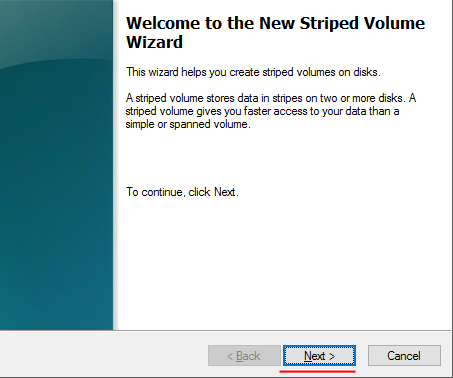
Step 3: The “New Striped Volume Wizard” will open. Click “Next“, then select the drives you want to add to RAID 0 in the left part of the wizard window and click “Add“. When all disks you want are added, click “Next“

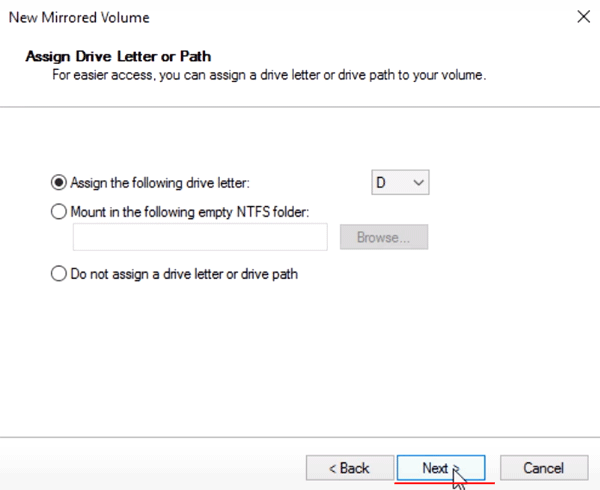
Step 4: Assign a letter to the array by choosing one from the list (the letter is set automatically, so you can leave it as the array wizard suggests) and click “Next” again
Step 5: In this step you need to select the file system for the future “stripe”. Choose “NTFS” and click “Next” again.
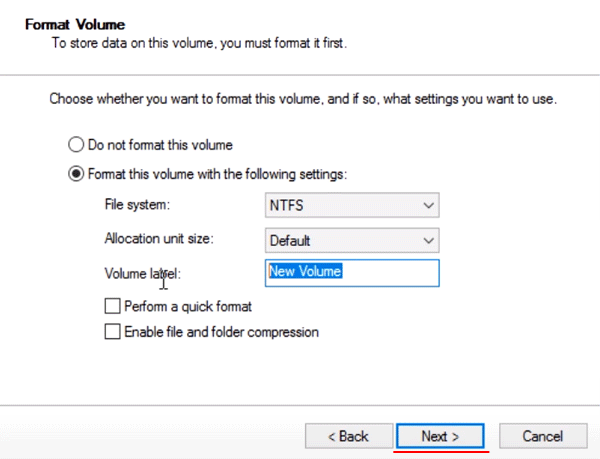
Step 6: Check that the settings are correct, and then click “Finish“. The system will show a warning that the selected disks will be converted to dynamic disks and that all information will be destroyed. Click “Yes“

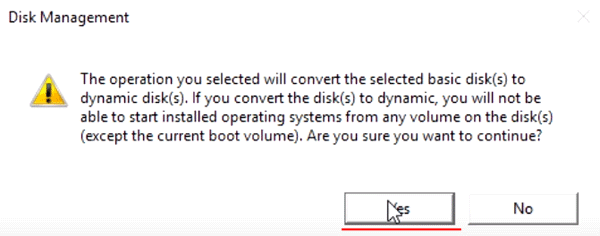
It will start formatting and synchronizing the disks. Once this process finishes — our RAID 01 (RAID 0+1) array will be created. Do not close the “Disk Management” window, and repeat steps from 3 to 6 for the second disk group, thus creating ome more RAID 0 array. Both arrays will appear in Windows Explorer as normal local drives.
Now you only need to combine the two arrays you created into RAID . To do this:
Step 1: Run “Disk Management” again as described above.
Step 2: Then right-click on either of the two RAID 0 arrays and select “New Mirrored Volume“
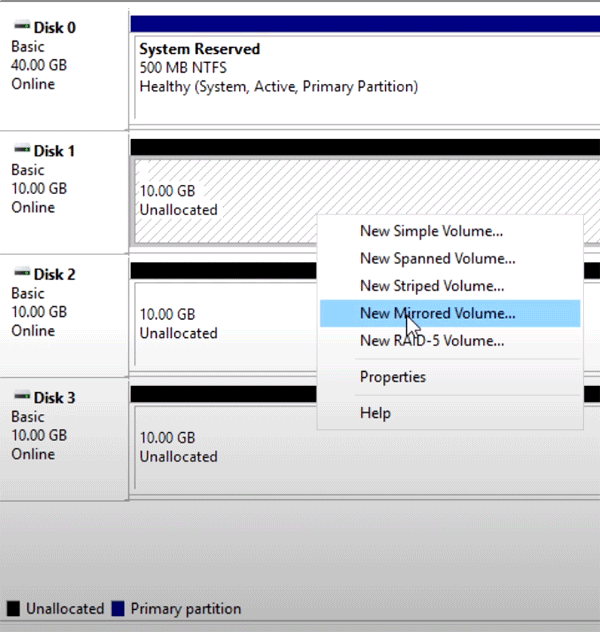
Step 3: The “New Mirrored Volume Wizard” opens in front of you. Repeat steps from 3 to 6 described above.
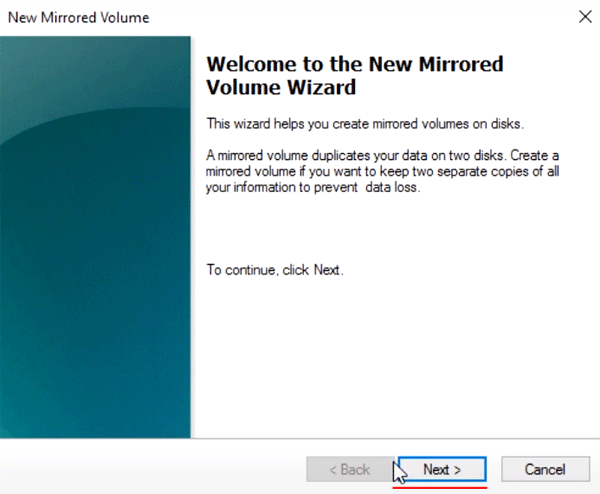
After that, your RAID 01 (RAID 0+1) will be created. It will appear in Windows Explorer as a regular drive and you will be able to do the same manipulations with it as with any other local drive.
What to do if important data was lost?
These days, almost everyone has some valuable information. Some have a photo from a wedding, and some have an important financial report. Moreover, the loss of important data can often result in financial losses. It is especially true for large companies, where cash turnover is estimated in the millions.
That is why almost everyone should know what to do if data suddenly disappear or a RAID array fails.
Because RAID arrays are a disk space consisting of several drives, the first thing to do is to extract the data from them to a safe place. And only then proceed to restore the array.
Use RS RAID Retrieve, one of the best RAID reconstructors available today. Not to be unfounded we suggest you read the article “Comparing the best RAID reconstructors“.
RS RAID Retrieve stands out from the competition by having a fully automatic mode, thanks to which ALL RAID parameters are determined automatically. All you have to do is connect the array drives to a running computer and make two mouse clicks.
In addition, RS RAID Retrieve supports ALL modern file systems, which allows you to rebuild a broken RAID array no matter what operating system and on what equipment (whether regular computer, server, or NAS) it was used.
Besides, unlike many competitors, RS RAID Retrieve has a deep drive scanning mode that allows you to recover even the data that was lost months ago.
Let’s take a look at an example of building a broken RAID 01 array and retrieving data from the drives. To begin, connect all the disks in the array to a working computer and then follow a series of simple steps:
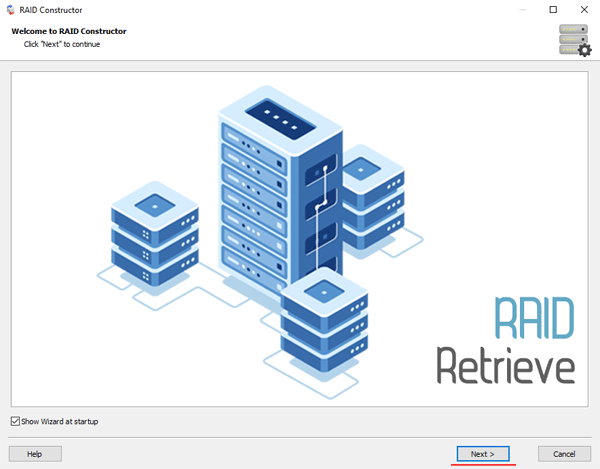
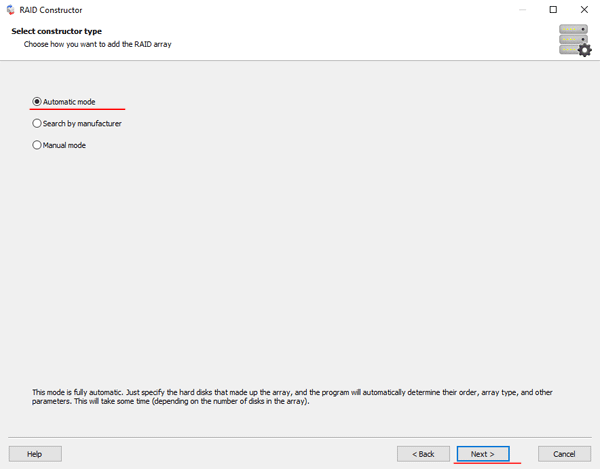
Step 1: Download and install RS RAID Retrieve. Launch the application after installing. The built-in “RAID constructor” will open in front of you. Click “Next“
Step 2: Choose the method of adding a RAID array for scanning. RS RAID Retrieve offers three options to choose from:
- Automatic mode – allows you to simply specify the drives that made up the array, and the program will automatically determine their order, array type, and other parameters;
- Search by manufacturer – this option should be chosen if you know the manufacturer of your RAID controller. This option is also automatic and does not require any knowledge about the RAID array structure. Having the manufacturer’s information allows you to reduce the time to build the array, and is, therefore, faster than the previous option;
- Manual creation – this option is worth using if you know what type of RAID you are using. In this case, you can specify all parameters you know, and those which you do not know – the program will automatically determine
After you select the appropriate option – click “Next“.
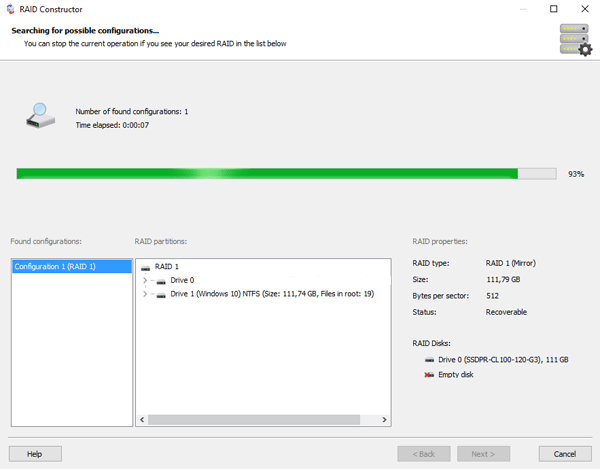
Step 3: Select the disks that make up the RAID array and click “Next“. It will start the process of detecting the array configurations. When it is complete, click “Finish“.
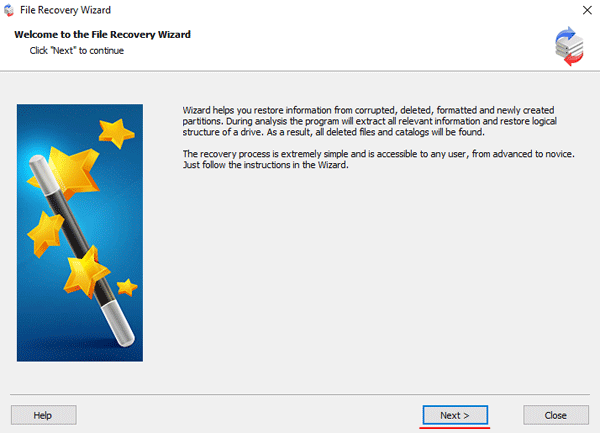
Step 4: After the constructor builds the array – it will appear as a regular drive. Double left-click on it. The File Recovery Wizard will open in front of you. Click “Next“
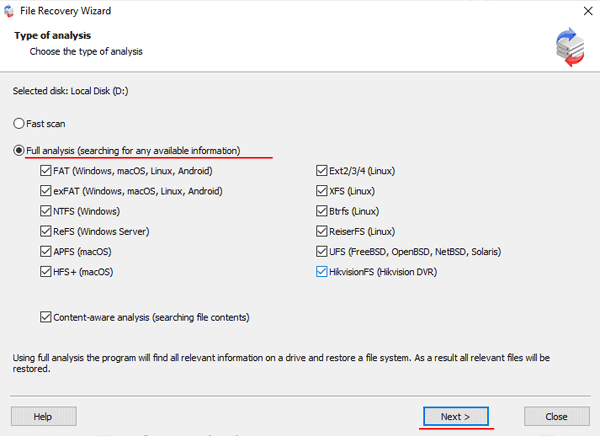
Step 5: RS RAID Retrieve will offer to scan your array for files to recover. You will have two options: a quick scan and a full analysis of the array. Select the desired option. Then select the file system type that was used on the array. If you do not know this information, check all available options, like on the screenshot. It is worth noting that RS RAID Retrieve supports ALL modern file systems.
Step 6: The array scanning process will start. When it finishes, you will see the previous structure of files and folders. Find the necessary files, right-click on them and select “Recovery“

Step 7: Specify the location where the recovered files will be saved. This can be a hard drive, a ZIP-archive, or an FTP-server. Click “Next“
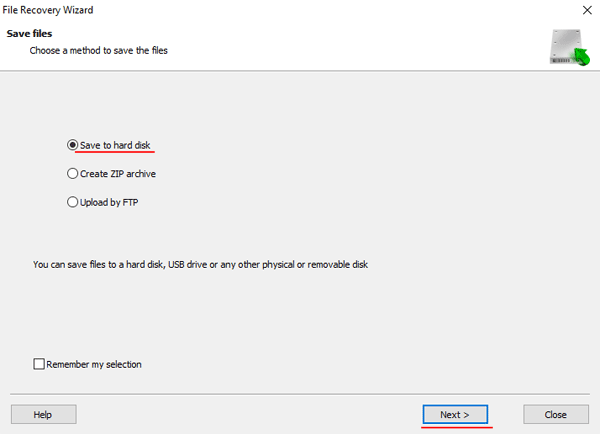
After clicking the “Next” button, the program will begin the recovery process. When it finishes – the selected files will be in the specified location.
After all, files are successfully restored – recreate the RAID 10 array, and then copy the files back.
As you can see, the RAID 10 data recovery process is quite simple and doesn’t require much PC knowledge, making RS RAID Retrieve the perfect application for professionals and novice users alike.

