How to Create a Hardware RAID on a Motherboard? Each motherboard manufacturer has its own BIOS interface and functionality, which means the procedure can vary. However, the core operation of hardware RAID using a motherboard is determined by the disk array implementation technology. There are implementations from both Intel and AMD.
In this article, we will take a detailed look at the implementation of RAID in the BIOS of an Asus motherboard on the Intel platform – how to create a RAID, what to do if you encounter issues, and how to remove it.
Contents
- Hardware RAID Technologies
- Configuring Storage Settings
- Creating RAID
- RAID Initialization and Partition Creation in a Windows Environment
- RAID Degradation and Recovery
- Removing RAID
- Data Recovery in the Event of RAID Failure
Hardware RAID Technologies
Let’s discuss hardware RAID via the motherboard. The main difference between hardware and software RAID implementations lies in the use of CPU resources in the latter case. However, this is not critical given the power of modern processors.
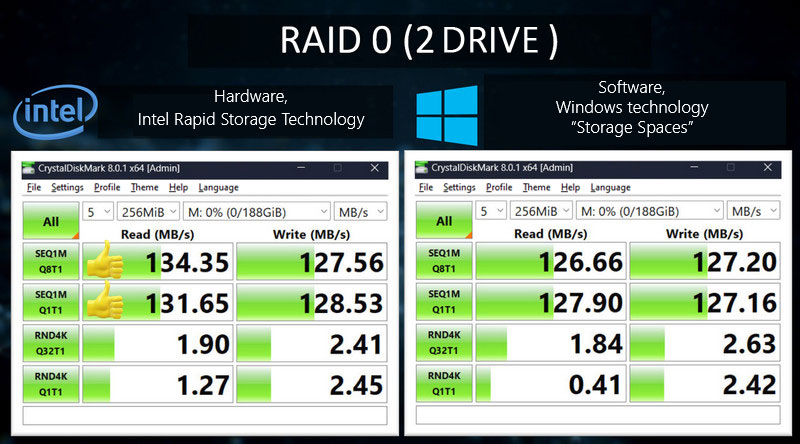
In terms of performance, hardware RAID is generally better, but not by much. For instance, here’s a comparison of read and write speed tests in CrystalDiskMark between Intel’s hardware RAID and a software RAID created using Windows’ built-in “Storage Spaces” technology.
Hardware RAID is implemented using an integrated hardware RAID controller, which is typically provided by the Intel or AMD chipset. You can check if a motherboard supports RAID by visiting its specifications page on the manufacturer’s website.
Modern technologies from both manufacturers support RAID implementation for SATA and M.2 PCI-E (NVMe) devices. AMD’s technology is called RAIDXpert2, while Intel’s is known as Intel Rapid Storage Technology.
You can create and manage RAID using these technologies in the motherboard’s BIOS and through specialized software in the Windows environment. For AMD, this is the AMD RAIDXpert2 program. For Intel, it’s the Intel Optane Memory and Storage Management program.
Working with software is easier and offers more features. However, if the operating system is not installed and you plan to install it on the array, you can use the BIOS.
Configuring Storage Settings
To create a RAID on an Asus motherboard with an Intel chipset, enter the BIOS by pressing the Del key when the computer starts. Enter the advanced BIOS mode, “Advanced Mode”.
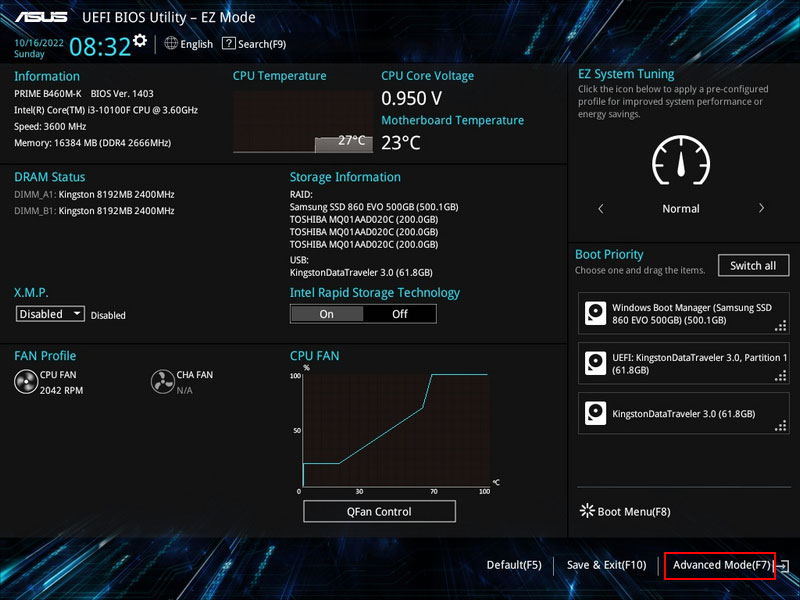
Before creating a RAID, certain settings need to be configured, particularly those related to storage device configuration.
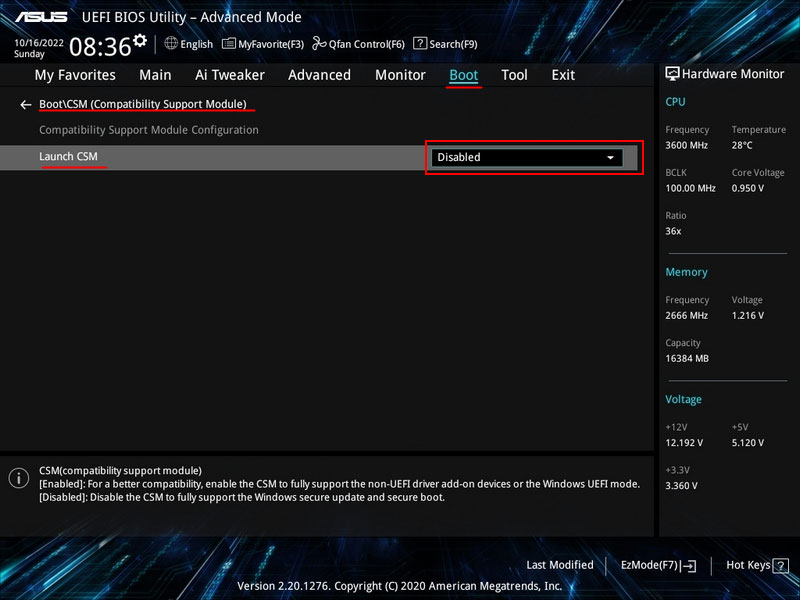
If you are creating an array from SSD M.2 PCI-E (NVMe), you must disable CSM—the compatibility module for UEFI and Legacy. RAID functionality for modern SSD M.2 PCI-E is supported only in UEFI mode. In the “Boot” section, go to “CSM (Compatibility Support Module)” and set the “Launch CSM” parameter to “Disabled”.
This step is not necessary for arrays made from SSD SATA or HDD.
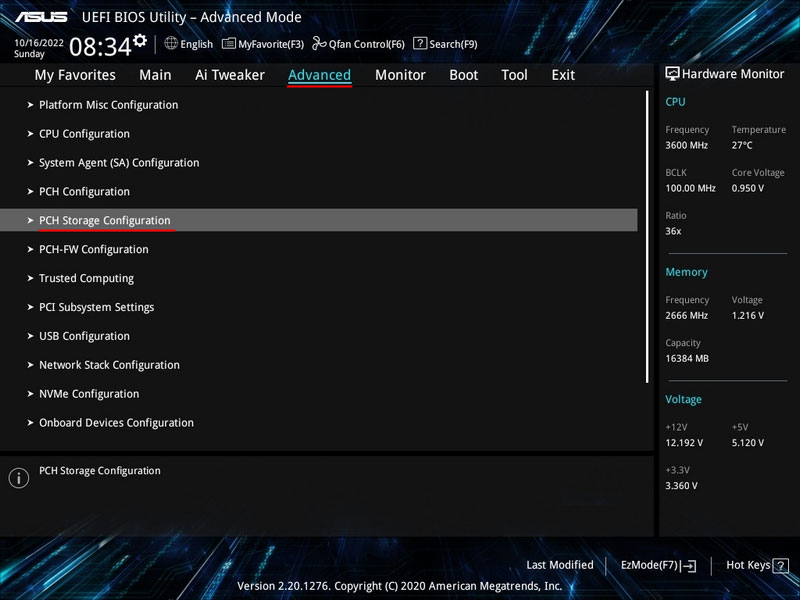
Next, configure the storage devices. For all types, go to the “Advanced” section, then to the “PCH Storage Configuration” subsection.
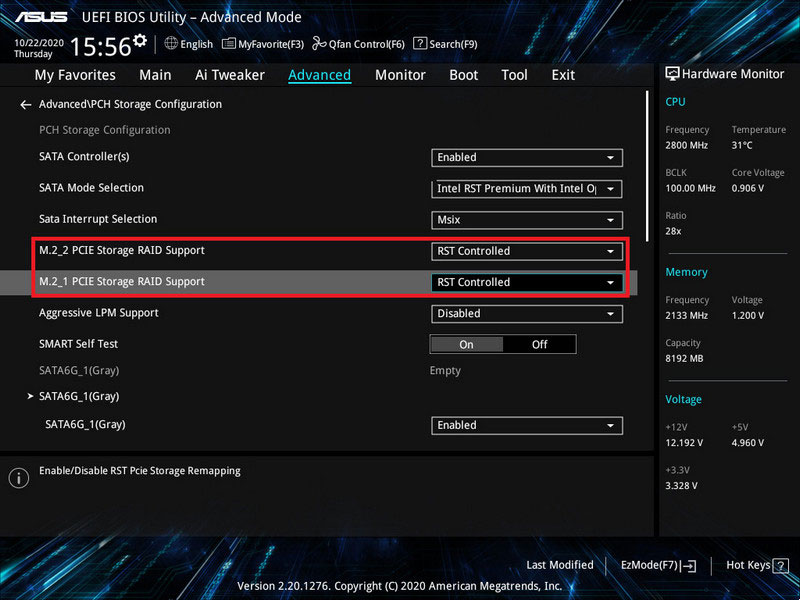
If the RAID is being created from SSD M.2 PCI-E, ensure all drives are detected. Set each to “RST Controlled”.
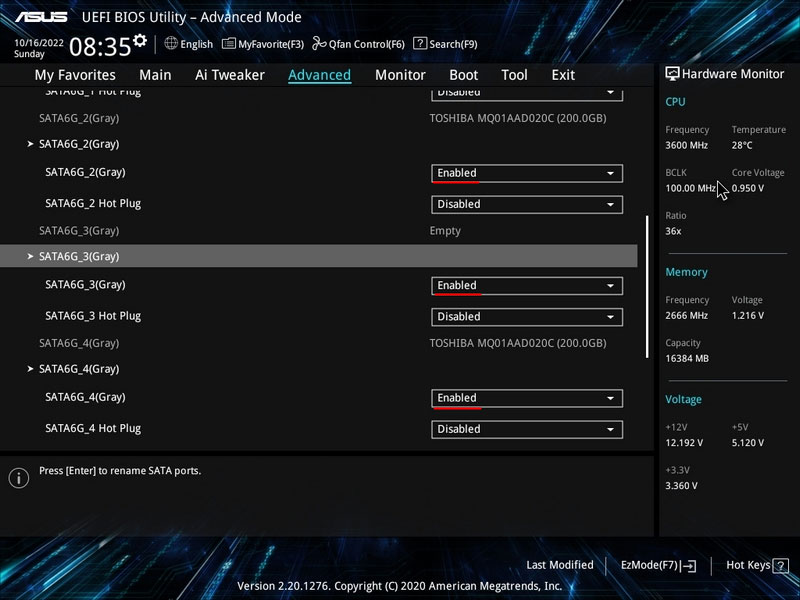
If the RAID is being created from SATA devices, ensure all drives are detected and not disabled.
For RAID and Intel Rapid Storage Technology to work, the “SATA Mode Selection” parameter should be set to “Intel RST Premium With Intel Optane System Acceleration (RAID)”. With this, the settings are complete. Press the F10 key to save the changes.
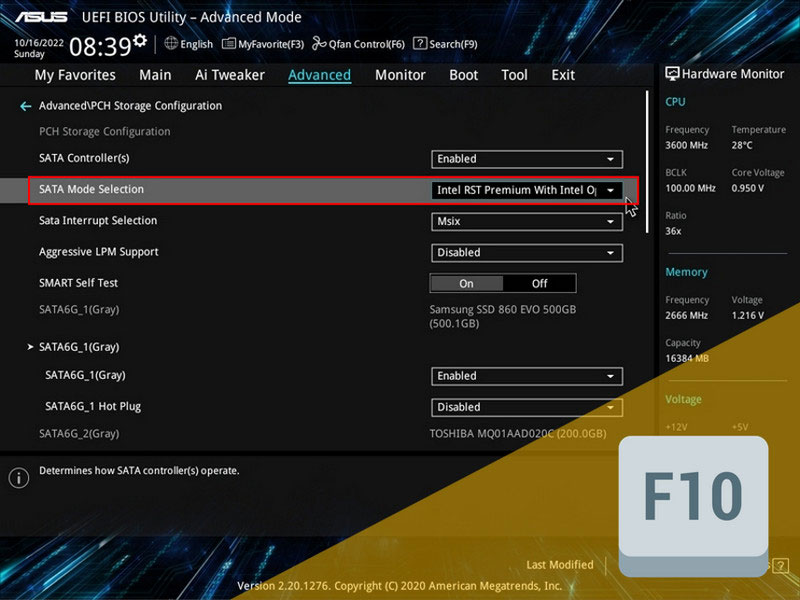
Restart the computer.
Important: If the “SATA Mode Selection” was not initially set to “Intel RST Premium With Intel Optane System Acceleration (RAID)” and was previously “AHCI”, the installed Windows will not boot. You will encounter a blue screen of death due to the absence of the new controller mode driver. Windows will need to be reinstalled.
Creating RAID
Upon restarting the computer, enter the BIOS again. Switch to the “Advanced Mode”.
We will now work with the RAID implementation technology on Intel chipsets – Intel Rapid Storage Technology. Creating RAID using this technology is done in the “Advanced” section, under the “Intel Rapid Storage Technology” subsection. Here, RAID can be created, managed, and deleted.
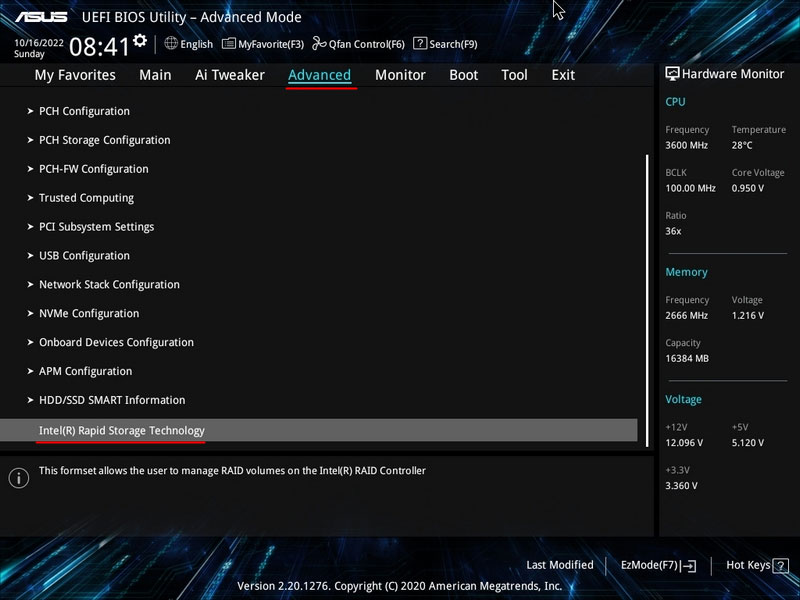
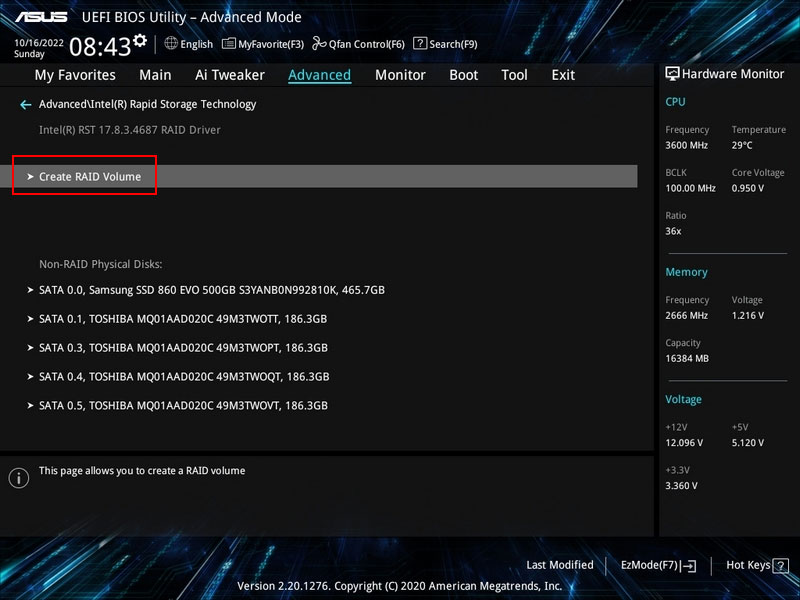
To create an array, click “Create RAID Volume.”
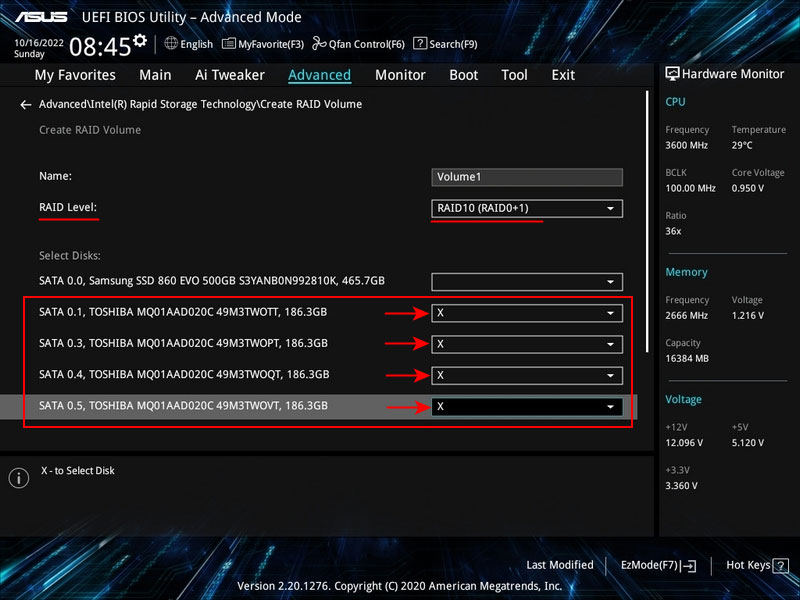
Next, you can specify a custom name for the array (in Latin characters) if you don’t like the default one. Choose the RAID configuration (level). Intel Rapid Storage Technology offers 4 common RAID configurations:
- RAID 0 (requires at least 2 disks);
- RAID 1 (requires at least 2 disks);
- RAID 5 (requires at least 3 disks);
- RAID 10 (requires at least 4 disks).
For more details on these configurations, refer to the article “What is RAID, and How Different Types of RAID are Used.”
In addition to RAID 0, 1, 5, 10, there is also a Recovery configuration. This is not a standard RAID configuration but a feature developed by Intel as part of the Intel Rapid Storage Technology. It uses a RAID 1 mechanism to copy data from one specified disk to another. This can be done continuously or upon request, essentially serving as a backup. A minimum of 2 disks is required.
Select the RAID configuration.
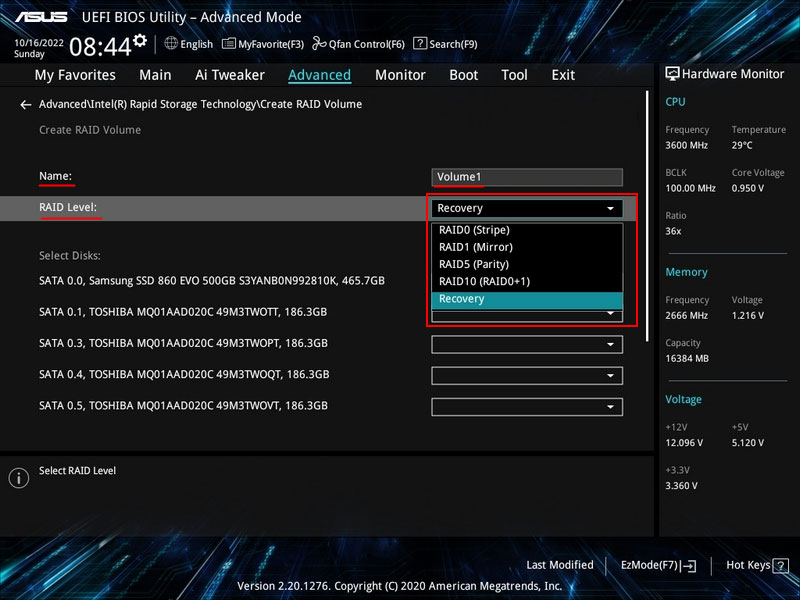
Next, mark the disks with a cross that will be included in the RAID.
Click “Create Volume.”
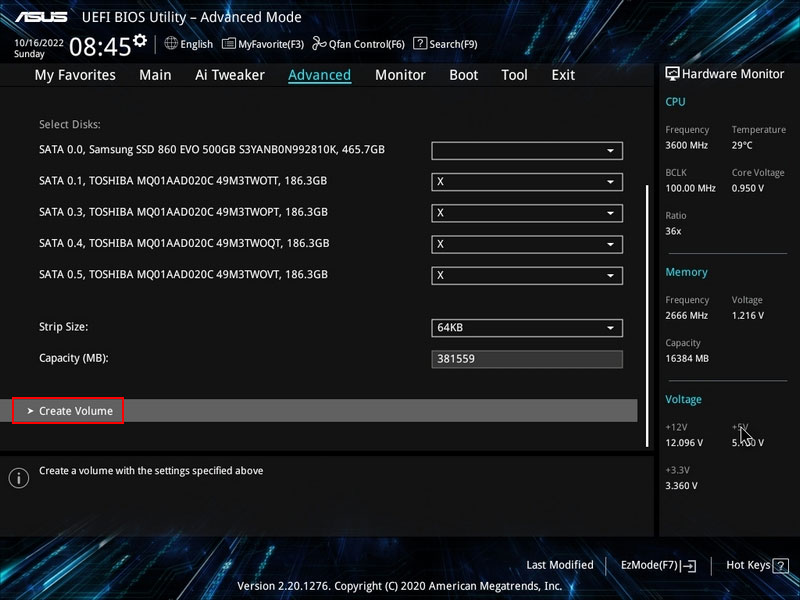
Important: During the RAID creation process, all contents of the disks along with their partitions will be deleted. If important data is not saved, recovering it afterward can only be done with effective software, such as RS Partition Recovery.
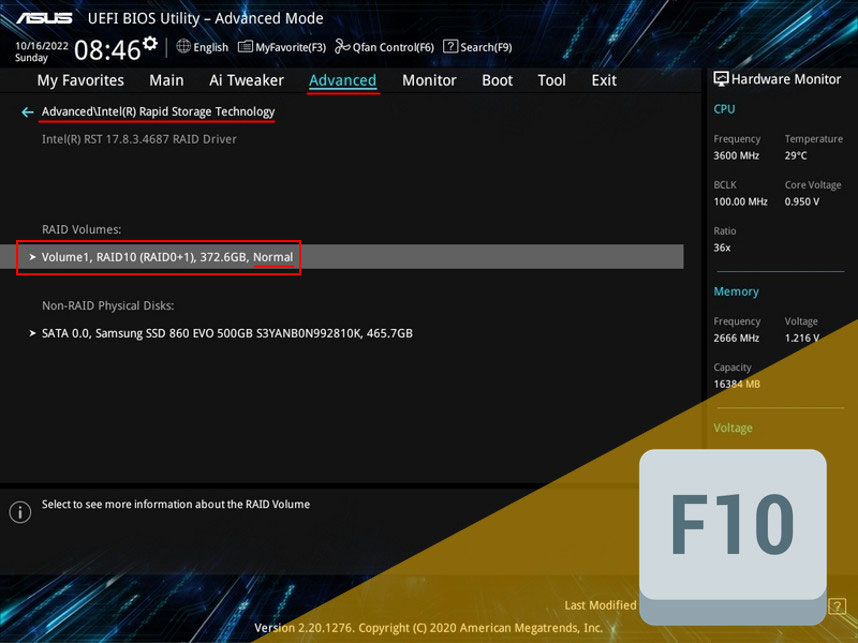
RAID is created. Now, in the advanced BIOS mode, under the path “Advanced > Intel Rapid Storage Technology”, you will always be able to see the status of the array. If it is functioning correctly, the status will be indicated as “Normal.”
Press the F10 key to save the changes made.
Now, let’s configure RAID in the Windows environment.
RAID Initialization and Partition Creation in a Windows Environment
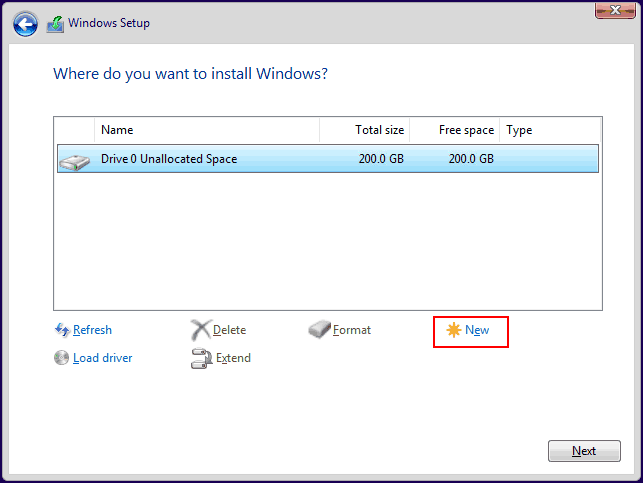
If the created RAID will be used for installing Windows, you can initialize it and create partitions during the operating system installation process. To do this, at the stage of selecting the installation location for Windows, choose the free space of the array and create partitions using the “Create” option.
Note: If the Intel VMD feature is enabled in the BIOS, available for Intel processors starting from the 11th generation, the RAID array from M.2 PCI-E SSDs will not be displayed during the Windows installation process. This feature is for M.2 PCI-E SSDs, serving as a hardware controller for the NVMe interface, providing enhanced RAID capabilities.
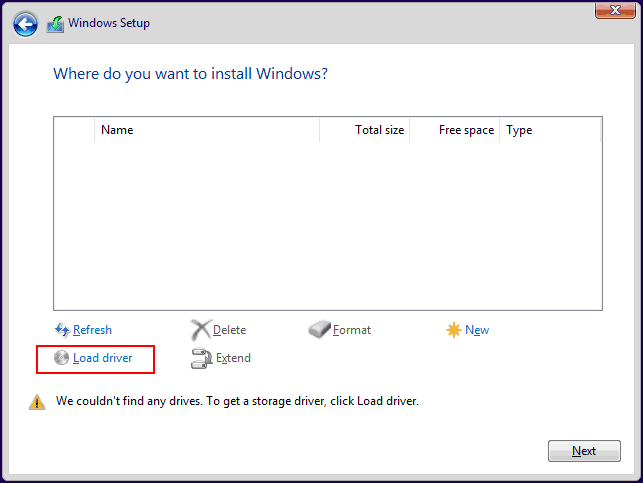
To use Intel VMD, you need to install its driver in Windows. It is available only for 64-bit Windows 10 and 11. You can download it from the Intel website. During the Windows installation, the Intel VMD driver can be installed by clicking “Load” and specifying the path to the folder with the driver, for example, on a flash drive.
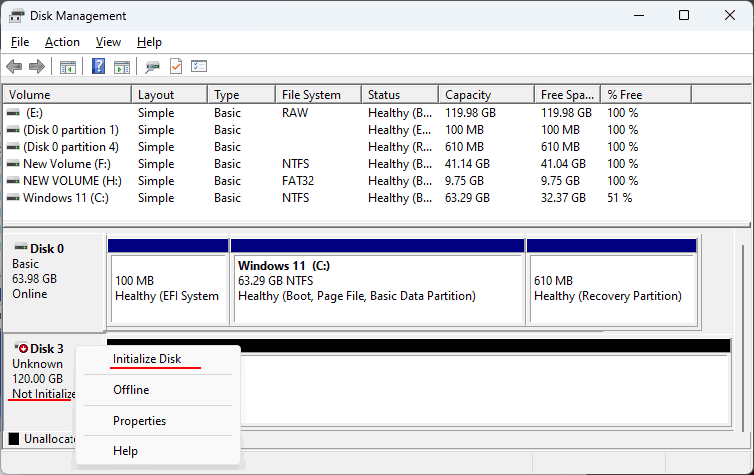
In a running Windows, you can initialize the RAID and create partitions on it using Disk Management. Launch it, which can be done via the shortcut menu by pressing Win+X. If the array initialization does not start automatically, select “Initialize Disk” from the context menu on its disk.
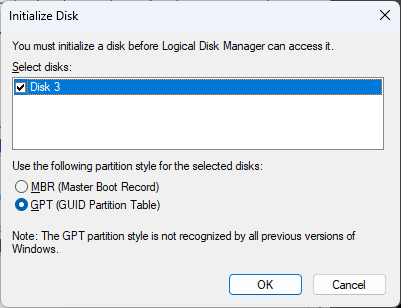
Select the partition style, which is usually GPT. It must be exclusively in UEFI mode (with CSM disabled), which is necessary for RAID from M.2 PCI-E SSDs.
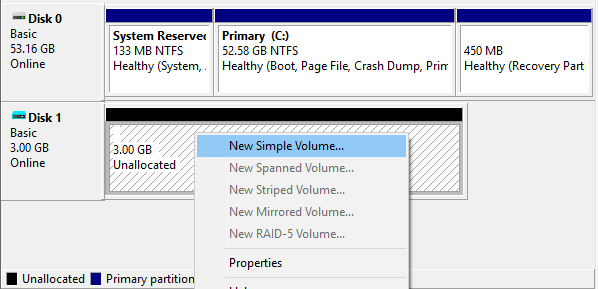
After initialization, you can create partitions on the array. Right-click on its disk space, select “New Simple Volume,” and create the partitions.
RAID Degradation and Recovery
What should you do if issues arise with your RAID array? An array with a problematic or failed disk is considered a degraded array. This RAID status – “Degraded” – can be seen in the advanced BIOS mode under “Advanced > Intel Rapid Storage Technology”, in the “RAID Volumes” section.
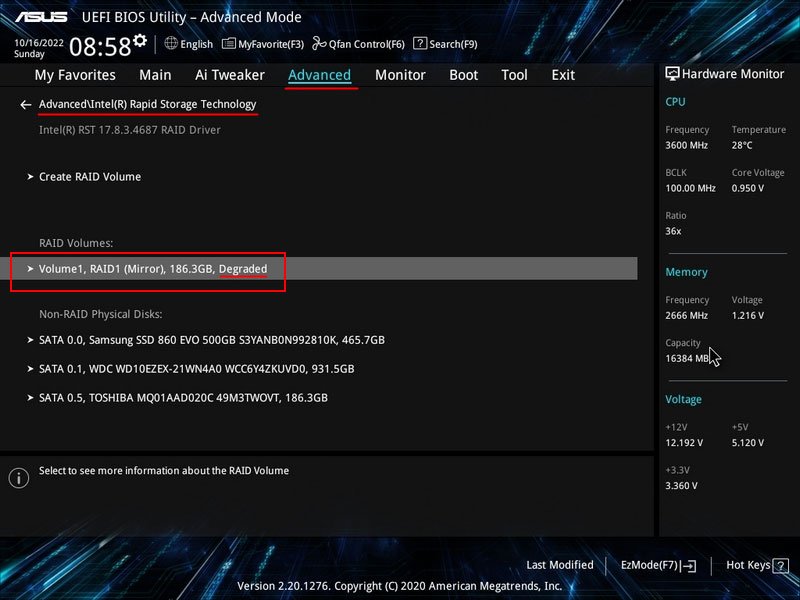
You can enter this section to identify which specific disk is having issues. If it is not detected, check its connections to ensure they are secure. If it is detected, you should diagnose it further. More details can be found in the article “Hard Drive Failure”.
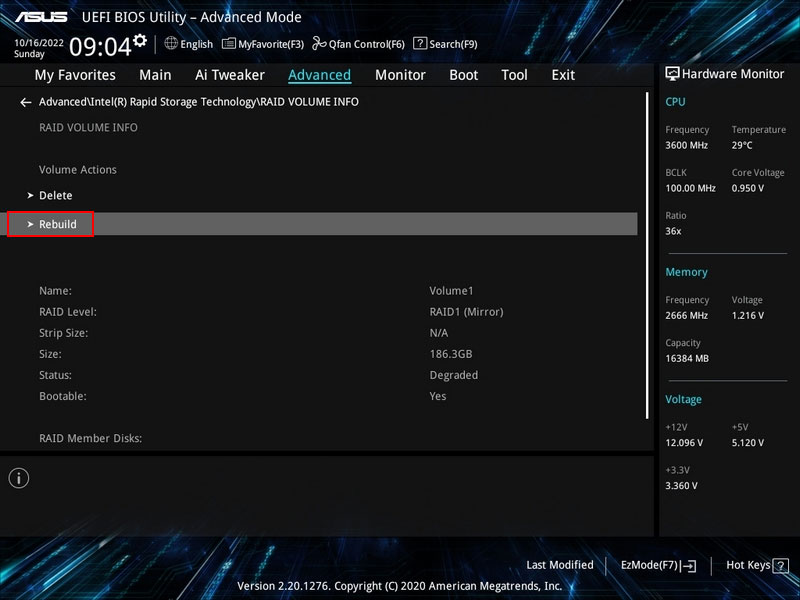
A failed disk needs to be replaced with another one. Then, you need to rebuild the RAID if it is a fault-tolerant RAID 1, 5, or 10. To do this, go to the “RAID Volumes” section of the degraded RAID. Click “Rebuild.”
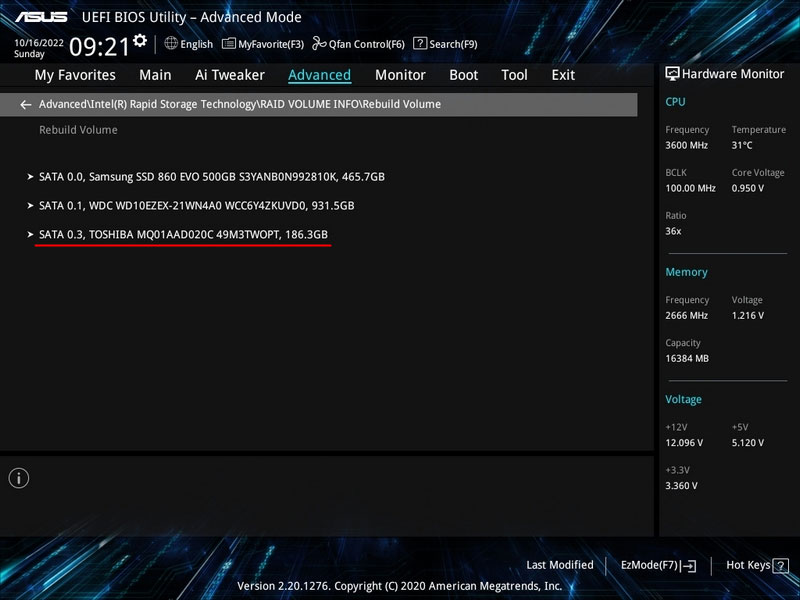
Select the new disk that you have prepared to replace the failed one.
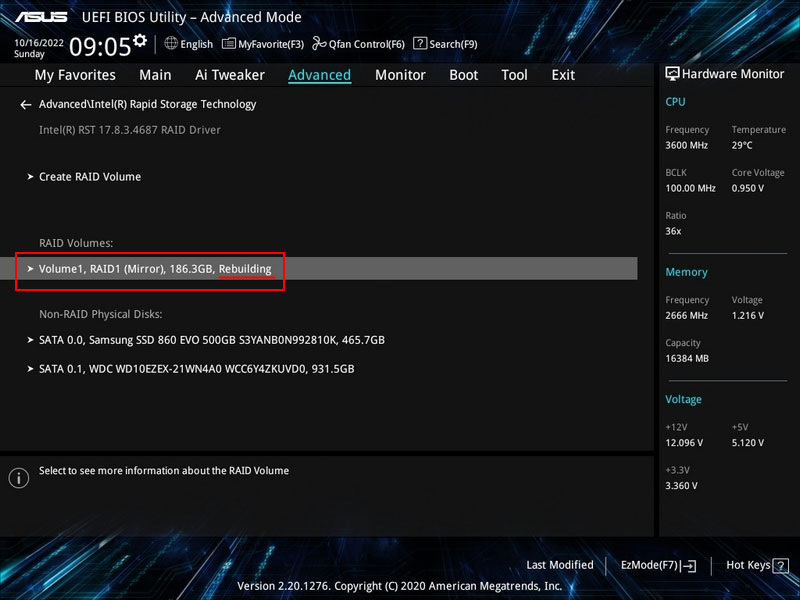
That’s it. The RAID will be marked as rebuilding – “Rebuilding”.
Removing RAID
RAID 0 is not fault-tolerant and does not provide data preservation in case one of the disks fails. In such a case, RAID 0 must be deleted and recreated with a new disk. How do you remove RAID 0?
When one of the disks fails, RAID 0 must be deleted and recreated with a new disk. How do you remove RAID 0?
In the advanced BIOS mode, navigate to “Advanced > Intel Rapid Storage Technology”. In the “RAID Volumes” section, the RAID 0 array will be listed as “Failed” – non-operational (crashed, broken), indicating that it cannot be recovered.
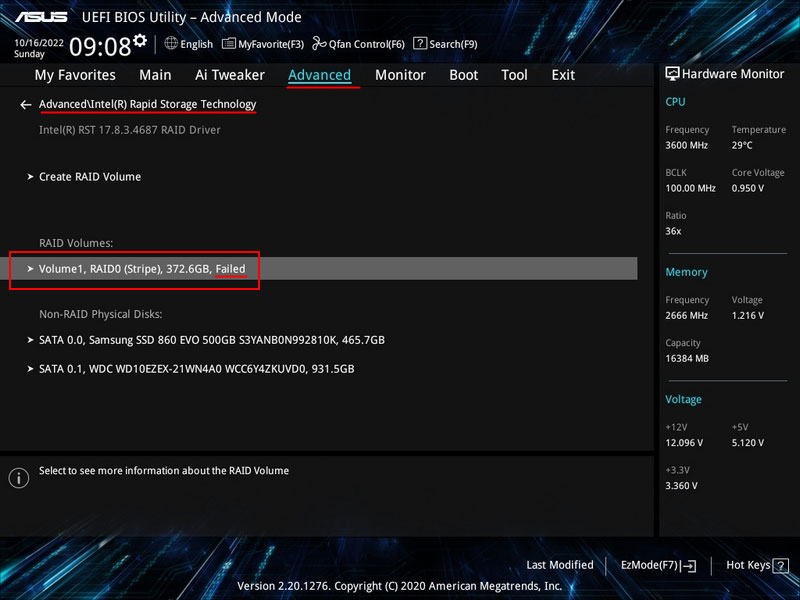
Enter this section. Click “Delete.” You can then create a new RAID 0. Finally, press the F10 key to save the changes.
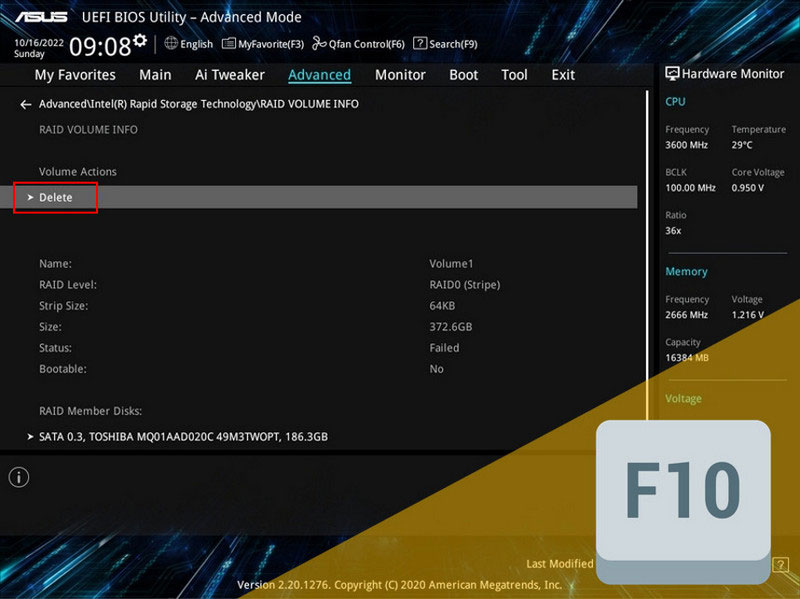
Other RAID configurations can be deleted in the same manner if they are no longer needed.
Data Recovery in the Event of RAID Failure
How to recover data when a RAID array fails and its status in the BIOS is marked as “Failed”?
A RAID failure signifies its collapse. Such an array needs to be deleted and recreated. For RAID 0, which lacks fault tolerance, failure occurs when one of the disks fails. Data from a failed RAID 0 can be recovered only if all the disks in the array are recognized by the computer.
Data protection in the event of a disk failure is available only for fault-tolerant RAIDs like 1, 5, and 10. However, any array can fail, including fault-tolerant ones. This can happen for various reasons, such as unsuccessful recovery after a disk replacement.
Another example is a failure of the RAID controller on the motherboard or the motherboard itself. With a new board or RAID controller, the array might not recover or might recover unsuccessfully, leading to failure.
Note: For guidance on what to do if the RAID controller on the motherboard or the motherboard itself fails, refer to the article “RAID Controller Failure”.
Data recovery from a failed RAID 1, 5, or 10 is possible even if one of the disks is not recognized by the computer.
To recover a RAID, you need software that supports RAID and handles complex data recovery scenarios, such as RAID failure. One such program is RS RAID Retrieve.
The program can reconstruct the RAID without a RAID controller, with an incomplete set of disks, recovery errors, etc., and allows data extraction.
Download and install the program.

Data recovery from damaged RAID arrays
Note: If the operating system is unavailable, RS RAID Retrieve can be run on a Win10XPE LiveDisk.
RAID arrays in the program typically display as RAID arrays. However, with Intel Rapid Storage technology, both RS RAID Retrieve and other programs, as well as the operating system, will see such a RAID as a regular physical disk named Intel Raid Volume.
If any disk in the array is missing, the RAID may display not as Intel Raid Volume but as one of the remaining disks.
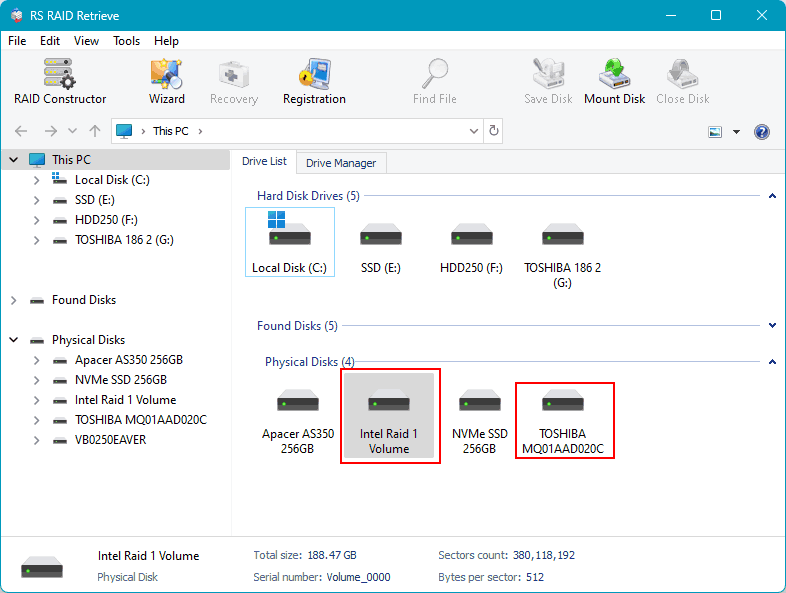
If neither the RAID nor its individual disks appear in RS RAID Retrieve, you need to delete the failed RAID to access each physical disk individually.
After deleting the RAID, do not perform any operations on the disks. Immediately launch RS RAID Retrieve and start the RAID constructor, either at program startup or from its window.
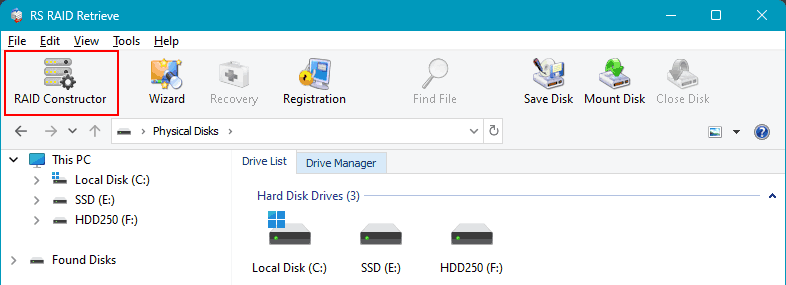
The program might automatically detect that some of the computer’s disks previously formed a RAID array and suggest configurations for these arrays. You can choose from these. If RS RAID Retrieve does not detect previously existing arrays or suggest their configurations, select “Manual Creation.”
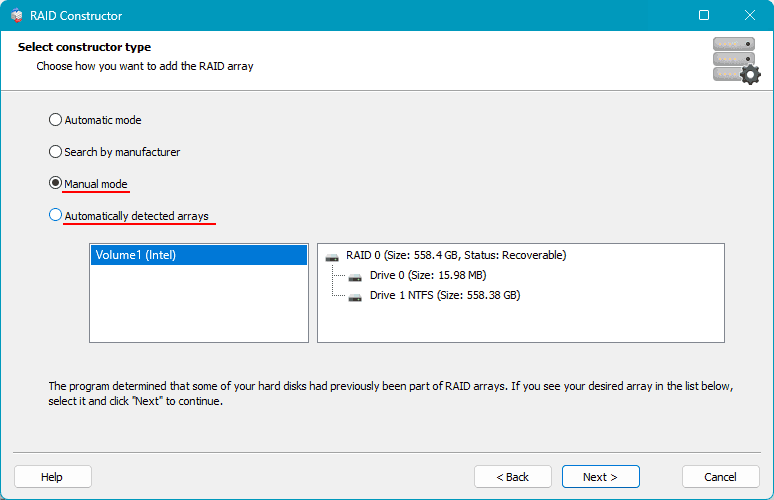
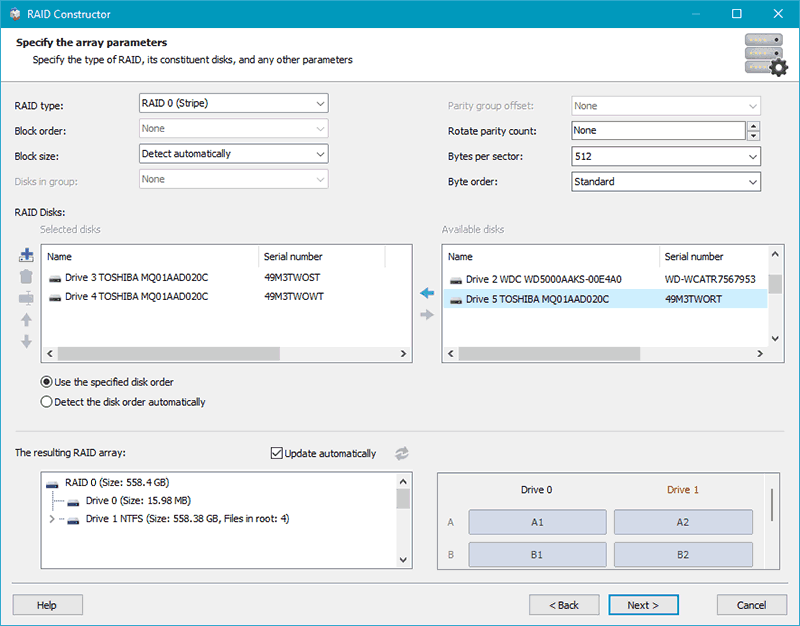
Next, configure the deleted RAID. If it’s a configuration suggested by the program, you can adjust some RAID parameters. If creating the RAID manually, specify the disks included in the array and other parameters. Click “Add.”
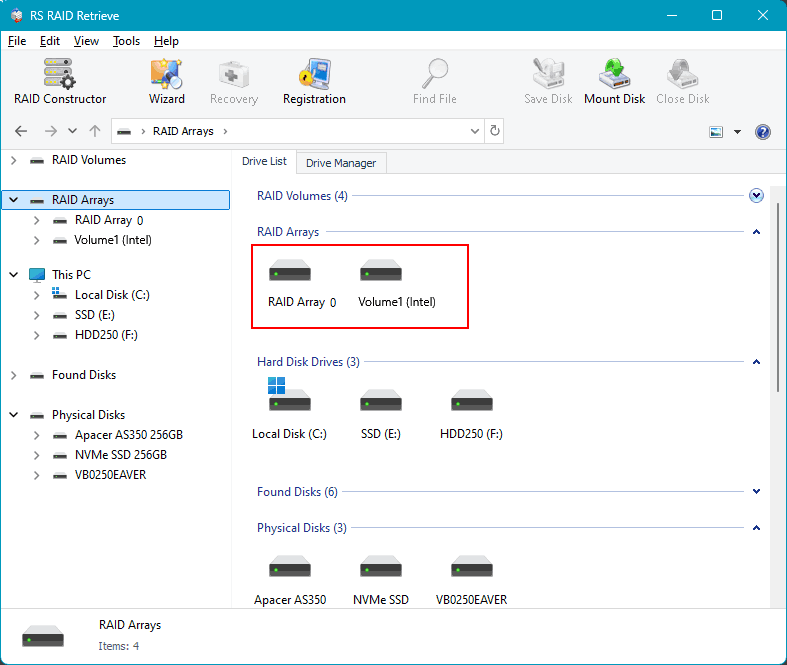
The configured array will display in the RAID arrays block. There may be several if the program suggests configurations. Click on the array.
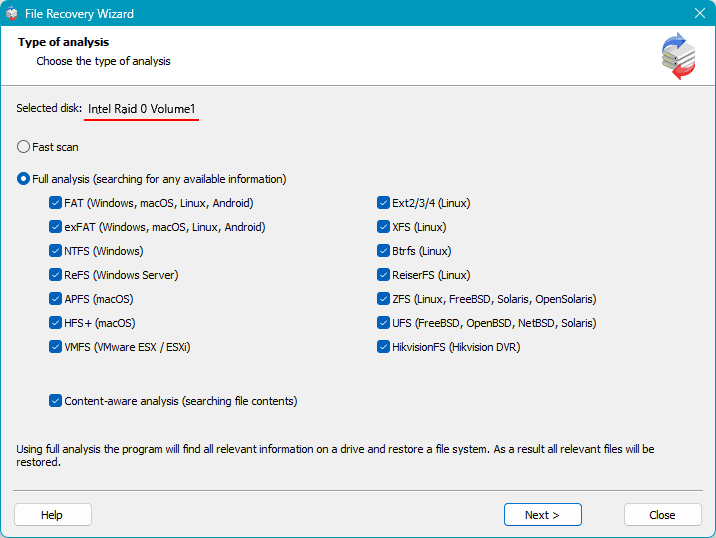
Start data analysis for recovery. There are two types of analysis. One is quick scan, which is a fast analysis used for recovering recently deleted data and extracting existing data.
The other type is full analysis, which takes longer but is effective in complex data recovery scenarios like long-term deletion, partition formatting, disk repartitioning, etc.
In the event of RAID failure and deletion, first try a quick scan. If it does not find the necessary data, restart recovery from the configured RAID and use a full analysis.
After analysis, you will see data available for recovery. Click to select the data you want to recover and press the “Recover” button.
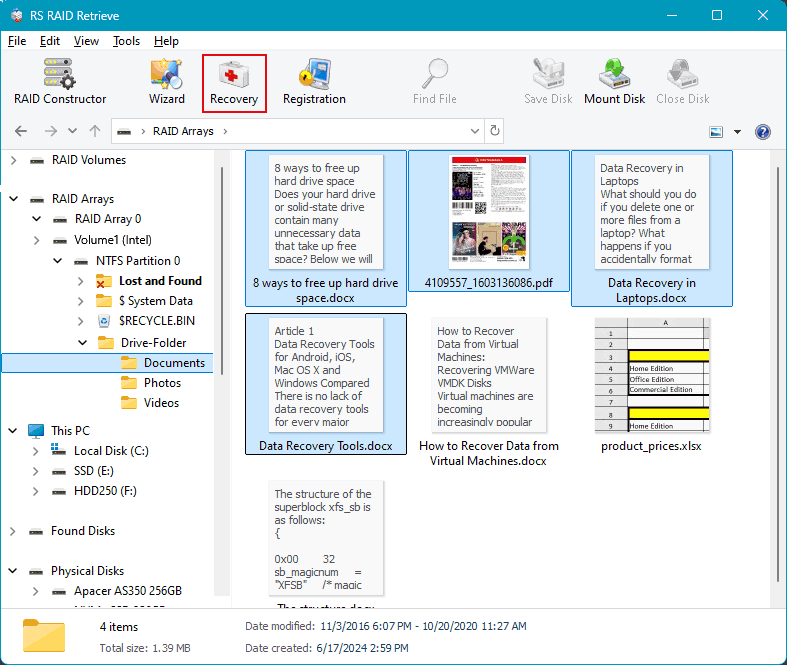
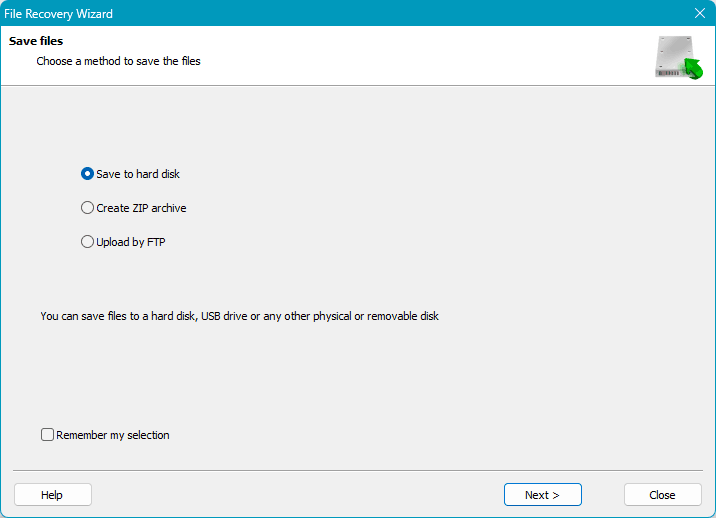
Next, specify the method for saving the recovered data. And specify the save path.
