If you care even a little bit about the safety of your data, then you have heard about RAID arrays. In this article, we’ll take a look at how to create a RAID 10 array in Windows 10.

Contents
- What is the difference between software and hardware RAID controllers?
- How to create a software RAID 10 in Windows 10 using "Storage spaces"?
- How to create a software RAID 10 in Windows 10 using "Disk Management"?
- How to create a software RAID 10 in Windows 10 using the command prompt (Windows PowerShell)?
- How to recover lost data from RAID 10?
Everyone has long been used to social networks and the fact that they collect data about their users. Instagram is no exception in this regard and stores data such as view history, likes, subscriptions, and many other actions, and since Instagram is currently one of the most popular social networks – the user should know how to view the collected data and delete it if necessary.
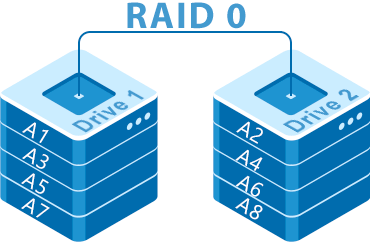
The main purpose of RAID arrays is to provide data safety in case one of the drives fails, but each RAID level has its peculiarities. Some levels provide the highest possible level of protection, but at the same time reduce data write speed (RAID 1), some on the contrary increase read/write speed to the drives, but at the same time greatly reduce the data safety level (e.g. RAID 0). It led to a combination of different levels to achieve the highest possible read/write speed and a high level of data security. Thus, combined RAID levels were created, and RAID 10 is one of them.
RAID 10 is a great solution that allows you to take two RAID 1 arrays and pack them into one RAID 0 array. It allows for both a high level of data security and high read/write speeds.
If you are not familiar with RAID types – you can read about them in the article “RAID Types“
One more advantage of RAID 10 is that it can be created using both hardware and software controllers.
What is the difference between software and hardware RAID controllers?
The decision of which controller to use for RAID 10 everyone makes on their own, based on their needs. However, before deciding, it is worth comparing them in price, performance, and reliability.
As for the price, hardware solutions will be more expensive. Moreover, the more important information is stored on a computer, server, or NAS, the higher quality the controller should be used (and therefore more expensive).
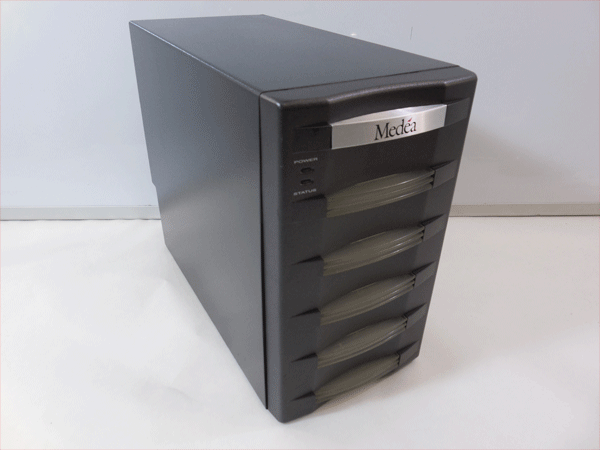
At the same time, it should be said that a fully functional software RAID 10 can be realized using only the built-in features of the Windows 10 operating system, which means that theoretically such a RAID should be cheaper. It is really true, but the user should remember that the hardware itself must be sufficiently powerful, since on too weak machines RAID 10 can not provide the necessary performance. The reason is that the software RAID controller uses some of the processor’s resources and since RAID 10 divides the data into strips first and then writes to each of the RAID 1 arrays – old computers start to lag a lot.
Therefore if you have an old machine you can try to create a software RAID 10. The creation process is detailed in the next paragraph of this article.
If we compare the reliability of software and hardware controllers then it is fair to say that hardware controllers are less error prone and less dependent on the operating system. But again, they are noticeably more expensive. So it makes sense to use them only for professional purposes. If we are talking about a home computer/server – the software controller is the best solution.
How to create a software RAID 10 in Windows 10 using “Storage spaces”?
As it was mentioned above, the built-in functionality of the Windows operating system does not support creating a RAID 10 array, but you can do something different and first create two RAID 1 arrays and then build a RAID 0 array from them.
First, create two RAID 1 arrays. To do this, follow these steps:
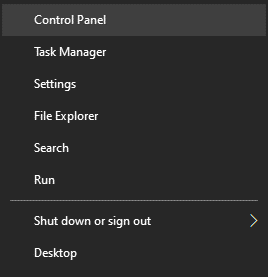
Step 1: Right-click on “Start” and choose “Control Panel“
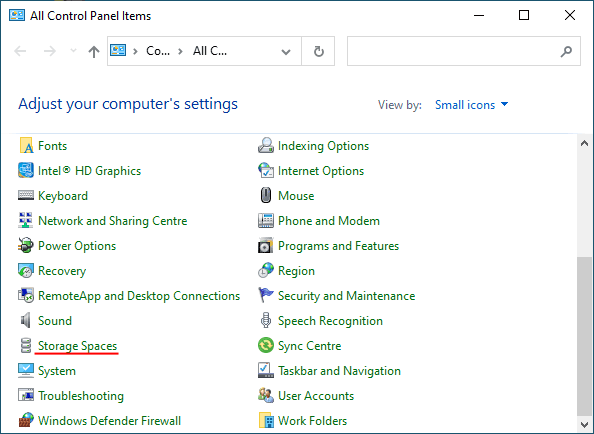
Step 2: In the window that appears, select “Storage spaces”
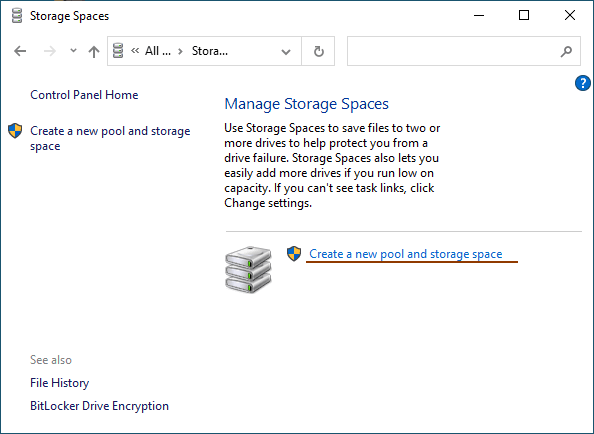
Step 3: Select “Create new pool and storage space“
Step 4: Select the disks you want to add to your RAID array.
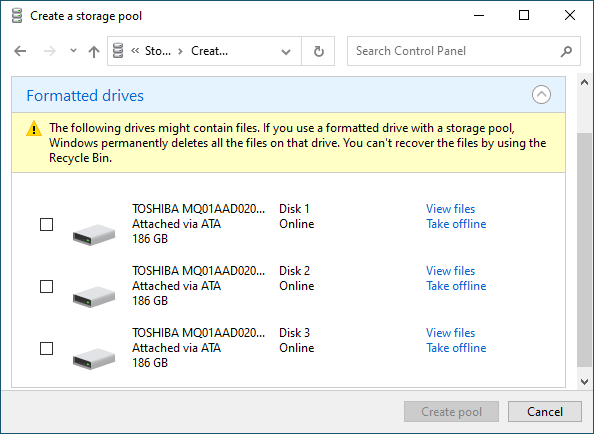
Important: All data on the disks that make up the RAID array will be deleted. So save all important files in advance to a different disk or external storage.
Once you have configured the array, you must give it a name and configure it correctly.
Step 5: In the “Name” field, enter a name for your RAID array.
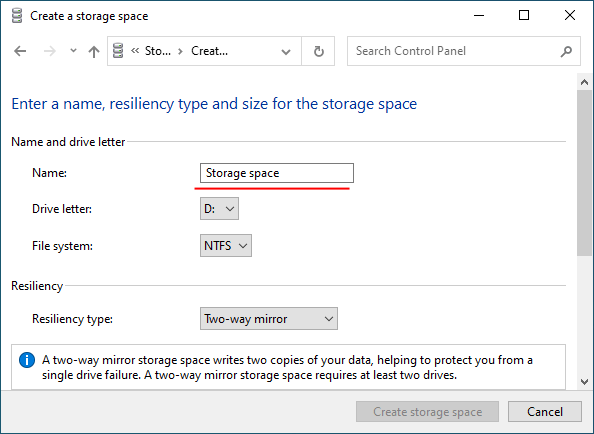
Step 6: Then select a letter and file system for the future RAID array
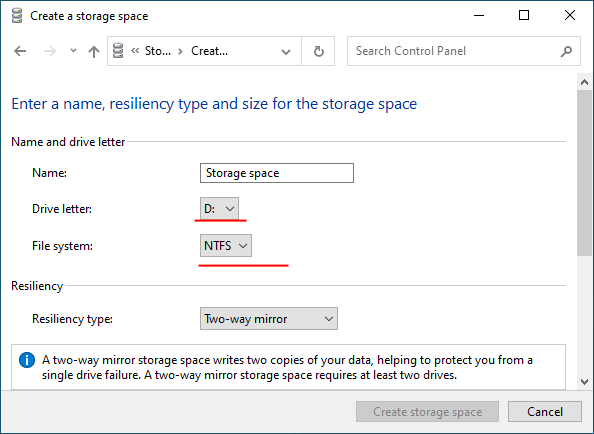
With this name and letter the array will be displayed on the Windows system.
Step 7: Now you have to choose the resiliency type.
- Simple (no resiliency) — is RAID 0;
- Two-way mirror –is RAID 1;
- Three-way mirror — is also RAID 1 (the only difference is the number of copies of the main hard drive);
- Parity — is RAID 5.
We are interested in the second option “Two-Way Mirror“
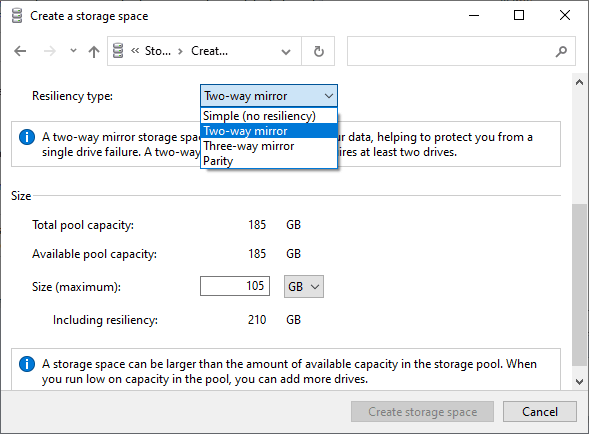
The program will automatically set the maximum available capacity of the disk array.
Usually, this value is a little lower than the actual amount of available data, and you can also set a larger disk space size. Keep in mind, however, that it is done so that you can install additional hard disks when the array is full, without having to rebuild it.
Step 8. Click “Create Storage Space“
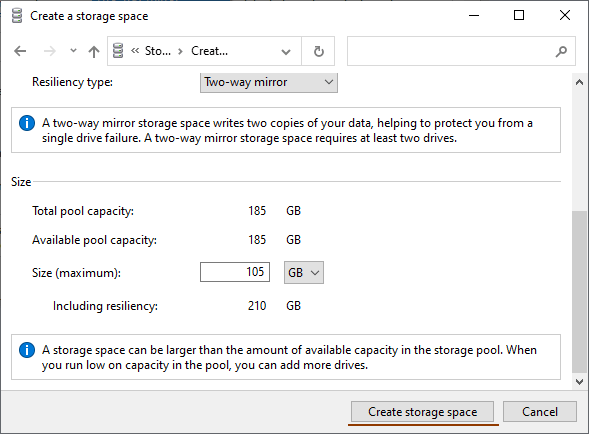
Once the wizard has set up your new RAID, it will be available as a separate drive in the “This PC” window. It will be no different than a regular hard drive, and you can do anything with it.
Perform the same operation for the remaining two disks.
Once both arrays have been created — you can start to combine them into one RAID 0 array.
It is done in the same way as for RAID 1, only now select our arrays instead of regular disks and in the step of selecting resilience type select “Simple (no resilience)” instead of the two-way mirror.
Once the array creation process is complete, you will have a RAID 10 array ready to go.
How to create a software RAID 10 in Windows 10 using “Disk Management”?
The other way to create software RAID 10 in the Windows operating system is to use a built-in utility called “Disk Management“. Just like the previous one, this method is quite easy and does not require deep knowledge of the operating system. So, let’s start by creating two RAID 1 arrays:
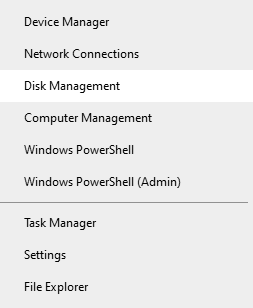
Step 1: Right-click on “Start” and choose “Disk Management“
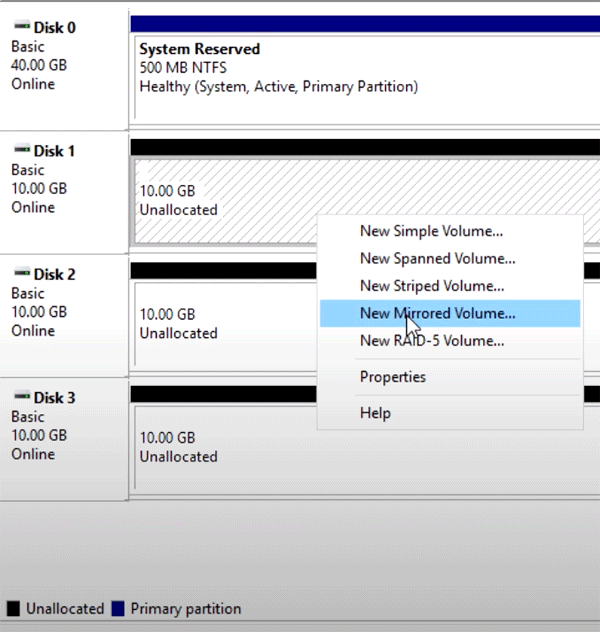
Step 2: The “Disk Management” utility will appear in front of you and displays all connected disks. Right-click and select “New Mirrored Volume“
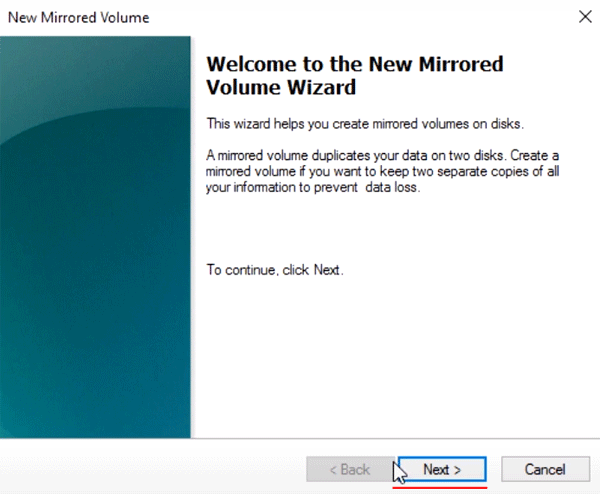
Step 3: The “New Mirrored Volume Wizard” will open. Click “Next“, then select the drives you want to add to RAID 1 in the left part of the wizard window and click “Add“. When all disks you want are added, click “Next“

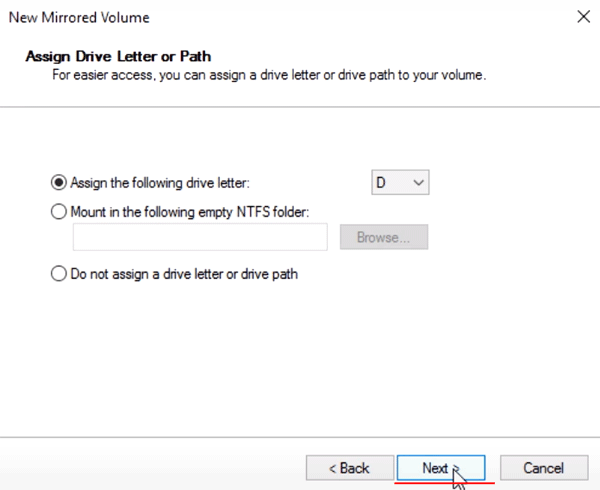
Step 4: Assign a letter to the array by choosing one from the list (the letter is set automatically, so you can leave it as the array wizard suggests) and click “Next” again
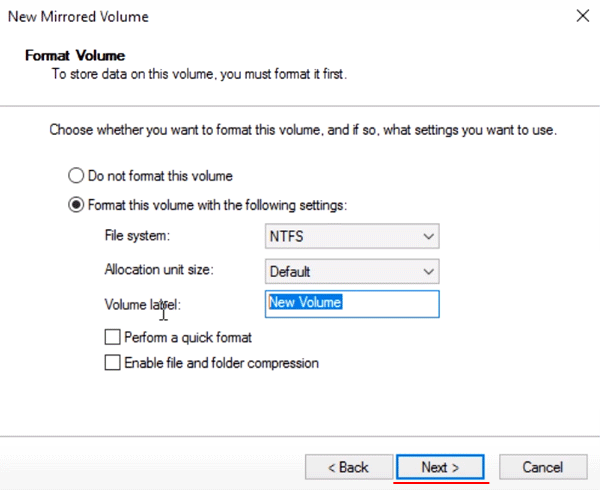
Step 5: In this step you need to select the file system for the future “mirror”. Choose “NTFS” and click “Next” again.
Step 6: Check that the settings are correct, and then click “Finish“. The system will show a warning that the selected disks will be converted to dynamic disks and that all information will be destroyed. Click “Yes“
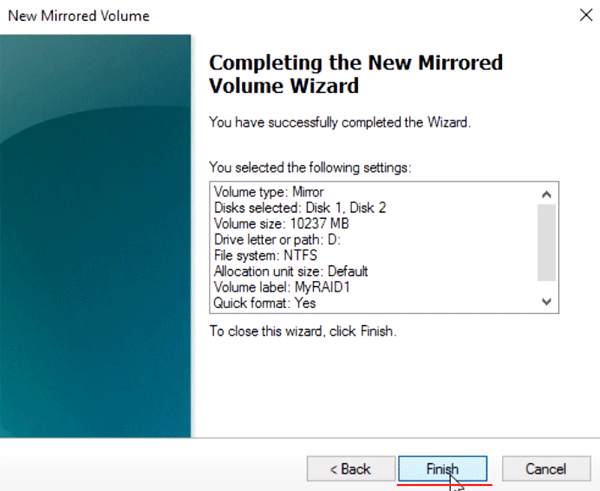
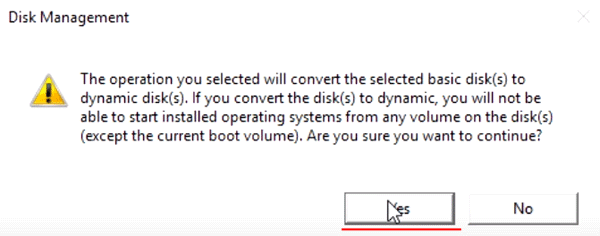
It will start formatting and synchronizing the disks. Once this process finishes — our RAID 1 array will be created. Do not close the “Disk Management” window, and repeat steps from 3 to 6 for the second group of disks, thus creating another RAID 1 array. Both arrays will appear in Windows Explorer as normal drives.
Now you only need to combine the two arrays you created into RAID 0. To do this:
Step 1: Run “Disk Management” again as described above.
Step 2: Then right-click on either of the two RAID 1 arrays and select “New Striped Volume“
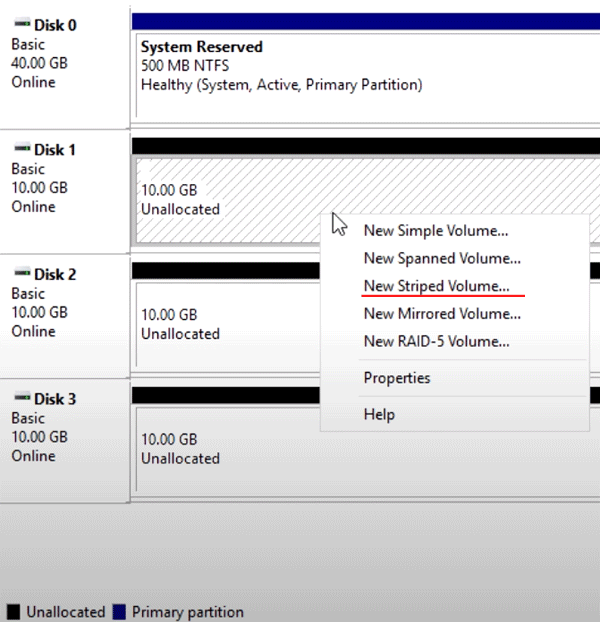
Step 3: The “New Striped Volume Wizard” opens in front of you. Repeat steps from 3 to 6 described above.
After that, your RAID 10 will be created. It will appear in Windows Explorer as a regular drive and you will be able to do the same manipulations with it as with a regular drive.
How to create a software RAID 10 in Windows 10 using the command prompt (Windows PowerShell)?
This method of creating a software RAID 10 is less convenient than the previous two, but it is great for those who like to work with the command prompt. Also, as before, we need first create the two RAID 1 arrays and then combine them into RAID 0. So, let’s create the RAID 1 arrays:
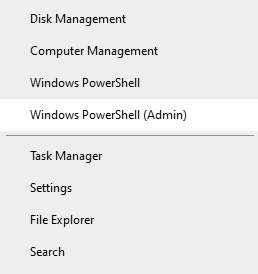
Step 1: Right-click on “Start” and click “Windows PowerShell (Admin)“
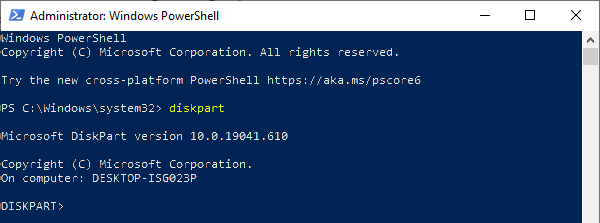
Step 2: In the window that appears, type “diskpart” and press “Enter“
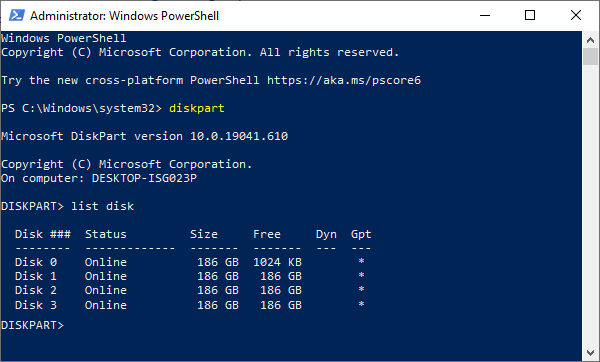
Step 3: Enter the command “list disk” and press “Enter” again. This command displays all drives connected to the computer.
Step 4: Let’s start creating our RAID 1 arrays. Run the following commands (pressing “Enter” after each command to execute it):
- select disk 0 – where “0” is the number of the disk to be manipulated;
- convert dynamic – this command converts the disk into a dynamic one;
Sometimes at this stage a message may appear that you need to restart the computer. If it appears – do it, if not – continue running the command.
- select volume 0 – select the desired disk;
- add disk=1 – where “1” is the number of the disk to be added as a mirror
The same commands should be executed for another group of disks, changing the desired disk numbers.
- list disk – to show the list of disks again (in this case our RAID 1 arrays will be displayed as regular disks);
- create volume stripe size=n disk=0,1 – where “n” is the size in megabytes and “0,1” are the numbers of the disks to be included in RAID 0.
After pressing the “Enter” key a new RAID 10 array will be created.
How to recover lost data from RAID 10?
RAID 10, if correctly configured and maintained, does an excellent job at its most important task – keeping the information on the disks safe. However, even RAID arrays can fail, and the reasons for that are quite numerous. If you want to know the main reasons for RAID 10 failures, read our article “Causes of RAID Failures“
But what to do if a RAID 10 array fails?
Foremost, regardless of the cause of the failure, extract the data from the drives to a safe place, as data can be lost while trying to restore a RAID 10 array to working order.
Use RS RAID Retrieve, the best RAID reconstructor available today.
The program is very simple and easy to use, but most importantly, it supports ALL types of RAID arrays, including combined arrays like our RAID 10.
In addition, RS RAID Retrieve has a powerful RAID constructor with an automatic mode, so you don’t have to manually enter RAID parameters. The constructor itself determines the order of the disks and other parameters.
It is also worth noting the support of all modern file systems, so RS RAID Retrieve can rebuild a broken RAID array regardless of the operating system in which such array was used.
So, in order to retrieve data from RAID 10 disks connect them to a working computer, and then perform a number of simple steps:
Step 1: Download and install RS RAID Retrieve.

Data recovery from damaged RAID arrays
Launch the application after installing. The built-in “RAID constructor” will open in front of you. Click “Next“.
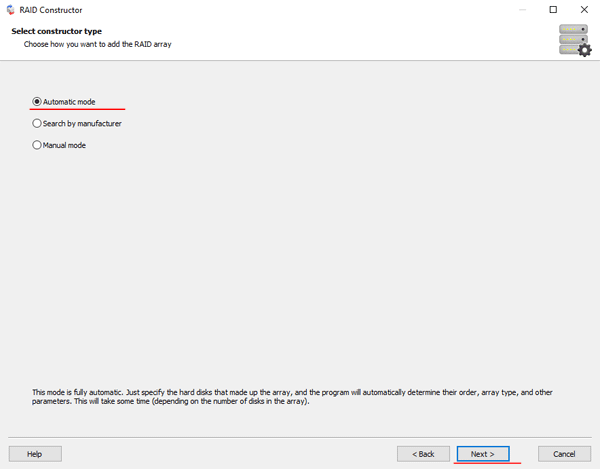
Step 2: Choose the method of adding a RAID array for scanning. RS RAID Retrieve offers three options to choose from:
- Automatic mode – allows you to simply specify the drives that made up the array, and the program will automatically determine their order, array type, and other parameters;
- Search by manufacturer – this option should be chosen if you know the manufacturer of your RAID controller. This option is also automatic and does not require any knowledge about the RAID array structure. Having the manufacturer’s information allows you to reduce the time to build the array, and is, therefore, faster than the previous option;
- Manual creation – this option is worth using if you know what type of RAID you are using. In this case, you can specify all parameters you know, and those which you do not know – the program will automatically determine
After you select the appropriate option – click “Next“.
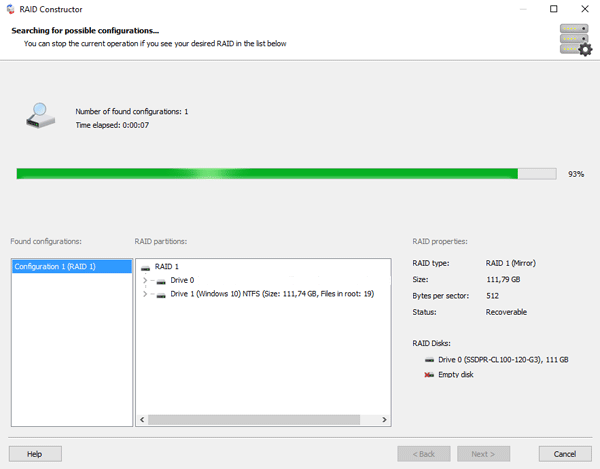
Step 3: Select the disks that make up the RAID array and click “Next“. It will start the process of detecting the array configurations. When it is complete, click “Finish“.
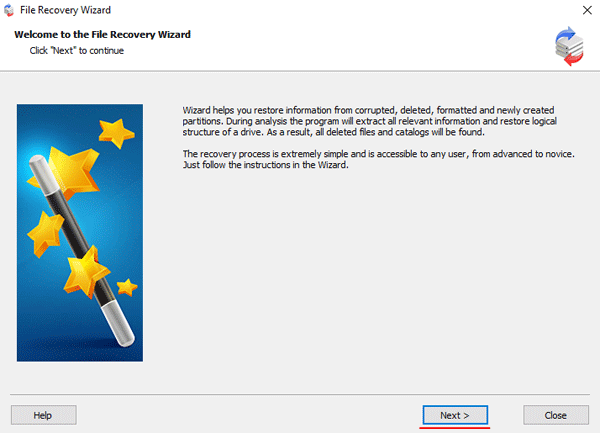
Step 4: After the constructor builds the array – it will appear as a regular drive. Double left-click on it. The File Recovery Wizard will open in front of you. Click “Next“
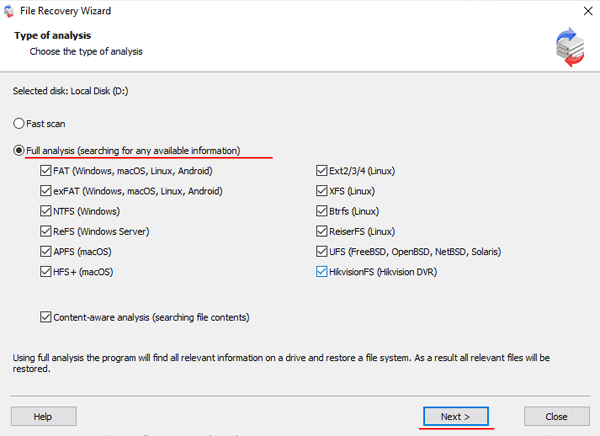
Step 5: RS RAID Retrieve will offer to scan your array for files to recover. You will have two options: a quick scan and a full analysis of the array. Select the desired option. Then select the file system type that was used on the array. If you do not know this information, check all available options, like on the screenshot. It is worth noting that RS RAID Retrieve supports ALL modern file systems.
Step 6: The array scanning process will start. When it finishes, you will see the previous structure of files and folders. Find the necessary files, right-click on them and select “Recovery“

Step 7: Specify the location where the recovered files will be saved. This can be a hard drive, a ZIP-archive, or an FTP-server. Click “Next“
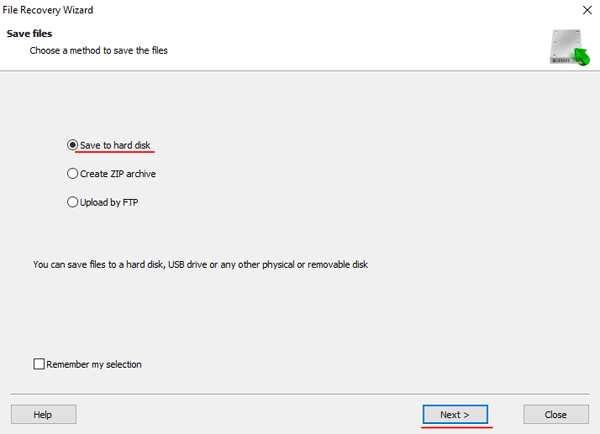
After clicking the “Next” button, the program will begin the recovery process. When it finishes – the selected files will be in the specified location.
After all, files are successfully restored – recreate the RAID 10 array, and then copy the files back.
As you can see, the RAID 10 data recovery process is quite simple and doesn’t require much PC knowledge, making RS RAID Retrieve the perfect application for professionals and novice users alike.








Wouldn’t using span instead of stripe work better since you can’t expand a striped volume without losing your data & you can expand a spanned volume more easily?