Trying to increase the data safety level, the developers implement the new technologies into their operating systems. In this article we will look at the LVM and answer the questions what is it, and its main advantages.

Contents
- What is LVM and how it works?
- Advantages and disadvantages of LVM
- How to work with LVM?
- The volume types in LVM?
- How to remove or resize the LVM volume?
- Snapshoots in LVM
- LVM + RAID and RAID + LVM
- What to do if the data was lost?
What is LVM and how it works?
LVM (logical volume manager) – is the technology that allows you to use some parts of your hard disk (or few disks) space and combine it into one logical volume for further work. Thank to this you can more flexibly partition your total disk space as you are not limited by one hard drive. LVM works also with SSD drives.
Let’s take a closer look on how LVM works.
Imagine that you have two hard drives with 100 GB memory space (2 x 100 GB). Using regular partitioning you can create maximum 100 GB volume for each disk.
If you will use LVM for this purpose – you can create for example one volume with 120 GB space, and the second one with 80 GB space. The main thing is that LVM creates some abstract level that merge the disk space for both hard drives and then you can partition total disk space as you want.
Schematically it looks following:
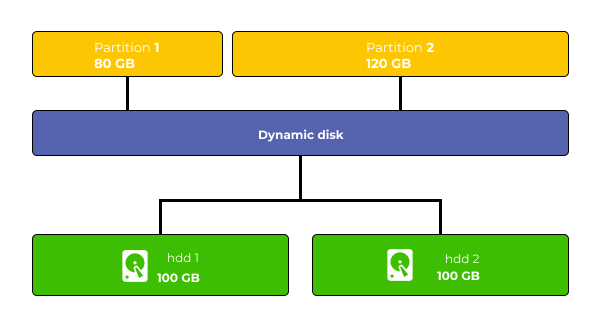
Such effect can be realized by using the device mapper subsystem.
Initial partitions are divided into blocks or block devices (physical volume (pv)) and combining them into a single virtual volume, or more precisely, a volume group (vg). Then, this virtual volume is divided into logical volumes (lv). For the file system, a logical volume is represented as a regular block device, although individual physical volumes may be located on different physical devices (and even the physical volume itself may be distributed like a RAID).
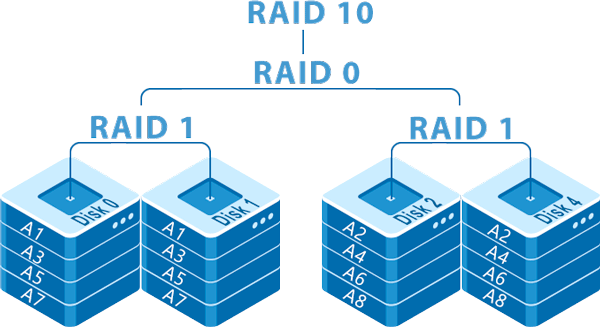
More information about the RAID can be found in the article “What is RAID and what it is used for?”
Advantages and disadvantages of LVM
Before using the LVM lets consider the main advantages and disadvantages of its usage. The main thing is that for some people LVM will be the best solution when for others it will the complete disappointment. But let’s start from advantages.
LVM runs at the kernel level. It guarantees the maximum transparency of disk configuration and usage. The programs will be able to work with logical, virtual LVM partitions in the same way as normal ones.
The main advantage is the possibility to create, resize, rename the volumes without restarting the computer.
You can also resize your volume dynamically. It means that you can create small size volume first, and then set it up to expand when filled in.
In addition, you can fat to combine any number of disks into one logical pool, and then to create as many volumes as you need. It is fast, and easy.
In addition, LVM allows you to create snapshots of logical volumes without stopping the operating system and use the advanced encryption features.
As you can see, LVM is suitable for home servers that stores a lot of data. LVM together with the fast file system can give you great opportunities for work.
You can find more information about choosing file system in the article “What file system is best to use?”
At the same time LVM technology has some disadvantages that can be a barrier to its use.
The most important disadvantage is the fact that LVM adds one more virtual level that may affect to the system performance. It is not essential for home usage, but is especially true for heavily loaded systems and servers. The problem is that even smallest performance dropping may much effect on the customer data availability. As an example, we can consider the video hosting. Since such pools has a large number of connections from clients — the smallest performance drops may make the video unavailable.
One more problem is that when creating snapshots, the performance drops too. It restricts their use in the production systems.
And the last disadvantage is the fact that modern file systems (like Btrfs and ZFS) supports a lot of restricts their use in the production system LVM features (like online resizing, snapshot creation etc). It makes no sense to use LVM in some cases.
How to work with LVM?
The option to configure LVM is provided during the installation of any modern Linux distribution but how to work with it? Below you fill find the instructions.
The LVM consist of three levels:
- physical volume (one or more);
- group of physical volumes (Volume Group (also called PV));
- logical volume (which will be available for programs (also called LV));
3.1 How to install the LVM?
The first thing you have to do before creating LVM is to install the LVM2 program. It can be made using the terminal and perform the command:
$ sudo apt install lvm2
After the LVM 2 is installed, you can start to work with your disks.
3.2 How to initial the physical LVM volumes?
Now we have to initial the physical LVM volumes. First of all, we have to decide which volumes we will use. Let’s imagine it will be the dev/sda6 and dev/sda7. To initial them perform the command:
$ sudo pvcreate /dev/sda6 /dev/sda7
To check if the physical volumes were initialized correctly use the command:
$ sudo pvscan
The system will show all logical volumes in the system.
You can also see the detailed attributes using the following command:
$ sudo pvdisplay
If you want to know the size of the LVM single memory block – check the PE Size attribute. By default, it is 4 MB, but you can change it at any time.
3.3 How to create the LVM Volume Group?
The Volume Group (VG) is the total memory pool which consist of few initiated physical volumes. This pool can be converter in logical volumes, and you will not be limited by the memory size of the physical disk. All disks inside the volume group should be initialized.
You can create the Volume Group with the following command:
$ sudo vgcreate vol_grp1 /dev/sda6 /dev/sda7
Now, to check if everything is ok use the command:
$ sudo vgdisplay
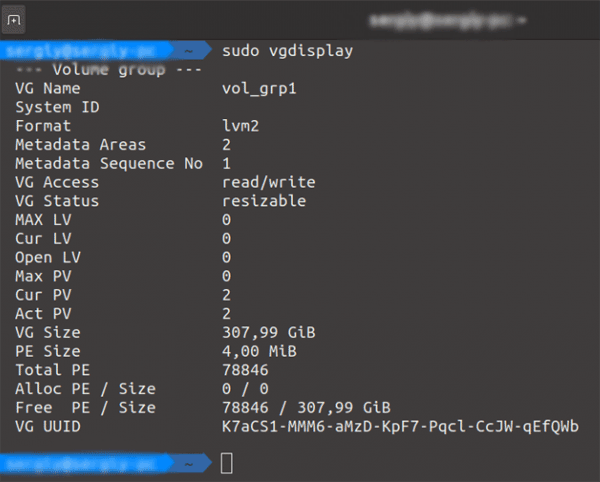
Now we are ready to create logical volumes.
3.4 How to create LVM logical volumes?
LVM logical volumes are created with the command lvcreate. As you remember, with LVM technology you are not limited by the physical size of any disk. It means that now you will divide all memory pool storage into a single logical volume.
As you remember, we had two hard dives 100 GB each. But now, we will create two logical volumes – 80 GB and 120 GB. Use the following command to do this:
$ sudo lvcreate -L 80G -n logical_vol1 vol_grp1
…where 80G is the size of your volume.
Thus, the command for creating the 100 GB volume will look like this:
$ sudo lvcreate -L 100G -n logical_vol2 vol_grp1
You can also use the following letters to specify the volume size:
- B — bytes;
- K — kilobytes;
- M — megabytes;
- G — gigabytes;
- T — terabytes;
To check the list of created logical volumes use the command:
$ sudo lvdisplay
If everything was made correctly you will see your just-created logical volumes, including the detailed information about every volume.
3.5 How to mount the LVM volume?
At this stage we can mount our new logical volumes. But first, we have to format them. It can be done as a regular volume. So, we can use the standard command:
$ sudo mkfs.ext4 /dev/vol_grp1/logical_vol1
$ sudo mkfs.ext4 /dev/vol_grp1/logical_vol2
…where logical_vol1 and logical_vol2 are the names of our volumes.
To mount the volumes, use the commands:
$ sudo mount /dev/vol_grp1/logical_vol1 /mnt/
$ sudo mount /dev/vol_grp1/logical_vol2 /mnt/
Now, you can work with our logical volumes as with the regular drive.
As you can see, the work with the logical volumes is the similar as the work with regular drives. You can format, rename and modify them without any problems.
The volume types in LVM?
In LVM you can use the three volume types – Linear Volumes, Striped Volumes, and Mirrored Volumes.
Linear Volumes are used in LVM by default. In fact – it is the regular volumes with no additional functions. No more reliability or performance grooving. In fact, it is similar to RAID 0. If y wants to know the difference between LVM and RAID – read the article “Comparison and difference between RAID lvm and mdadm”
Striped Volumes are useful when you want to increase the speed reading/writing for your LVM volume. It can be created with the command:
$ sudo lvcreate -L 1G -i 2 -n logical_vol2 vol_grp1
…where -i – is the stripes number (this number can’t be bigger than the number of physical disks), and -L – is the size of one stripe (can’t be bigger than the disk size).
It is a good solution if you are not afraid to lose the data. As if one disk fails – all information will be lost. Striped LVM volume are also used if you want to reduce the load on your hard or SSD drives. But the problem is the same – if one drive will fail, you will lose all data.
The next LVM volume type is the mirrored volume. This volume is the analogue of the RAID 1 and creates the data cope on each disk in your group.
This method allows to save one copy of your data. If one disk fails – all your volumes will be converted to linear, and you will be able to read the information. At the same time such volume will be much slower, as the computer will need to write the data several times.
To create mirrored LVM volume use the command:
$ sudo lvcreate -L 200M -m1 -n lv_mirror vol_grp1
How to remove or resize the LVM volume?
There are situations, when the free memory space of your LVM volume ends. It is not a problem, as you can add the new hard drive to your LVM group.
5.1 How to resize the logical volume?
You can resize the logical volumes, and no matter is the free space on the physical disk. If the memory pool has a free storage – you can use it for any logical volume. It can be made with the command lvextend. Let’s resize our LVM volume from 80 GB to 100 GB. To do this just use the command:
$ sudo lvextend -L+100G /dev/vol_grp1/logical_vol1
…where -L+100G is the new size of your volume.
To decrease the LVM volume instead of + use –
So, the command to decrease the LVM volume will looks like this:
$ sudo lvextend -L-100G /dev/vol_grp1/logical_vol1
5.2 How to remove the LVM volume?
If you don’t need the LVM volume, there is no problem to delete it. But be careful before deleting, as all data will be lost. To delete the LVM volume use the command:
$ sudo lvcreate -L 200M -m1 -n lv_mirror vol_grp1
Now, your LVM volume is deleted completely.
Snapshoots in LVM
LVM technology allows to create the snapshots. It is very useful if you need to make some changes, but you are not sure about the final result. You can create the snapshot and in case of problems “returns” to snapshot. At the same time, you don’t need to stop your machine, what is especially important for servers on in production companies, where a lot of employees may access the data.
Important: snapshot in not a backup.
When you making the snapshot, all writing processes are stopping for few milliseconds (it all depends on data amount and server performance). The regular user will not pay attention.
Besides, in case of problems you can fast roll-back your server to a working condition.
In addition, snapshots don’t need a lot of free memory, so it is very useful.
At the same time, you can’t store your snapshot too long, as it will load your hard drive and operating system. That is why for long-time saving regular backup in more useful.
To create the snapshot in LVM, use the command:
Lvcreate -L 1G -s -n snap_vg_data /dev/mapper/vg_data-lv_data
…where -L 1G is the amount of memory, reserved for the snapshot, and vg_data-lv_data – is the name of your snapshot.
To check the detailed information about your snapshot, use the command:
lvdisplay /dev/vg_data/snap_vg_data
As you can see, is fast and easy to create the snapshoots in LVM.
LVM + RAID and RAID + LVM
A lot of users ask: is it possible to create the LVM volume, based on RAID arrays and vice versa – create RAID array, based on the LVM volumes?
The answer is “Yes”. But there are some details, which you should know before starting such process.
If you want to create the RAID array, based on LVM volumes you have to know how LVM distributes the data. The LVM volume will fill the first disk, when second disk will be not used (during Linear data distribution). This process id shown in the picture below:

Such case is a big problem for SSD drives, as it strongly increases the wear of the filled disc, plus the performance will drop significantly. Even if you will use the parity method (two disk groups with parity) — this will not change the situation. The problem is that the parity will be used inside the group, but not between all disks. The filling of the second group will begin only when the first group is full.
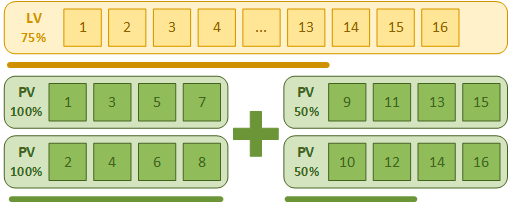
That is why the LVM volume based on RAID arrays is more preferable. The mdadm utility will correct distribute the load between the disk, plus you will be able to add the disks to your storage. The problem is the fact, that LVM is hard to administrate. You have to know a lot of commands to work with it correctly.
So, if you are not Linux geek – this is not your choice. In such case it is better to use regular RAID array, as the Windows and Mac OS cannot work with LVM.
What to do if the data was lost?
The use of technologies designed to increase data security or the flexibility of disk space allocation does not always end well. In some cases, it can create more problems, than in case if using regular disks. It is especially true for inexperienced users, who wants to get something more out of their computer configuration, but does not know how to handle the disk construction correctly. That is why it is important to know what to do if important data is lost.
First of all, you have no panic and use the professional tool for data recovery.
For now, the most effective solution to retrieve important data from RAID array is RS RAID Retrieve.
The built-in RAID constructor will build your RAID array or LVM volume, and you will be able to move your information into a safe place.
Let’s take a closer look at how you can retrieve the data:
Step 1: Download and install RS RAID Retrieve. Launch the application after installing. The built-in “RAID constructor” will open in front of you. Click “Next“
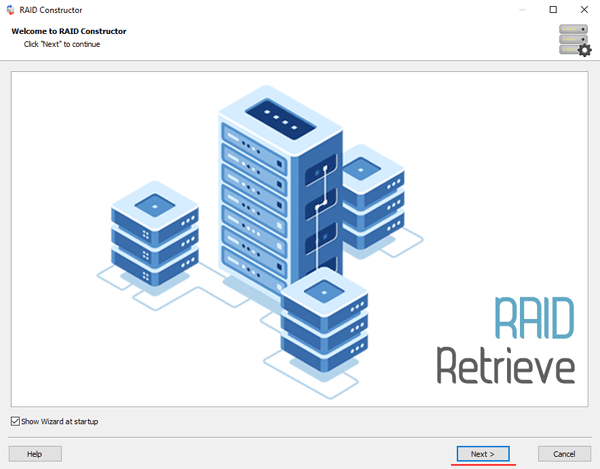
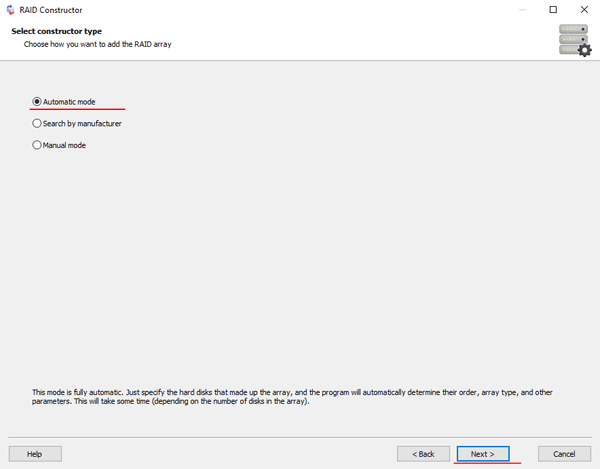
Step 2: Choose the method of adding a RAID array ot LVM volume for scanning. RS RAID Retrieve offers three options to choose from:
- Automatic mode – allows you to simply specify the drives that made up the array or LVM volume, and the program will automatically determine their order, array type, and other parameters;
- Search by manufacturer – this option should be chosen if you know the manufacturer of your RAID controller. This option is also automatic and does not require any knowledge about the RAID array structure. Having the manufacturer’s information allows you to reduce the time to build the array, and is, therefore, faster than the previous option;
- Manual creation – this option is worth using if you know what type of RAID you are using. In this case, you can specify all parameters you know, and those which you do not know – the program will automatically determine
After you select the appropriate option – click “Next“.
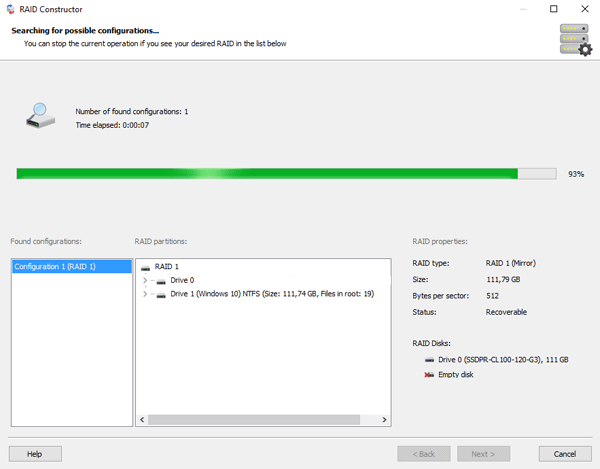
Step 3: Select the disks that make up the RAID array or LVM volume and click “Next“. It will start the process of detecting the array configurations. When it is complete, click “Finish“.
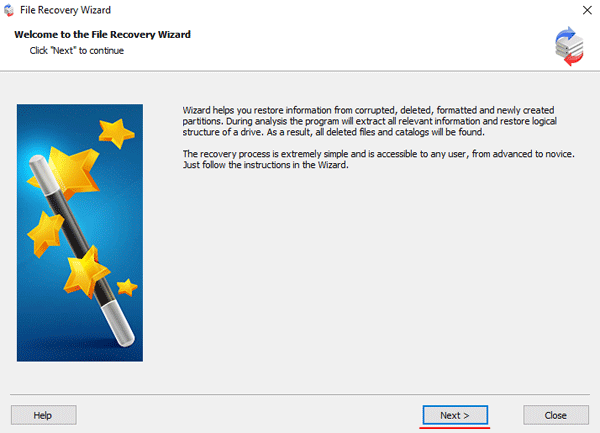
Step 4: After the constructor builds the LVM volume (or RAID array based on the LVM volumes) – it will appear as a regular drive. Double left-click on it. The File Recovery Wizard will open in front of you. Click “Next“
Step 5: RS RAID Retrieve will offer to scan your array or LVM for files to recover. You will have two options: a quick scan and a full analysis of the array. Select the desired option. Then select the file system type that was used on the array. If you do not know this information, check all available options, like on the screenshot. It is worth noting that RS RAID Retrieve supports ALL modern file systems.
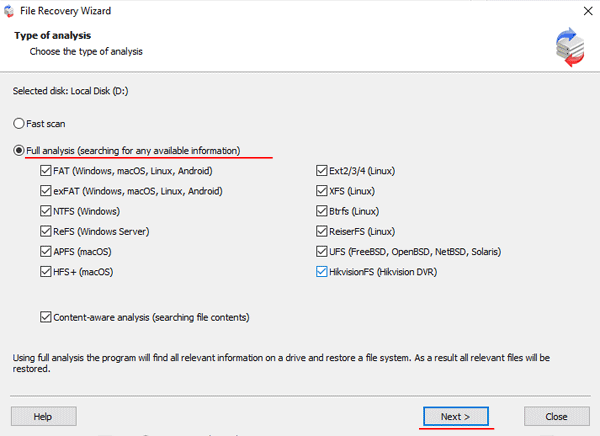
Step 6: The scanning process will start. When it finishes, you will see the previous structure of files and folders. Find the necessary files, right-click on them and select “Recovery“

Step 7: Specify the location where the recovered files will be saved. This can be a hard drive, a ZIP-archive, or an FTP-server. Click “Next“
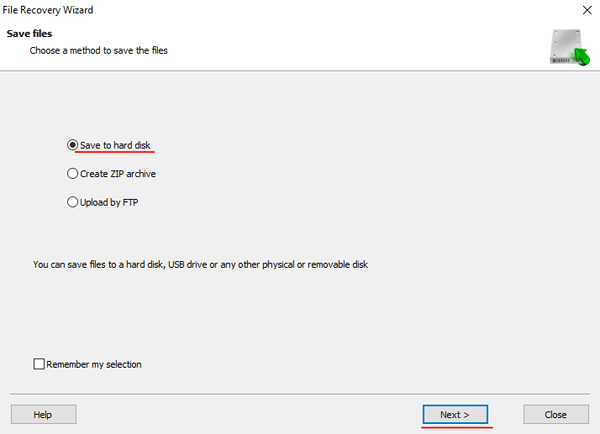
After clicking the “Next” button, the program will begin the recovery process. When it finishes – you will find selected files in the specified location.
After all, files are successfully restored – recreate the LVM volume, and then copy the files back.
As you can see, with RS RAID Retrieve it is easy to extract important data from the broken LVM. Moreover, you don’t need any additional software or hardware. Just connect the drives to your PC and use the above instruction. Fast and easy.

