In this article we will look at how to recover lost data from a RAID 10 array.
Contents
- RAID 10 -- how it works?
- Advantages and disadvantages of RAID 10
- How to create RAID 10 in Linux?
- How to create RAID 10 in Windows 10?
- The main causes of RAID 10 failure
- What to do if your RAID 10 array falls?
RAID technology has become very widespread due to increased data security. However, each RAID level has advantages as well as disadvantages. This has led to the emergence of combined RAID levels, which are designed to take advantage of each RAID type.
RAID 10 — how it works?
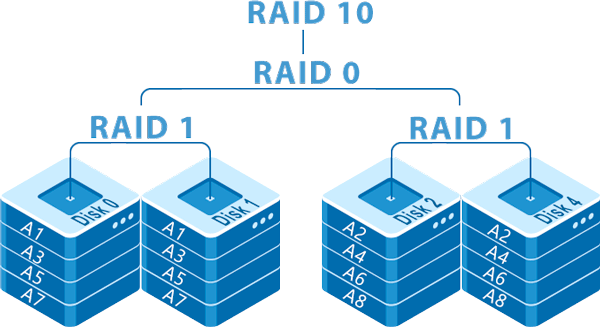
RAID 10 (RAID 1 + RAID 0) uses striping and mirroring technology at the same time. The controller first divides the information into blocks as in RAID 0, then writes it to multiple disks simultaneously (Striping). However, blocks of information are not written to the disks individually, but to RAID 1 arrays.
It turns out that RAID 10 is two RAID 1 arrays inside a RAID 0 array. With this solution, an optimal read/write speed and a high level of security are achieved at the same time.
Advantages and disadvantages of RAID 10
Let’s talk about the advantages and disadvantages of RAID 10. The advantages are the following:
- high read/write speed – it is noticeably higher than in RAID 5 due to the absence of the need to calculate parity data;
- high level of reliability (again, it is higher than in RAID 5) – the array functionality is guaranteed as long as at least one drive in each disk group is working;
- shorter latency than other RAID levels;
However, RAID 10 also has its disadvantages. Among them we can highlight the following:
- poor scalability – the user can only use an even number of disks (using an odd number of disks is possible if one of them will be used as a hot spare disk);
- high cost – RAID 10 is one of the most expensive RAID levels since only half of the disk space is available to the user;
- no possibility to replace a broken disk – if one of the disks fails the user will be forced to use the remaining disks. If there is a spare disk it will automatically join the array, but if one more disk fails there will be nothing to replace it with;
- difficult to set up – RAID 10 is a bit more complex to set up and correctly configure than simple arrays such as RAID 0, RAID 1, RAID 5, etc.
As a rule, RAID 10 makes sense when working with “heavy” applications which require high performance to work correctly.
How to create RAID 10 in Linux?
RAID 10 can be easily created on a software controller in a Linux operating system and there are two ways to do it: The first one creates RAID 10 immediately and the second one creates two RAID 1 arrays first and then combines them into RAID 0. In both cases, this is done using the “mdadm” utility, so it needs to be installed in the system.
Before you build RAID 10 in any way, you should check if there is any metadata on the disks from previously used RAID arrays. To do this:
Step 1: Start a terminal and use the command:
mdadm -E /dev/sd[be]
Step 2: If such blocks are found, you will have to format each of the disks. To do this, use the command:
fdisk /dev/sdb
Step 3: Now use the following keys on your keyboard to format and create new partitions on the disks (after each command press “Enter” to confirm):
- n – to create a new partition;
- p – for selecting a primary partition type;
- 1 – to assign a partition number;
- t – to change the partition ID;
- fd – to change the partition ID on Linux raid autodetect;
- p – to check the results (the partition table is displayed);
- w – to quit and apply changes;
The result should look something like the screenshot below:

This operation should be done for each of the disks. Only then can you start to create a RAID 10 array.
To create a software RAID 10 using the first method, follow a few simple steps:
Step 1: Open the terminal any way you like. To create RAID 10, type the following command (and confirm it by pressing “Enter“):
mdadm —create /dev/md0 —level=10 —raid-devices=4 /dev/sd[b-e]1
where:
- md0 — is our RAID 10 array;
- level=10 — is the type of the created array (in our case RAID 10);
- /dev/sd[b-e]1 — are the devices which will make up the RAID 10 array;
Once this command is finished, your RAID array will be created.
Step 2: Check if your array was successfully created. To do this, use the command:
cat /proc/mdstat
The result should look like the screenshot below:

Your RAID 10 array is ready to use.
If you want to go the other way and create two RAID 1 arrays first and then combine them to RAID 0 (together we get RAID 10) – then after disk formatting perform the following steps:
Step 1: Suppose you have four disks: /dev/sdb and /dev/sdc as well as /dev/sdd and /dev/sde. In order to create two RAID 1 arrays run the following commands:
mdadm —create /dev/md1 —metadata=1.2 —level=1 —raid-devices=2 /dev/sd[b-c]1
mdadm —create /dev/md2 —metadata=1.2 —level=1 —raid-devices=2 /dev/sd[d-e]1
cat /proc/mdstat
As a result, you will get two devices, md1 and md2.
Step 2: Now create RAID 0 from these two arrays. To do this, perform a command in the terminal:
mdadm —create /dev/md0 —level=0 —raid-devices=2 /dev/md1 /dev/md2
Step 3: Just like in the first option, you need to check if everything goes well. To do this, use the command:
cat /proc/mdstat
Step 4: Create a configuration of your RAID 10 array for further reading when you boot the operating system. Use the command:
mdadm —detail —scan —verbose >> /etc/mdadm.conf
All done. Your RAID 10 array is successfully created.
How to create RAID 10 in Windows 10?
The built-in functionality of the Windows operating system does not support creating a RAID 10 array, but you can do something different and first create two RAID 1 arrays and then build a RAID 0 array from them.
First, create two RAID 1 arrays. To do this, follow these steps:
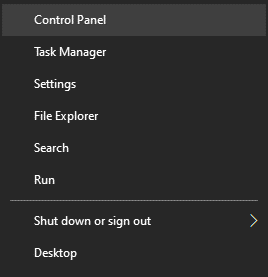
Step 1: Right-click on “Start” and choose “Control Panel“
Step 2: In the window that appears, select “Storage spaces”
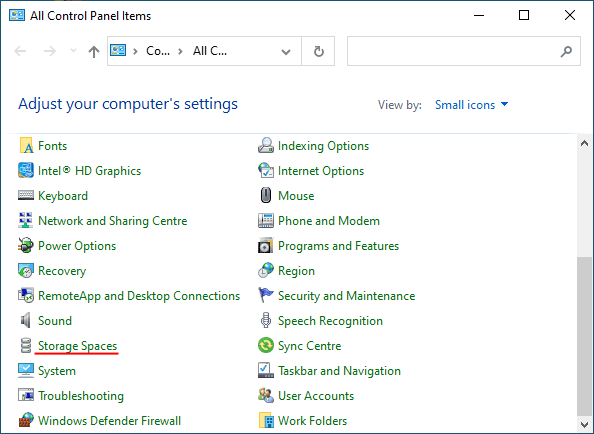
Step 3: Select “Create new pool and storage space“
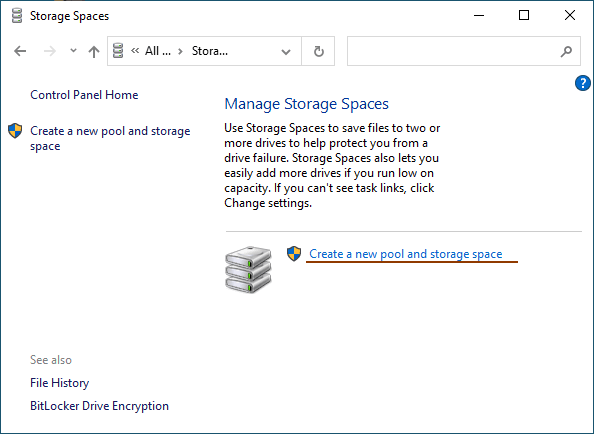
Step 4: Select the disks you want to add to your RAID array.
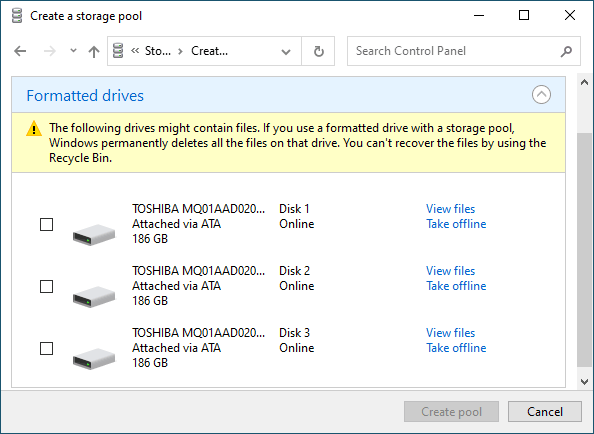
Important: All data on the disks that make up the RAID array will be deleted. So save all important files in advance to a different disk or external storage.
Once you have configured the array, you must give it a name and configure it correctly.
Step 5: In the “Name” field, enter a name for your RAID array.
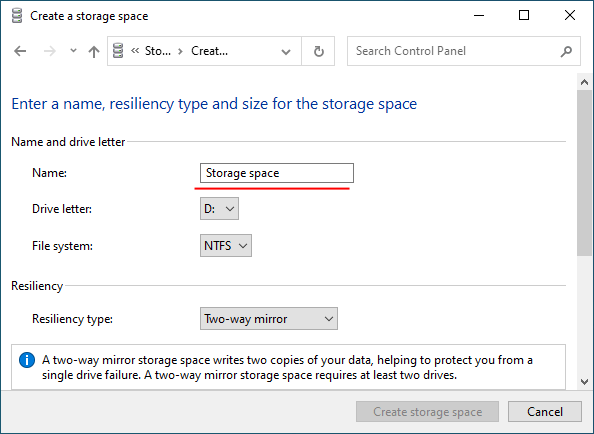
Step 6: Then select a letter and file system for the future RAID array
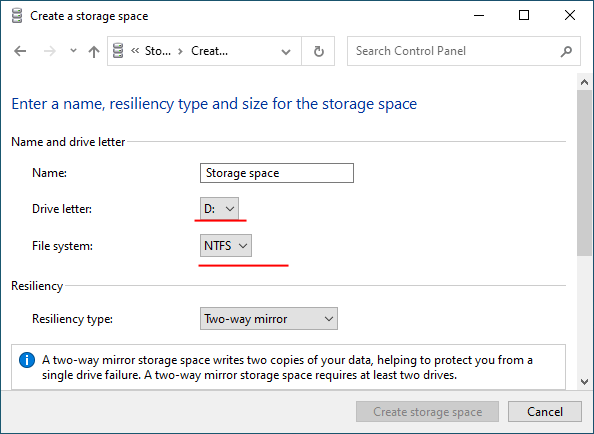
With this name and letter the array will be displayed on the Windows system.
Step 7: Now you have to choose the resiliency type.
- Simple (no resiliency) — is RAID 0;
- Two-way mirror –is RAID 1;
- Three-way mirror — is also RAID 1 (the only difference is the number of copies of the main hard drive);
- Parity — is RAID 5.
We are interested in the second option “Two-Way Mirror“
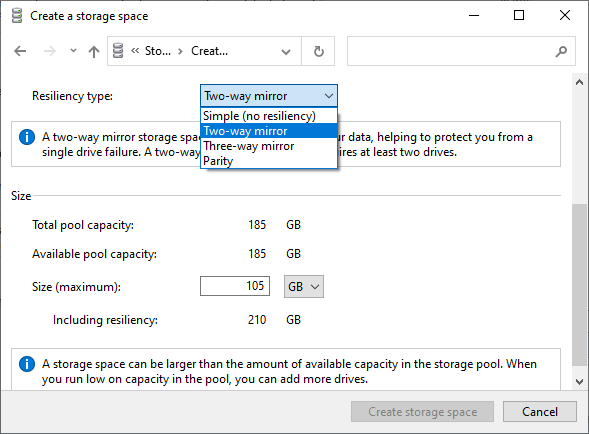
The program will automatically set the maximum available capacity of the disk array.
Usually, this value is a little lower than the actual amount of available data, and you can also set a larger disk space size. Keep in mind, however, that it is done so that you can install additional hard disks when the array is full, without having to rebuild it.
Step 8. Click “Create Storage Space“
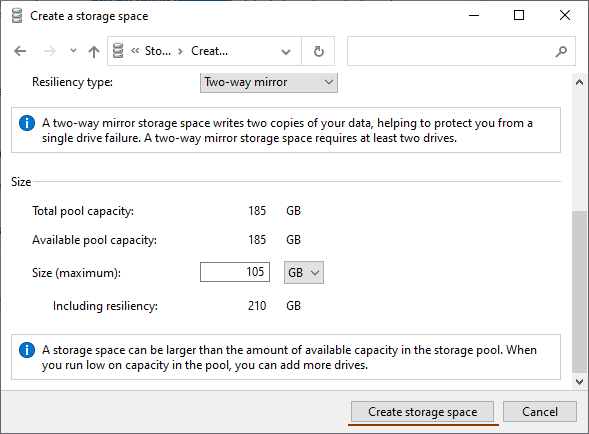
Once the wizard has set up your new RAID, it will be available as a separate drive in the “This PC” window. It will be no different than a regular hard drive, and you can do anything with it.
Perform the same operation for the remaining two disks.
Once both arrays have been created — you can start to combine them into one RAID 0 array.
It is done in the same way as for RAID 1, only now select our arrays instead of regular disks and in the step of selecting resilience type select “Simple (no resilience)” instead of the two-way mirror.
Once the array creation process is complete, you will have a RAID 10 array ready to go.
The main causes of RAID 10 failure
Using RAID 10 raises the level of data security to a new level, but there are several reasons why users can still lose important information.
Let’s start with the most common cause – human error. Most often users lose important data due to accidental files deletion, formatting of the array, and other manipulations which make a RAID 10 array inoperable.
Voltage fluctuations and sudden power failure can also cause the loss of important data. The thing is that the array controller is very sensitive to power and since it is responsible for the information distribution between the disks – any failure in its work leads to the loss of the information. In addition, it is worth noting that controllers are not interchangeable, so in the case of failure, even if you replace it with an identical – the array will not work. The whole thing is that the new controller will not have information about where the initial block of information is, and therefore it will not know how to correctly build the array.
It is also worth noting that hardware controllers, although more expensive, but are less sensitive to power surges, while software controllers often fail precisely because of interruptions with electricity.
To avoid problems with the controller (both hardware and software) it is best to use an uninterruptible power supply. Thanks to the built-in battery it allows to save the data and finish the work of the operating system in normal mode in case of a sudden power failure.
Operating system failures also affect the performance of the entire array. Again, everything revolves around the functioning of the controller. If the operating system malfunctions, the system gives the wrong commands to the controller, and the user can lose important information. In some cases, the array becomes completely inoperable. Especially it is actual for software controllers, which work depends on the operating system, and in case of its breakdown, the array falls apart. Even if the user can restore the full work of the OS – the controller can not always be restored. Much depends on the cause of the failure.
Hardware controllers are less sensitive to os failures, but sometimes this failure can corrupt the files in the array.
Therefore, maintain your operating system regularly. This will help to ensure both a high-performance level and avoid data loss in the future.
The functionality of RAID 10 array directly depends on the state of the disks inside. If the number of bad sectors is too high, the controller will either detect the disk as broken or will not be able to build the array at all. It is also worth mentioning that since usually identical disks are used in the array – their lifespan is about the same. Therefore, if one of the drives is failed or there are too many dead sectors on it, it makes sense to check the health of the rest of the disks. On how to do this you can read the article “How to check and fix errors on the hard disk or SSD drive” Otherwise you can lose information.
The actions of viruses can also corrupt or delete the data, as well as cause a RAID 10 array to fail. It all depends on the strength of the infection. If the controller files are corrupted – the array just won’t start and your data will be lost. So regularly scan your system for malware and adware.
Damage to the logical structure of the disks can also lead to RAID 10 array failure. They can occur for a variety of reasons, from viruses to data manipulation. The important thing is that damage to the logical drive structure leads to data loss. So check your drives regularly.
If for any of these reasons your array has stopped working – immediately recover information from the disks, since incorrect attempts to restore the array can lead to irretrievable loss of data.
What to do if your RAID 10 array falls?
RAID arrays emphasize the data importance since they were developed precisely to ensure information safety in case of physical disk failures. However, despite the high level of security, losses do occur. In some cases the cause is a disk failure, in others, it is caused by user actions. However, regardless of the cause – the user loses data that is important to them. Therefore, if your RAID 10 failed you should immediately start data recovery from the disks and only after that perform all sorts of manipulations to restore the array.
The best thing to do is immediately use RS RAID Retrieve — a professional tool for recovering lost data. With support for ALL modern file systems, RS RAID Retrieve is great for recovering lost data from servers, NAS, and other systems. In addition, the program has an intuitive interface, so you do not have any problems during the recovery of the lost information.
To extract data from disks you should:
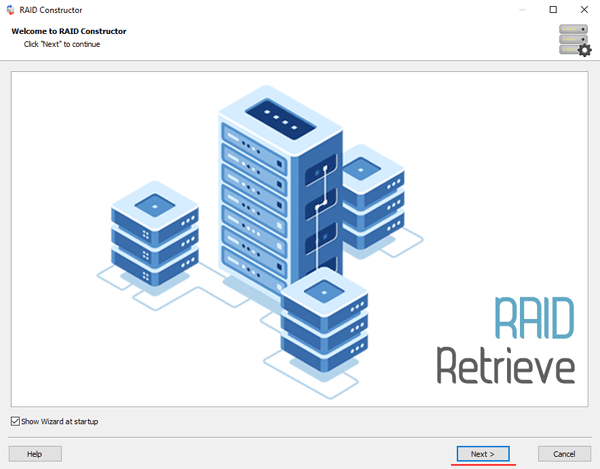
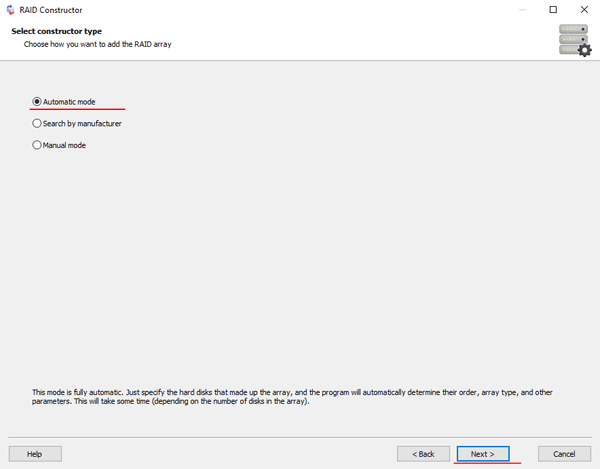
Step 1: Download and install RS RAID Retrieve. Launch the application after installing. The built-in “RAID constructor” will open in front of you. Click “Next“
Step 2: Choose the method of adding a RAID array for scanning. RS RAID Retrieve offers three options to choose from:
- Automatic mode – allows you to simply specify the drives that made up the array, and the program will automatically determine their order, array type, and other parameters;
- Search by manufacturer – this option should be chosen if you know the manufacturer of your RAID controller. This option is also automatic and does not require any knowledge about the RAID array structure. Having the manufacturer’s information allows you to reduce the time to build the array, and is, therefore, faster than the previous option;
- Manual creation – this option is worth using if you know what type of RAID you are using. In this case, you can specify all parameters you know, and those which you do not know – the program will automatically determine
After you select the appropriate option – click “Next“.
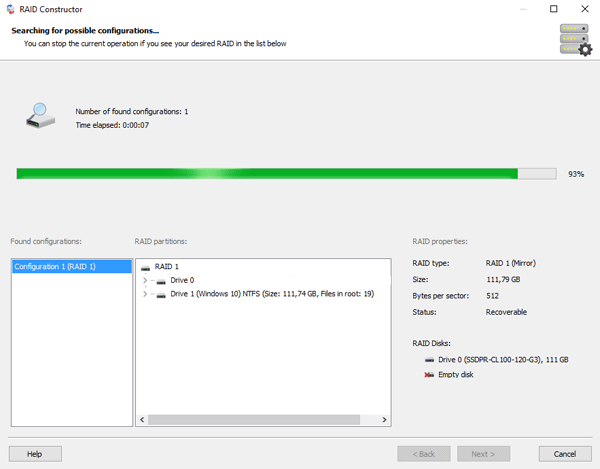
Step 3: Select the disks that make up the RAID array and click “Next“. It will start the process of detecting the array configurations. When it is complete, click “Finish“.
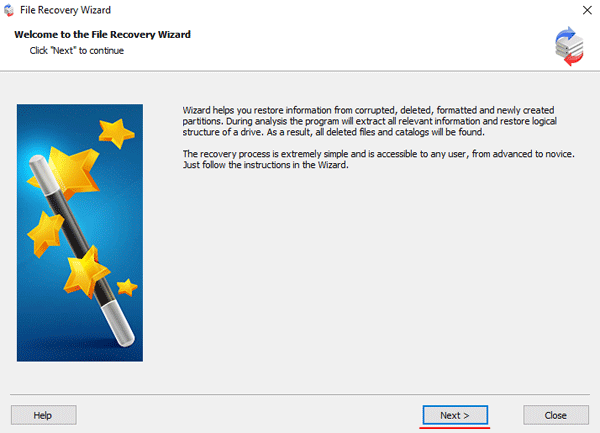
Step 4: After the constructor builds the array – it will appear as a regular drive. Double left-click on it. The File Recovery Wizard will open in front of you. Click “Next“
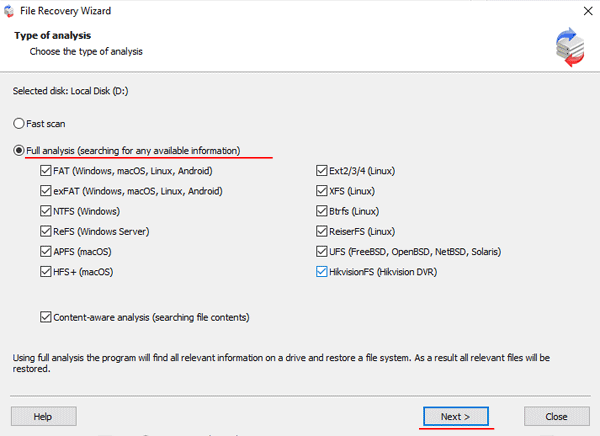
Step 5: RS RAID Retrieve will offer to scan your array for files to recover. You will have two options: a quick scan and a full analysis of the array. Select the desired option. Then select the file system type that was used on the array. If you do not know this information, check all available options, like on the screenshot. It is worth noting that RS RAID Retrieve supports ALL modern file systems.
Step 6: The array scanning process will start. When it finishes, you will see the previous structure of files and folders. Find the necessary files, right-click on them and select “Recovery“

Step 7: Specify the location where the recovered files will be saved. This can be a hard drive, a ZIP-archive, or an FTP-server. Click “Next“
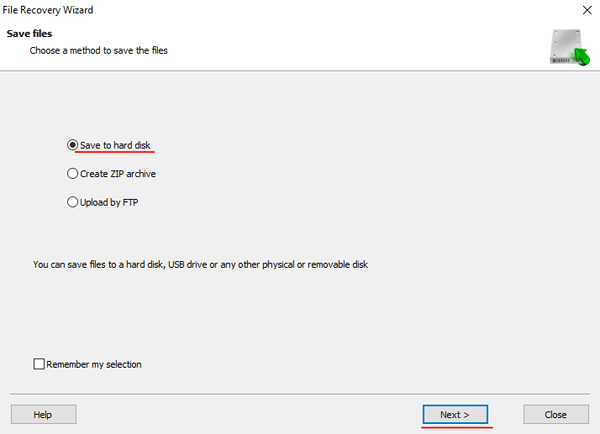
After clicking the “Next” button, the program will begin the recovery process. When it finishes – the selected files will be in the specified location.
After all, files are successfully restored – recreate the RAID 10 array, and then copy the files back.
As you can see, the RAID 10 data recovery process is quite simple and doesn’t require much PC knowledge, making RS RAID Retrieve the perfect application for professionals and novice users alike.

