Using combined arrays allows you to get the most out of each RAID type while minimizing the drawbacks. In this article, we will look at the advantages and disadvantages of RAID 50, and how to recover lost data in case of a RAID failure.

Contents
- RAID 50 -- how it works?
- Disadvantages of RAID 50
- How to create RAID 50 in Windows Server?
- How to create RAID 50 in Linux?
- The main causes of RAID 50 failure
- What to do if your RAID 50 array fails?
Each RAID type has its advantages and disadvantages. But sometimes a user wants to get more out of his RAID array and that is where combined RAID types come in. For example RAID 50 allows combining the advantages of RAID 5 and RAID 0.
RAID 50 — how it works?
RAID 50 works as follows: first, the controller in charge of allocating data between the disks divides the information blocks into two streams (like in RAID 0). The first one is written to the first RAID 5 array and the second one to the other RAID 5 array respectively. The number of streams depends on how many RAID 5 groups are used in the array.
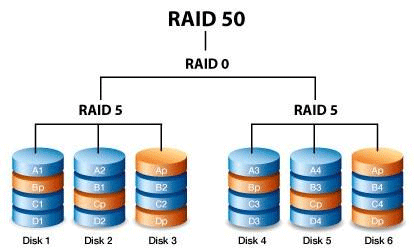
It results in both a high write speed (twice as fast as in a typical RAID 5 since the data is written to two arrays at once) and a high read speed — since data is read from all disks at the same time.
The minimum number of disks for RAID 50 is six. Two of these will be dedicated to parity data (one for each RAID 5 array) and the remaining four will be available to the user.
Hence, RAID 50 will have a read rate similar to RAID 0 with four disks.
In the event of a failure of any of the drives, the data will remain available. Furthermore, the data recovery to a new drive (hot spare) will be somewhat faster than for a regular RAID 5, as only half of the data needs to be recovered (the other half will be on a different array).
It is also worth noting that two or more hot spare disks can be added to RAID 50: one for each RAID 5 array.
One more advantage of RAID 50 is the high level of robustness against the number of failed disks. RAID 5 arrays with a minimum number of disks have no problem with one drive failing. Accordingly, the more RAID 5 arrays used within your RAID 50 array – the more drives will be able to fail without consequences to the array and data integrity. For example, a RAID 50 array with four RAID 5s inside can tolerate four disk failures simultaneously (one per array) without loss of data.
The maximum number of disks is 32.
Disadvantages of RAID 50
RAID 50 also has its disadvantages. Among them, first of all, we should mention the high price of the array. It is not the price per gigabyte, but the minimum number of disks that the user has to buy to be able to build RAID 50. Whereas a normal RAID 5 array can be built with 3 disks, a RAID 50 array needs a minimum of 6 disks. Of these only four will be available to the user.
A RAID 50 array can be built with a software controller without any problems. This is both an advantage and a drawback of RAID 50. The point is that the need to calculate the parity data for each RAID 5 array is a heavy burden on the controller. Accordingly, the more RAID 5 arrays are employed within your RAID 50 system, the greater the strain will be. This is especially true for computers with poor performance, as the controller cannot provide sufficient processing power. This in turn leads to severe performance degradation. In some cases, it even comes to the fact that it becomes impossible to use the array.
Therefore, if you have a weak computer or laptop it is better to spend some money and buy a hardware controller which can provide the correct performance to work properly with RAID 50.
Before purchasing a hardware controller you can create a RAID 50 array on a software controller and test if your computer can provide the needed performance or if you have to use a hardware controller.
The next part of this article will tell you how to build a software RAID 50 array.
The other drawback of RAID 50 is that it is somewhat more difficult to create such an array than regular RAID 5. This is especially true for the Windows operating system where it is not possible to create a RAID 50 array using only the system’s built-in functions.
An interesting thing is that in some cases the array can survive three disk failures and in other cases, two broken disks will result in a loss of data.
It all depends on which disks will fail. If two disks of the same group fail, then the data will be lost (since RAID 5 can only survive the failure of one disk). However, if one disk in each group fails, the array will continue its function. The user will only notice the corresponding notification and performance degradation.
Despite simultaneous data reading/writing, RAID 50 will be limited to the slowest array due to the nature of information dividing (as in RAID 0). Accordingly, if any of the disks fails, the performance of the entire array will be reduced.
One of the most important drawbacks of RAID 50 is the impossibility to replace the hard drive if it fails. It is all about the peculiarities of the array controller. To create a RAID 50 array you must first create two (or more) RAID 5 arrays and then combine them into a RAID 0 array. If one of the disks fails – the controller will not know how to add a new disk and then how to rebuild the array correctly.
Therefore it is highly recommended to use hot spare disks for each disk group. In case of failure of any of the hot spare drives, the drive will automatically be added to the array without losing any data. Otherwise, the user will be forced to use the remaining array of resources.
How to create RAID 50 in Windows Server?
In Windows Server, only RAID 0, RAID 1, and RAID 5 can be created using the built-in tools. However, users can use a little trickery and create two RAID 5 arrays first and then combine them into RAID 0.
So, first of all, create RAID 5 arrays. To do this, follow a few simple steps:
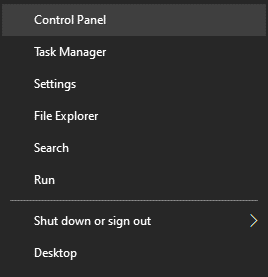
Step 1: Right-click on “Start” and choose “Control Panel“
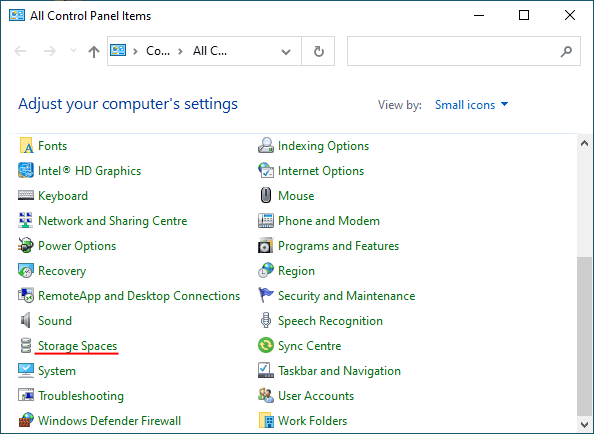
Step 2: In the window that appears, select “Storage spaces”
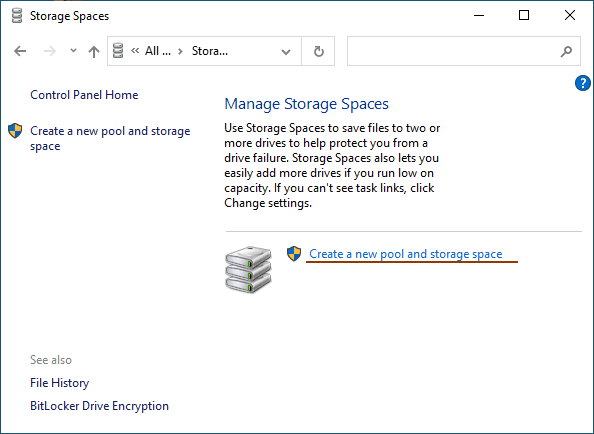
Step 3: Select “Create new pool and storage space“
Step 4: Select the disks you want to add to your RAID array.
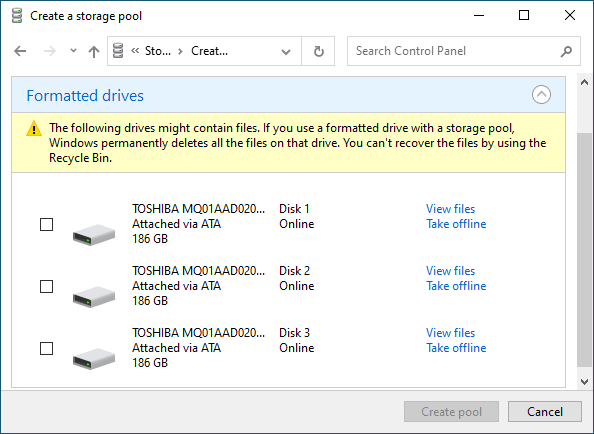
Important: All data on the disks that make up the RAID array will be deleted. So save all important files in advance to a different disk or external storage.
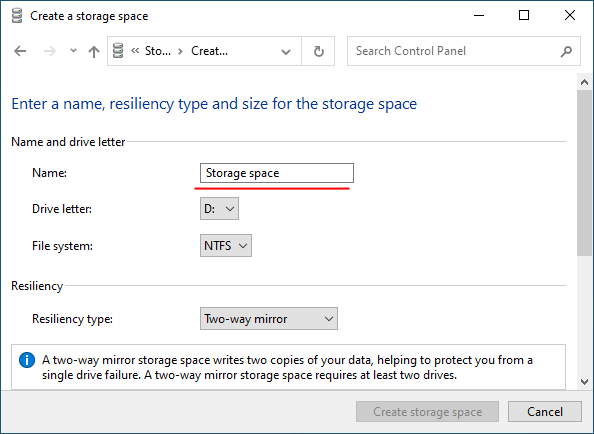
Once you have configured the array, you must give it a name and configure it correctly.
Step 5: In the “Name” field, enter a name for your RAID array.
Step 6: Then select a letter and file system for the future RAID array
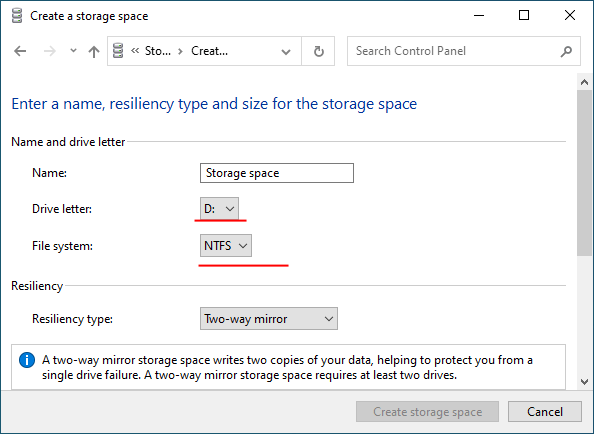
With this name and letter the array will be displayed on the Windows Server operating system.
Step 7: Now you have to choose the resiliency type.
- Simple (no resiliency) — is RAID 0;
- Two-way mirror –is RAID 1;
- Three-way mirror — is also RAID 1 (the only difference is the number of copies of the main hard drive);
- Parity — is RAID 5.
We are interested in the last option “Parity“
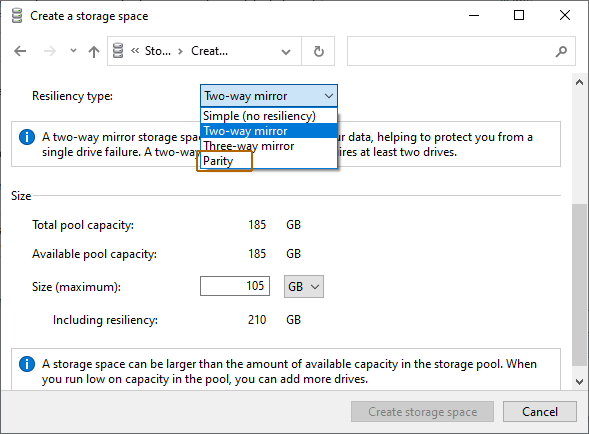
The program will automatically set the maximum available capacity of the disk array.
Usually, this value is a little lower than the actual amount of available data, and you can also set a larger disk space size.
Step 8. Click “Create Storage Space“
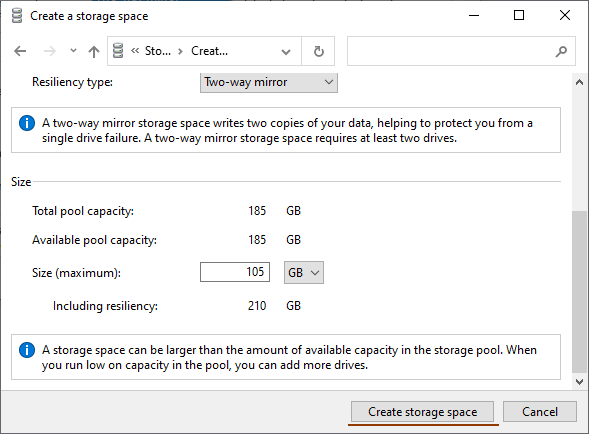
Once the wizard has set up your new RAID, it will be available as a separate drive in the exploer. It will be no different than a regular hard drive, and you can do anything with it.
Repeat these steps for each disk group.
Once you have created several RAID 5 arrays, you need to combine them into RAID 0.
It is done in the same way as RAID 5, only now select the newly created arrays instead of the regular disks, and choose “Simple (no reciliency)” instead of “Parity” in the type of reciliency step.
Once the array creation process is complete, you will have a complete RAID 50 array ready to go.
How to create RAID 50 in Linux?
You can create a software RAID 50 in Linux using the “mdadm” utility (it must be installed on your system).
Before you build RAID 50 you should check if there is any metadata on the disks from previously used RAID arrays. To do this:
Step 1: Open a terminal and use the command:
mdadm -E /dev/sd[be]
Step 2: If such blocks are found, you will have to format each of the disks. To do this, use the command:
fdisk /dev/sdb
Step 3: Now use the following keys on your keyboard to format and create new partitions on the disks (after each command press “Enter” to confirm):
- n – to create a new partition;
- p – for selecting a primary partition type;
- 1 – to assign a partition number;
- t – to change the partition ID;
- fd – to change the partition ID on Linux raid autodetect;
- p – to check the results (the partition table is displayed);
- w – to quit and apply changes;
The result should look something like the screenshot below:

This operation should be done for each of the disks. Only then can you start to create a RAID 50 array.
You can now start creating RAID 50. Suppose you have six disks: /dev/sdb1, /dev/sdc1, /dev/sdd1, and /dev/sde1, /dev/sdf1, /dev/sdg1. From them as well as in Windows we will first create two RAID 5 arrays and then combine them into RAID 0.
To create RAID 50 follow:
Step 1: Launch a terminal and run the following two commands, hitting “Enter” after each to confirm:
mdadm —create —verbose /dev/md1 —level=5 \ —raid-devices=3 /dev/sdb1 /dev/sdc1 /dev/sdd1
mdadm —create —verbose /dev/md2 —level=5 \ —raid-devices=3 /dev/sdу1 /dev/sdf1 /dev/sdg1
Step 2: Now let’s create a RAID 0 from these two arrays. To do that perform a command in the terminal:
mdadm —create /dev/md0 —level=0 —raid-devices=2 /dev/md1 /dev/md2
Step 3: Create a configuration of your RAID 50 array for later reading it when you boot your operating system. Use the command:
mdadm —detail —scan —verbose >> /etc/mdadm.conf
All done. Your RAID 50 array has been successfully created.
The main causes of RAID 50 failure
Despite the high level of data integrity, RAID 50 can still crash. There are several reasons for this:
1) The first and most common cause of RAID 50 failures is human error. Most often users accidentally delete important information, format the disk, or do things that cause the array to re-initialize or crash. So when working with RAID 50 you should only do what you think is best and if you are unsure, check the Internet for more information or read the manual for your controller if it comes with one.
2) Controller failures can also lead to RAID 50 failures and data loss. The reason is that the controller is responsible for distributing data between the disks and calculating parity. Therefore, if something happens to it – the data will be lost. It is also worth mentioning that controllers are not interchangeable and replacement with a new one (even if it is completely identical) will not be successful, because the new controller will not have information on how to correctly build the array (location of the initial block etc). This problem is especially true for software controllers, which are highly dependent on the performance of both hardware and software. So to avoid problems with your controller, keep an eye on both the operating system and the physical state of your computer (use dusting, changing thermopaste, etc.).
3) Viruses and adware can also affect RAID 50 performance. For example, if your array is built on a software controller – viruses can corrupt the controller files, which will invariably lead to data loss. Also, viruses can delete or corrupt files on the drives, making them unreadable. To prevent this from happening, scan your array regularly with an anti-virus. You can use both paid and free anti-viruses for this (Avast, NOD 32, etc.).

4) The physical state of the disks directly affects RAID 50 performance. Too many bad sectors on the disk can cause the array to fail. Sometimes because of too many errors the controller sees the disk as broken or can’t build the array at all. So periodically check the state of your disks and fix any errors found. You can read about how to do this in the article “How to check and fix disk errors?” It is also worth saying that if any of the disks in the array is in bad shape – it makes sense to check all other disks for bad sectors, as the array usually uses identical disks, and therefore their life cycle is about the same.
5) It is not uncommon for a RAID 50 array to fail due to power surges and sudden power outages. Hardware controllers are usually more sensitive to power surges. They can cause the chips that control the array to fail. Whereas software controllers more often fail because of sudden power failure, although voltage fluctuations have no less effect on them than on hardware controllers. Also, sometimes there are cases when a group of disks can fail due to power problems, which can lead to irretrievable data loss. Therefore, to avoid losing data, take care of an uninterruptible power supply. It is usually not too expensive and avoids many problems with your array.
6) The operating system processes user requests and commands the controller to read certain files from the array or write new files to it. Therefore, failures in the operating system can disrupt the performance of the array. In addition, there have been cases where OS failures have made files unreadable or disappeared altogether. Software controllers are built completely on the operating system, so any malfunction of the operating system has an impact on the performance of the entire RAID 50 array. Perform regular maintenance on the operating system. By doing so you can ensure both a high level of system performance and avoid data loss.
7) Damaged logical structure of the disk can also cause RAID 50 to fail. The matter is that if the disk has faults in its logical structure the controller will not be able to work with the disk correctly, and this will severely affect the performance of the array (or the controller will detect a faulty disk, or will not be able to build the array at all). So check the condition of your disks regularly.
8) Often users get a non-functional array due to damaged connection cables. This usually happens after routine maintenance. The wizard may accidentally damage the cable or fail to tighten it, and the controller can’t find the drive and can’t reassemble the array. Only have your RAID 50 serviced by a quality service that can guarantee the quality of the work done.
What to do if your RAID 50 array fails?
If your RAID 50 fails, it is important to know what steps to take to avoid losing important data. The first thing to do is to take care of data security, and only then proceed to repair the array. So as soon as your array fails, extract the data from the disks immediately. Use RS RAID Retrieve, professional software for recovering lost data. The program is easy to use and supports ALL modern file systems, which means it’s great for anyone, regardless of their PC knowledge or the device the array was running on.
So, in order to retrieve data you should:
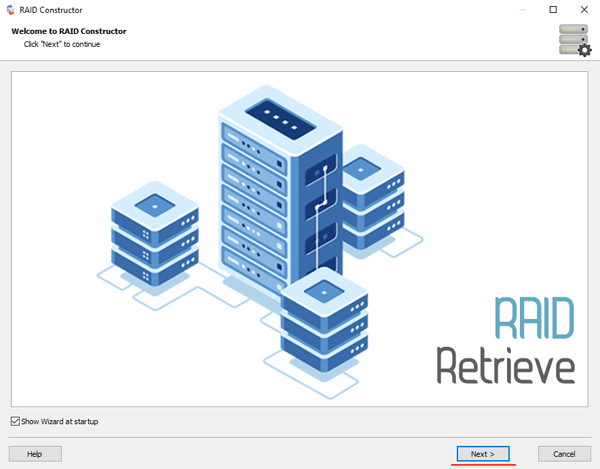
Step 1: Download and install RS RAID Retrieve. Launch the application after installing. The built-in “RAID constructor” will open in front of you. Click “Next“
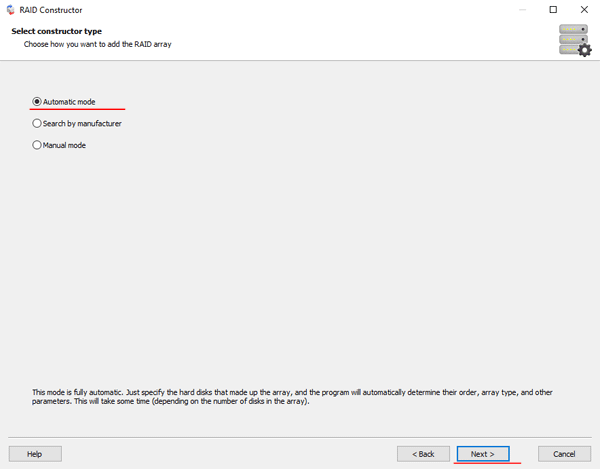
Step 2: Choose the method of adding a RAID array for scanning. RS RAID Retrieve offers three options to choose from:
- Automatic mode – allows you to simply specify the drives that made up the array, and the program will automatically determine their order, array type, and other parameters;
- Search by manufacturer – this option should be chosen if you know the manufacturer of your RAID controller. This option is also automatic and does not require any knowledge about the RAID array structure. Having the manufacturer’s information allows you to reduce the time to build the array, and is, therefore, faster than the previous option;
- Manual creation – this option is worth using if you know what type of RAID you are using. In this case, you can specify all parameters you know, and those which you do not know – the program will automatically determine
After you select the appropriate option – click “Next“.
Step 3: Select the disks that make up the RAID array and click “Next“. It will start the process of detecting the array configurations. When it is complete, click “Finish“.
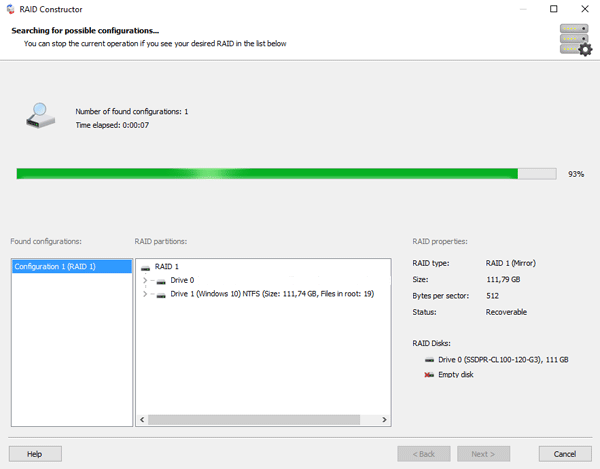
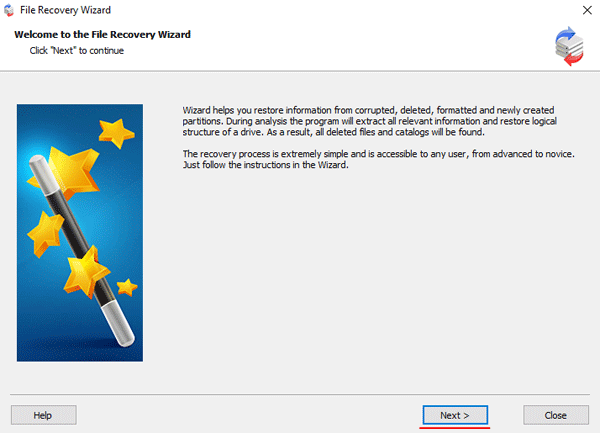
Step 4: After the constructor builds the array – it will appear as a regular drive. Double left-click on it. The File Recovery Wizard will open in front of you. Click “Next“
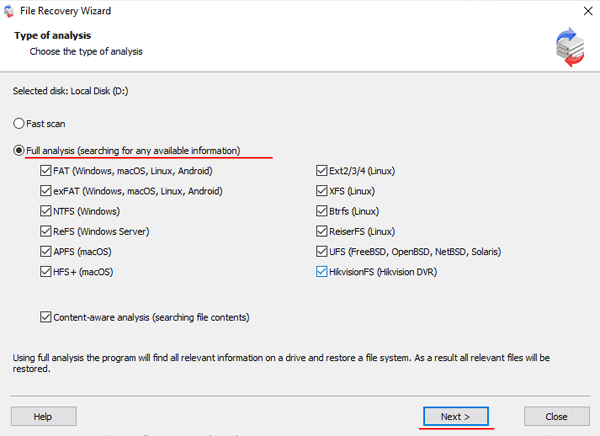
Step 5: RS RAID Retrieve will offer to scan your array for files to recover. You will have two options: a quick scan and a full analysis of the array. Select the desired option. Then select the file system type that was used on the array. If you do not know this information, check all available options, like on the screenshot. It is worth noting that RS RAID Retrieve supports ALL modern file systems.
Step 6: The array scanning process will start. When it finishes, you will see the previous structure of files and folders. Find the necessary files, right-click on them and select “Recovery“

Step 7: Specify the location where the recovered files will be saved. This can be a hard drive, a ZIP-archive, or an FTP-server. Click “Next“
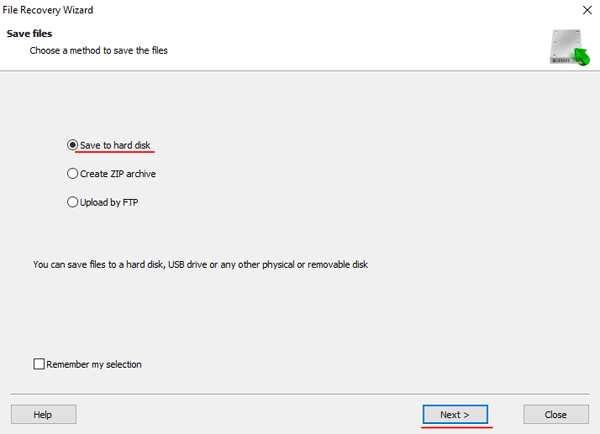
After clicking the “Next” button, the program will begin the recovery process. When it finishes – the selected files will be in the specified location.
After all, files are successfully restored – recreate the RAID 50 array, and then copy the files back.
As you can see, the RAID 50 data recovery process is quite simple and doesn’t require much PC knowledge, making RS RAID Retrieve the perfect application for professionals and novice users alike.

