The intensive development of Internet technologies has forced everyone to look at data security from a completely different angle since the consequences of losing important information can be measured in thousands and even hundreds of thousands of dollars. It led to the appearance of disk RAID arrays whose main purpose is to prevent data loss in case of hard drive failure. In this article, we will find out how to recover important data if a RAID 6 array fails.

Contents
- How RAID 6 works?
- RAID 5 vs. RAID6 - which is better to choose?
- How to create a RAID 6 array?
- The main causes of RAID 6 failure
- How to recover lost data from RAID 6 array?
How RAID 6 works?
The RAID 6 array works on the same principle as RAID 5. It means that all data is distributed between the disks evenly, including the parity information used if one of the disks fails. RAID 6, however, needs two disks instead of one to store the parity data. The point is that during the parity calculation this information is written on two random disks at the same time. It allows you to keep the data in case of a failure of two drives at once because you will have either one copy of the parity data or the data itself.
In addition, during data recovery, as well as in RAID 5, the load on the hard drives will be distributed evenly. It has a positive effect on the lifetime of the drives. The minimum number of disks to create a RAID 6 array is four, two of which will be allocated to store checksums, and the maximum is limited to sixteen.
RAID 5 vs. RAID6 – which is better to choose?
Since RAID5 and RAID 6 are similar, users often have a question about which of these two RAID levels to choose? To answer this question, we must first look at the advantages and disadvantages of both arrays and make conclusions based on this data. How RAID 5 works are described in detail in the article “How to Recover Lost Data from a RAID 5 Array?“
So, let’s start by comparing the speed of both arrays. RAID 5 is fast enough to provide optimal read/write speed and to handle multiple input/output requests by alternating the parity data. That is, all drives are accessed simultaneously. It also allows the highest possible read performance, essentially like RAID 0.
RAID 6 offers all the same benefits as RAID5 except for the write speed. The reason is that RAID 6 uses a more complex checksum algorithm and the parity data is written twice. This puts a great load on the controller and performance is degraded. RAID 6 is usually 10-15% slower than RAID5. Also, while RAID 5 requires a significant amount of time to rebuild the array in the event of a disk failure, RAID 6 will take even longer to rebuild due to the double checksum recalculation.
Speaking of price, RAID 5 is also advantageous since only one disk is used to store the parity data. Moreover, to build a RAID 6 array you need at least four disks, which is not very cost-effective for the average user.
When it comes to data security it is clear that RAID 6 is more secure than RAID 5. Firstly, it can survive the failure of two disks at once without losing information. Secondly, because of the two copies of parity data the risk of losing important data is several times lower than in RAID 5.
So, all things considered, it is safe to conclude that RAID 6 is suitable for servers where a high level of reliability is needed. For general users, RAID 5 is better suited due to its lower cost and higher speed.
How to create a RAID 6 array?
Both hardware and software controllers can be used to create a RAID 6 array. It all depends on the needs and financial capabilities of the user. However, if you decide to create a software RAID 6 – you should take into account that the double parity recalculation is very stressful for the controller. Accordingly, on weak computers and budget laptops, it is not always possible to obtain a high level of performance. Moreover, if you are running a Windows operating system you will need to use the third-party software since the built-in Windows features allow you to create the RAID 0, RAID 1, and RAID 5 only.
Linux is a bit different and software RAID 6 can be created using a terminal or a graphical shell called “Webmin“.
Webmin is a handy control panel accessible via a web browser, and Webmin modules are the front-end to the console utilities.
A superuser account must be used to install it.
It is worth noting that installation of this utility is possible either through the terminal or through the Software Center (if such is available in your system). The second option is much easier – just download the Webmin package from the official website and open it in the Application Center.
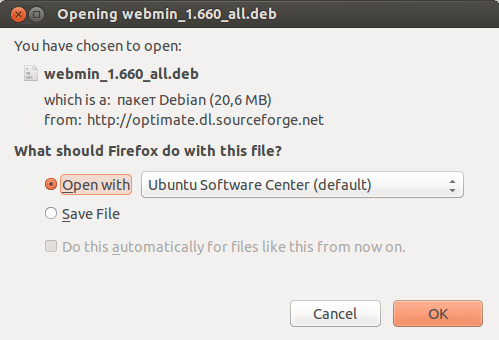
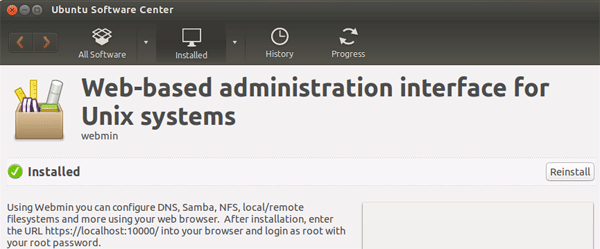
After downloading the installation package, Webmin and the modules required to fulfill the dependencies will be installed, which will be reflected in the Software Center with the status “Installed“
If you use a terminal to install the Webmin package – then follow these steps:
Step 1: Start the terminal, type the command sudo apt-get install perl libnet-ssleay-perl openssl libauthen-pam-perl libpam-runtime libio-pty-perl libdigest-md5-perl and press “Enter“. If necessary, type your password and hit “Enter” again. This command will install the packages needed for Webmin to work.
Step 2: Add a Webmin repository so that you can install and update Webmin using your package manager. To do this, add the repository to the file /etc/apt/sources.list If there is no such file, create one.
Step 3: Open sources.list file with any text editor and add the line # Repository for Webmin deb http://download.webmin.com/download/repository sarge contrib at the end
Step 4: Type the command $ sudo apt-get update and press “Enter” to update the package index of our system.
Step 5: After that, download the Webmin PGP key using wget and add it to your system key list. To do this, run the command $ wget -q -O- http://www.webmin.com/jcameron-key.asc | sudo apt-key add
Step 6: Now update your package list to add the Webmin repository that your system now trusts. To do this, type the command $ sudo apt update again and press “Enter“
Step 7: All that remains is to install the Webmin package. Type in the terminal command $ sudo apt install webmin and press “Enter” again.
After performing these steps, the Webmin package will be installed and available for use.
To create a RAID-6 array you should:
Step 1: Run Webmin by typing in the url address: https://localhost:10000 and pressing “Enter” (please note that you must type in https:// and not http://) You will see the Webmin interface.
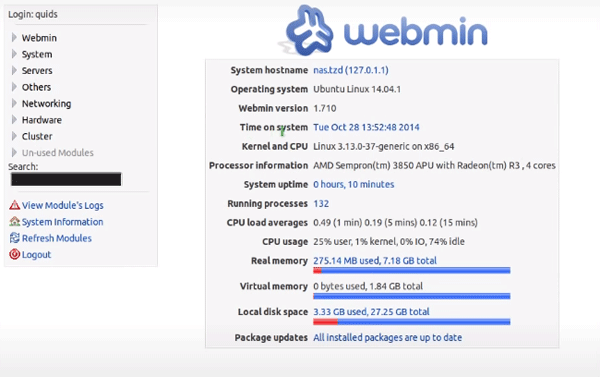
Step 2: On the left side of the browser window you will see the Webmin menu. Choose “Hardware” and click on “Linux RAID” in the list that appears
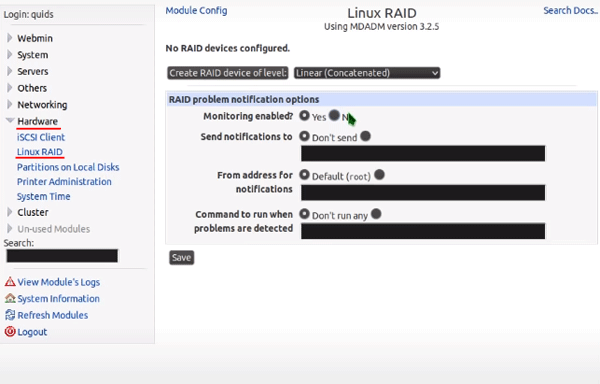
Step 3: Click on “Linear (Concatenated)” and choose the RAID 6 type. Confirm by pressing the “Save” button.
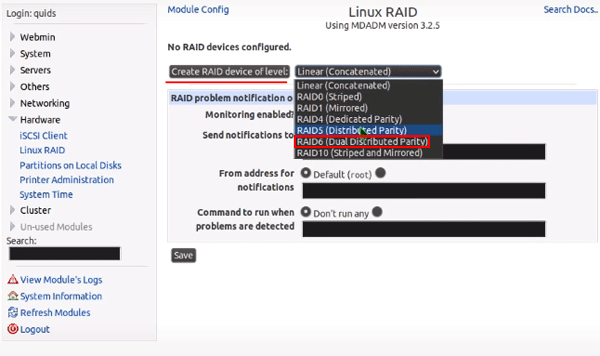
Step 4: In this step select the disks that will make up our RAID array. Leave all other settings as they are. Be sure to check that the “Force initialization of RAID” function is enabled as it is responsible for whether our array will build automatically after system reboot and click “Create“
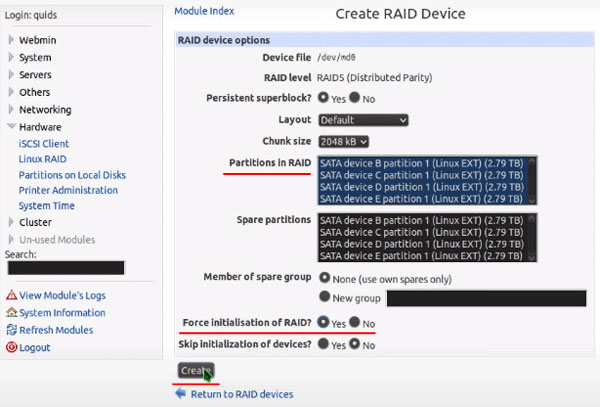
After that, your RAID 6 array will be created and ready to use.
The main causes of RAID 6 failure
Despite the highest level of data security, achieved by using RAID 6, there are a few reasons why users can lose important information.
The first and one of the most common reasons is voltage fluctuations and sudden power failure. Hardware controllers are less sensitive to sudden power outages, but they are significantly more expensive. Software controllers are more sensitive to sudden power outages and surges, but users often choose them due to their low price, as it is possible to create a software RAID 6 array on almost any computer without additional equipment. However, it is highly recommended to use an uninterruptible power supply when working with both software and hardware controllers. It will noticeably extend the life of your array.

One more reason for RAID 6 failure is the array controller fails, and since it is responsible for the array assembling and data distribution, it is the most vulnerable place in the array. If this situation happened to you – you should immediately begin to recover lost data, because even after replacing the controller with a new one – the data will not be available for two reasons: firstly the controllers are not interchangeable, and secondly – the new controller will not be prescribed the location of the initial information block, respectively it will not be able to correctly build the array. In addition, often after replacing the controller the process of creating a new array begins, which necessarily leads to data loss.
If your RAID 6 array successfully worked for several years and after the next reboot it can’t reassemble – the reason could be too many bad sectors on the disk. Hard drives and SSD disks have certain lifespans. Of course, this largely depends on the manufacturer of the drive, the price, the quality of service, etc. However, even if you have bought expensive delirious drives – you need to service them regularly, to prolong the life of your array. The fact is that if your disks are in too bad condition, the controller will either detect a failure of one or two disks or will not be able to build the array at all due to reading errors. So service your RAID 6 regularly. You can either do it yourself or ask a professional to do it for you. If you decide to service your array yourself, read the article “How to check the health of your disk and fix errors?” There you will find a lot of useful information.
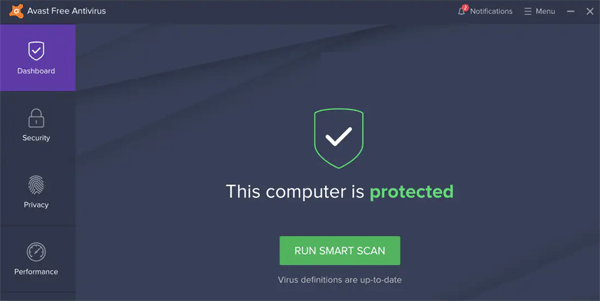
Viruses and adware are one of the most common causes of RAID failure. The whole point is that viruses can delete or move the information needed for a RAID 6 array to work correctly, and even if your array is perfectly fine on the hardware level, viruses can delete important files and make the whole array non-functional. It is especially true for OS Windows (Windows Server) since there are millions of viruses for this operating system because of its popularity among users. Therefore, regularly scan your array and operating system for malware, because otherwise your data might be lost or fall to third parties.
Array reassembly errors on reboot also cause data loss. The cause may be damaged connection cables, incorrectly connected disks, broken logical structure of the disks, etc. Most often this error occurs after service maintenance because at that time the system is cleaned from dust, and sometimes the specialist can either accidentally hit the connection cable or doesn’t tighten it and the array can’t be reassembled.
The functionality of a RAID 6 array greatly depends on how the operating system works. It is especially true for software controllers, as the array is often created using the functionality of a particular operating system. It means that if critical failures occur in the operating system – the software controller will automatically stop functioning. And even if the user will able to restore the operating system – the software controller does not always continue to work. It all depends on what kind of error it was and whether it damaged the controller files. Hardware controllers are less sensitive to OS failures, but sometimes errors in the operating system lead to accidental deletion or corruption of information. Therefore, keep an eye on the state of your operating system and maintain it regularly. It will help to avoid many problems in the future.
The last and most common cause of data loss on RAID 6 is human error. Often users accidentally delete important data, format the array or perform actions that either result in losing important information or damaging the entire array.
Using a licensed operating system and licensed software, regular virus checks, and good maintenance of the operating system and the entire array — is the key to extending the life of your RAID 6 array many times over.
How to recover lost data from RAID 6 array?
Information is so ingrained in our lives that its loss often has huge consequences. Bank accounts, financial statements, personal user data – all of this is information that can often be worth millions of dollars. Despite the high level of data security that RAID 6 provides – as you can see from the previous paragraph in this article – data can still be lost. Fortunately, it is possible to recover lost data, but the user needs to know how to proceed and what to do to successfully recover important information.
The most important thing to do is not to perform any manipulations with the data to avoid damaging it. The best thing to do right away is to use RS RAID Retrieve — a professional software for recovering lost data from RAID arrays.
RS RAID Retrieve supports ALL modern file systems, so no matter what system was used when working on the array – you will be able to recover lost information. Moreover, it has an intuitive interface, which means you won’t have any problems using it no matter what level of PC knowledge you have.
Before you start recovering lost data – first fix the physical problem of the disks in the array (if this is the cause). Then connect all the disks to your working computer and follow a few simple steps:
Step 1: Download and install RS RAID Retrieve. Launch the application after installing. The built-in “RAID constructor” will open in front of you. Click “Next“
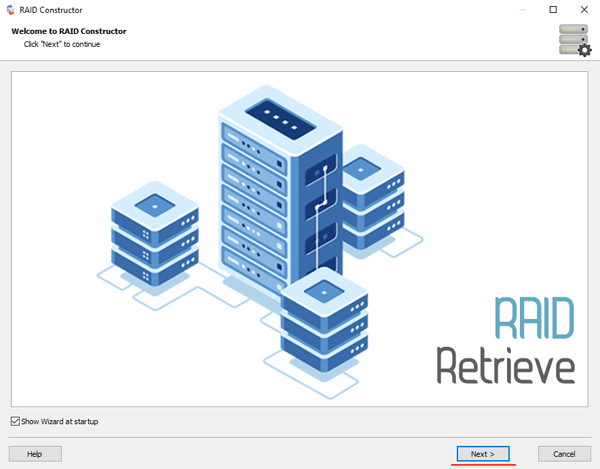
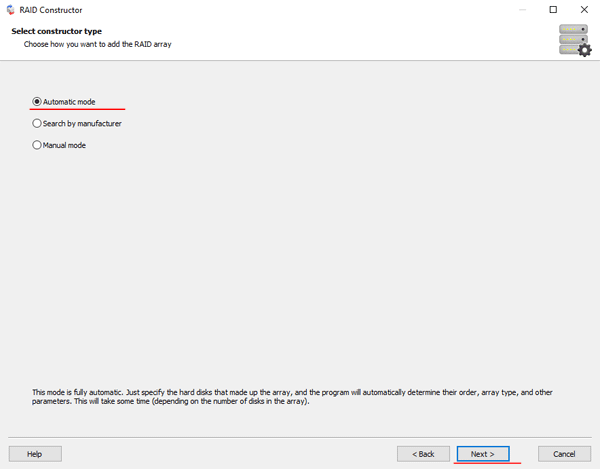
Step 2: Choose the method of adding a RAID array for scanning. RS RAID Retrieve offers three options to choose from:
- Automatic mode – allows you to simply specify the drives that made up the array, and the program will automatically determine their order, array type, and other parameters;
- Search by manufacturer – this option should be chosen if you know the manufacturer of your RAID controller. This option is also automatic and does not require any knowledge about the RAID array structure. Having the manufacturer’s information allows you to reduce the time to build the array, and is, therefore, faster than the previous option;
- Manual creation – this option is worth using if you know what type of RAID you are using. In this case, you can specify all parameters you know, and those which you do not know – the program will automatically determine
After you select the appropriate option – click “Next“.
Step 3: Select the disks that make up the RAID array and click “Next“. It will start the process of detecting the array configurations. When it is complete, click “Finish“.
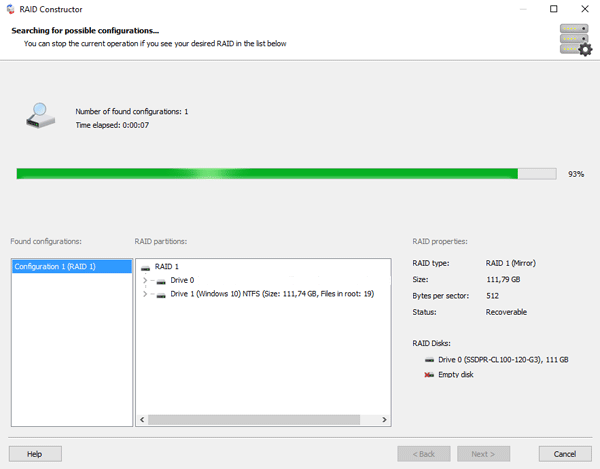
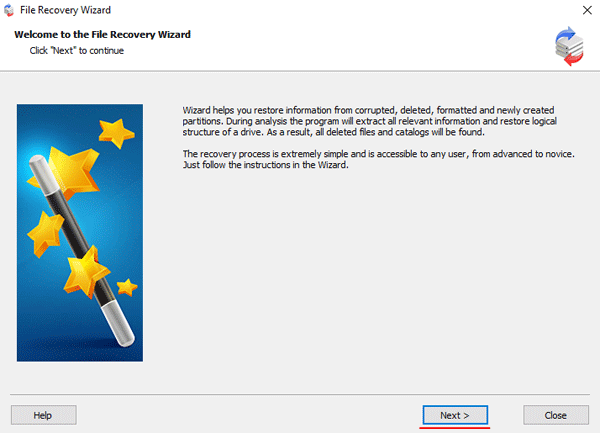
Step 4: After the constructor builds the array – it will appear as a regular drive. Double left-click on it. The File Recovery Wizard will open in front of you. Click “Next“
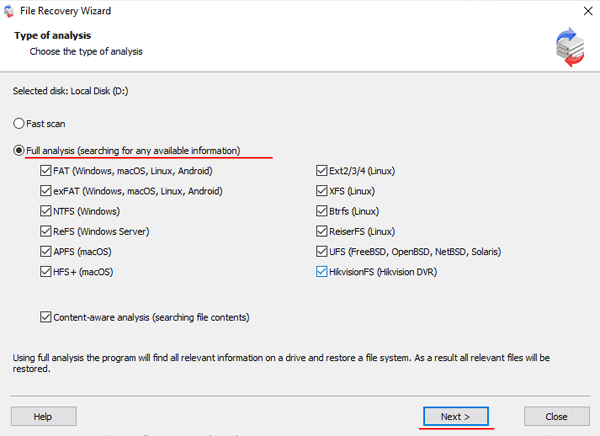
Step 5: RS RAID Retrieve will offer to scan your array for files to recover. You will have two options: a quick scan and a full analysis of the array. Select the desired option. Then select the file system type that was used on the array. If you do not know this information, check all available options, like on the screenshot. It is worth noting that RS RAID Retrieve supports ALL modern file systems.
Step 6: The array scanning process will start. When it finishes, you will see the previous structure of files and folders. Find the necessary files, right-click on them and select “Recovery“

Step 7: Specify the location where the recovered files will be saved. This can be a hard drive, a ZIP-archive, or an FTP-server. Click “Next“
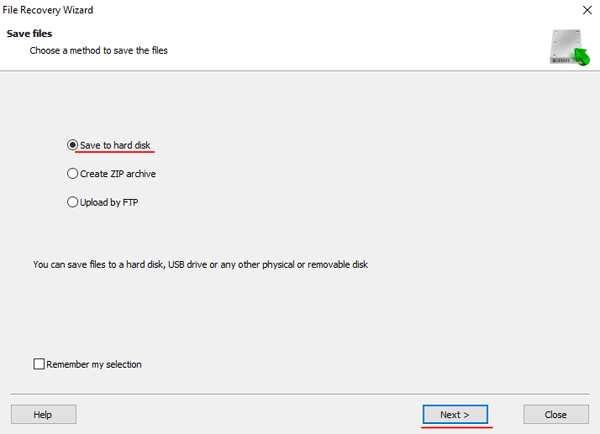
After clicking the “Next” button, the program will begin the recovery process. When it finishes – the selected files will be in the specified location.
After all, files are successfully restored – recreate the RAID 6 array, and then copy the files back.
As you can see, the RAID 6 data recovery process is quite simple and doesn’t require much PC knowledge, making RS RAID Retrieve the perfect application for professionals and novice users alike.

