Probably every user has faced the paradox that no matter how huge is the size of the C drive, there comes a day when it starts to be catastrophically lacking space. In this article, we will consider how to correctly increase C drive space from another drive in Windows without losing data.
Contents
- Why increase the size of the C drive?
- Increasing the size of the C drive at the expense of the D drive using Windows built-in tools
- Using third-party software to increase the size of the C drive at the expense of the D drive
- What to do if important data is lost while increasing the size of the C drive?
Why increase the size of the C drive?
More often than not, you have to change the disk size if when installing the Windows operating system you have miscalculated the system disk size and in time the free space on the C disk starts to be insufficient. Also when you buy a PC – often the disk is partitioned in a bad way: either there is only one partition with Windows on it, or the system partition size is very small.
In any case, if the system drive C has too little space, then in addition to the messages that there is not enough free space left, which will be shown by Windows, you will also notice a strong decrease in performance.
The thing is that over time, the system disk becomes clogged with a large number of updates, programs, temporary files, and other files necessary for the normal functioning of the operating system. Also, users often have to install additional components so that third-party software can work with the operating system.
Therefore, even after cleaning temporary files with utilities such as CCleaner, you will still need to decide where to get additional free space from.
Fortunately, if there is enough free space on the other local drive, you can easily “give” it to the system drive (usually the C drive). Read below how you can do that.
Increasing the size of the C drive at the expense of the D drive using Windows built-in tools
The Windows operating system has a built-in “Disk Management” tool that can be used to increase the size of the C drive at the expense of the D drive. To use it you need to:
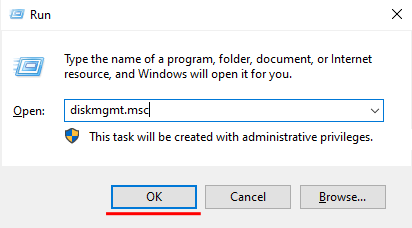
Step 1: Right-click on the “Start” button and select “Disk Management”. You can also use the key combination “Win + R” and in the window that will open type “diskmgmt.msc” and click “OK”
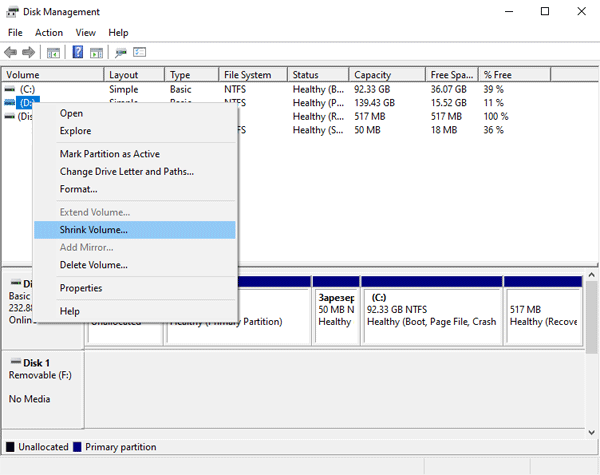
Step 2: The main window of the “Disk Management” program will open in front of you. Select the volume that has free space to shrink it for later attachment to the “C:\” volume. Right-click on it and select “Shrink volume”.
Step 3: Now you need to specify how much free space you want to take from the disk (in our case we entered a figure of 5000 MB (i.e. 5 GB)) and click “Shrink”
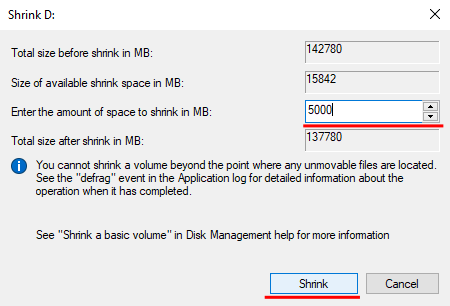
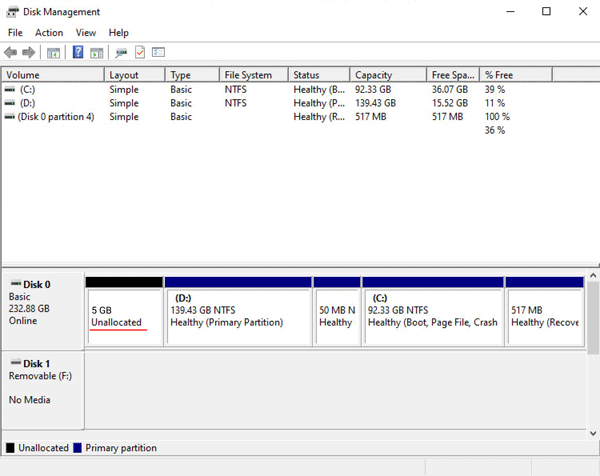
After the partition has been compressed a new “Unallocated space” appears in “Disk Management”. This is the space that can be attached to the other disk partition.
Step 4: Now we need to add “Unallocated” space to our C:\ drive. To do this, right-click on the C drive and select “Extend Volume”.

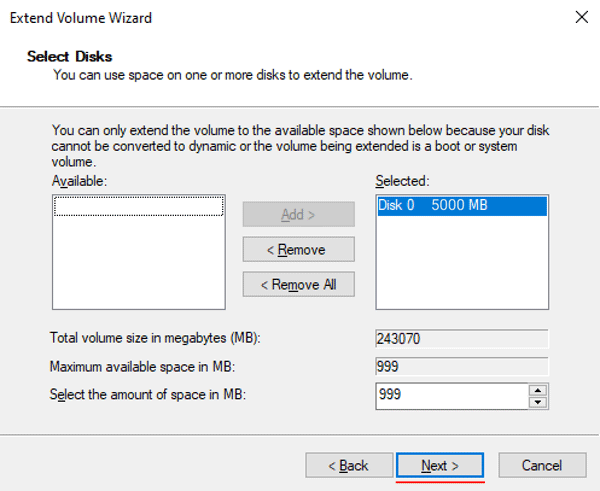
Step 5: You will be offered an unallocated area on the disk to join (the 5 GB we took from the other volume). Select it and click “Next”
Step 6: All that remains is to click “Finish”, and then your system disk will be 5,000 MB larger.
Using third-party software to increase the size of the C drive at the expense of the D drive
In addition to the built-in Windows features, you can also use third-party software to increase the size of the C drive at the expense of the D drive. Nowadays there are many such programs, but as an example, we will use the free DiskGenius Free Edition program.
So to increase the C drive’s size, you should:
Step 1: Download DiskGenius Free Edition from the official website and install it following the tips of the application installation wizard. You shouldn’t have any difficulties at this step, because the application installation is done as usual.
Once the program is installed – run it by double-clicking on the appropriate icon on the desktop.
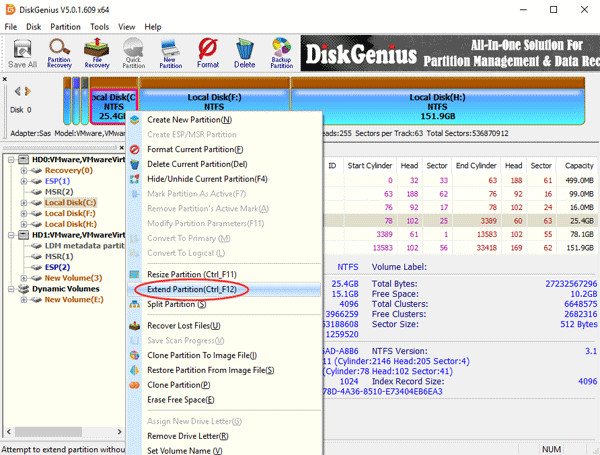
Step 2: You will see the main application window, which will display all the volumes on each disk connected to your computer. Right-click on the C drive and select “Extend Partition”.
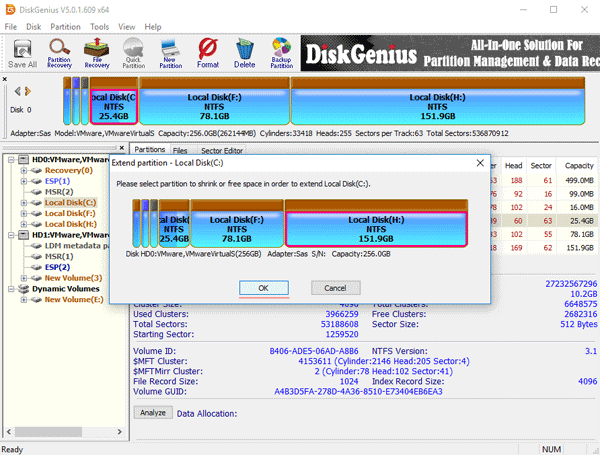
Step 3: The Extend Partition window will appear. Select the disk from which you want to take the free space and click “OK”.
Partition selected in this step should contain enough free space, as the software will move free space from this partition to the C drive.
Step 5: The program will show a list of steps that will be performed in the process of resizing the drive. Click the “Yes” button to start resizing the C drive.
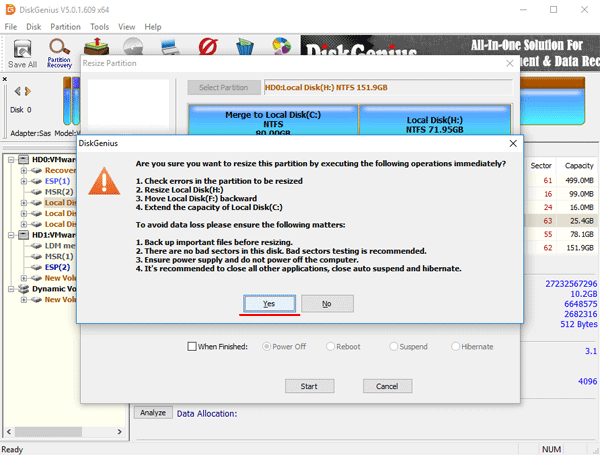
After clicking “Yes”, Disk Genius will create its version of WinPE to be able to finish all the operations started. Once the resizing process is finished, your computer will automatically reboot and you can enjoy the additional space on your C drive.
Resizing a partition involves quite a few operations, such as changing the initial and final partition locations, changing MBR and DBR settings, moving data, etc. Thus the process is not free from the risk of data loss, even if the partition manager software is stable.
Therefore, before you start the process of resizing the C disk, it is recommended that you carry out the following steps:
1) Make sure that there are no bad sectors on the disk. This is especially important for those partitions that you are planning to resize. To learn how to check and fix the disk for bad sectors read the article “Checking and fixing hard drive errors”.
2) Make sure that the power supply works properly and does not shut down the computer until the resizing is finished.
3) Close all other programs accessing the volumes you are going to manipulate;
4) Turn off the system sleep mode, so that your computer doesn’t go to sleep while the C drive is being enlarged.
Because the partition to be expanded is a system volume, DiskGenius will boot into its WinPE version to complete the resizing operations.
What to do if important data is lost while increasing the size of the C drive?
When working to increase the size of the C drive at the expense of another local drive, you should be very careful as improper manipulation with the drive will invariably lead to the loss of important data.
It is not uncommon for users to format a partition from which they want to take free space. There have also been cases where the resizing of the C drive at the expense of the D drive ended up with an error or malfunction, after which all the data on the D drive became unreadable or disappeared altogether, and the system either offered to format the local drive with the important data, or would not boot at all. Each of these cases invariably resulted in the loss of important information.
If such information has happened to you – use immediately RS Partition Recovery, a professional data recovery program, since using it will greatly increase the chances of successful lost data recovery.
The thing is that with every unnecessary manipulation the probability of your files being overwritten increases. For example, when files have disappeared or become unreadable they physically remain on the disk. The system just instructs Windows Explorer that other information can be written in their place, so the more unnecessary manipulations you perform, the higher the probability that other information will be written in place of important files.
So, to recover important files you should:
Step 1. Install and launch the RS Partition Recovery.
All-in-one data recovery software
Step 2. Select the drive or partition from which you want to recover data.

Step 3. Choose the type of analysis.

Fast scan you should use in case the file was lost recently. The program will scan the drive quickly and show the files available for recovery.
The Full analysis function allows you to find lost data, after formatting, disc resizing, or file structure corruption (RAW).
Step 4. Preview and select the files to recover it.

Step 5. Add the files you want to save to the "Restore list" or select the entire partition and click Recovery.


It should be noted that it is best to save the recovered file to an external hard drive or USB flash drive.


")

