The evolution of the Internet has taken the quality of web content to a whole new level. 4K video streaming, browser games, and other elements that improve user interaction with the browser require computing power for correct playback. In this article, we’ll analyze what is hardware acceleration in browsers, why it’s needed, how to enable or disable it in different browsers, and what the consequences might be.

Contents
- What is hardware acceleration?
- Advantages and disadvantages of using hardware acceleration
- How to enable or disable hardware acceleration in Google Chrome
- How to force the hardware acceleration in Google Chrome?
- How to enable or disable hardware acceleration in Mozilla Firefox?
- How to enable or disable hardware acceleration in the Opera browser?
- How to check whether there is an effect from enabling or disabling hardware acceleration in the browser?
- What to do if important data has been lost due to manipulation with the browser?
Today, on most computers, the web browser is the most frequently used application. There is a simple explanation for this: 99% of information on the Internet is consumed through the browser and only 1% through additional applications (here we are talking about personal computers and laptops, not mobile devices). Accordingly, browsers must have sufficient functionality and performance to provide the most comfortable surfing on the Internet.
However, to ensure fast and quality surfing, a browser alone is not enough. The computer must be powerful, otherwise the user will get only freezes, “crashes” or constantly page reloading. It is especially true when playing video and games, as well as in the rendering of complex animations.
This is where hardware acceleration comes into play.
What is hardware acceleration?
Hardware acceleration is a way of distributing the computational load between the CPU and the video processor (GPU). If this feature is enabled in the browser, the browser uses the power of the video processor instead of the software capabilities. This reduces the load on the CPU and allows the page to load faster.
The result is especially noticeable on pages with a lot of media data, or on sites with games, as the entire video rendering, 3d graphics, and complex animations take over the graphics processor (that is, it performs the functions for which it was created). The central processor at this time is busy processing other processes (processing user commands, system processes, etc.).
It is worth noting that often, even with small loads, the use of hardware acceleration makes animations and videos smoother and games more responsive.
Advantages and disadvantages of using hardware acceleration
Using hardware acceleration in Google Chrome, Mozilla Firefox, Opera, Safari, etc. has both advantages and disadvantages.
It is worth noting that the effect of using hardware acceleration will be evident if your computer uses a discrete graphics card.
The thing is that discrete graphics cards have their processor and video memory. This solution allows you to use additional resources to provide a smoother operation of the system and evenly distribute the workload. However, discrete graphics cards are more expensive. Especially if we are talking about laptops.
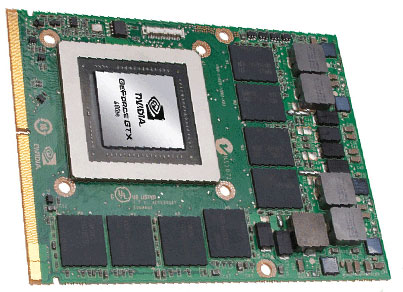
Integrated graphics cards are usually built into the CPU and have no dedicated video memory. Instead, they use some of the RAM for their needs. It makes them cheaper, but a computer with an integrated graphics card will be less performant than one with a discrete graphics card. Most often integrated graphics cards are used in laptops because of their size, making the laptop thinner, lighter, etc.
But, back to the use of hardware acceleration in the browser. It’s up to each browser to decide whether or not to use hardware acceleration. The decision is based on an analysis of your computer’s configuration. Depending on how powerful the computer is, hardware acceleration can give both positive and negative results.
Often, when the power of the graphics processor will not be enough – instead of faster page loading and smooth animation, the user will get heavy freezes and constant page reloading.
Sometimes the computer may even stop responding to any commands and the system completely hangs. It is especially common to see this on computers with the integrated graphics card. The reason for the occurrence of brakes is not difficult to guess – the graphics card can not provide the necessary performance level and instead of improving the browser, it slows it and the entire operating system.
In such a situation, it is better to immediately disable the hardware acceleration, as continuing to work in this mode can lead to the loss of important data such as bookmarks, passwords, autofill data, and even cause data loss on the hard disk or SSD drive.
You can read about how to recover browser bookmarks in the article “How to recover deleted Google Chrome bookmarks?“
However, since every computer is different, it is up to the user to decide whether to use hardware acceleration in the browser or not.
Google Chrome uses hardware acceleration in 80% of cases. If you notice a significant decrease in performance, you can try to turn hardware acceleration off. Or, if you want faster performance, you can check if you have hardware acceleration turned on, and if not, you can turn it on manually.
How to enable or disable hardware acceleration in Google Chrome
As mentioned above, hardware acceleration in Google Chrome is enabled by default in 80% of cases. However, if you suspect that hardware acceleration is disabled – follow a few simple steps to check if it is:
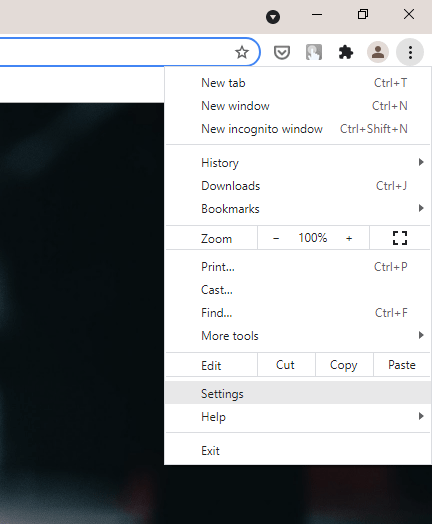
Step 1: Launch Google Chrome on your computer, then click on the three dots in the top right corner and choose “Settings” (you can also type “chrome://settings” in the address bar and press “Enter”)
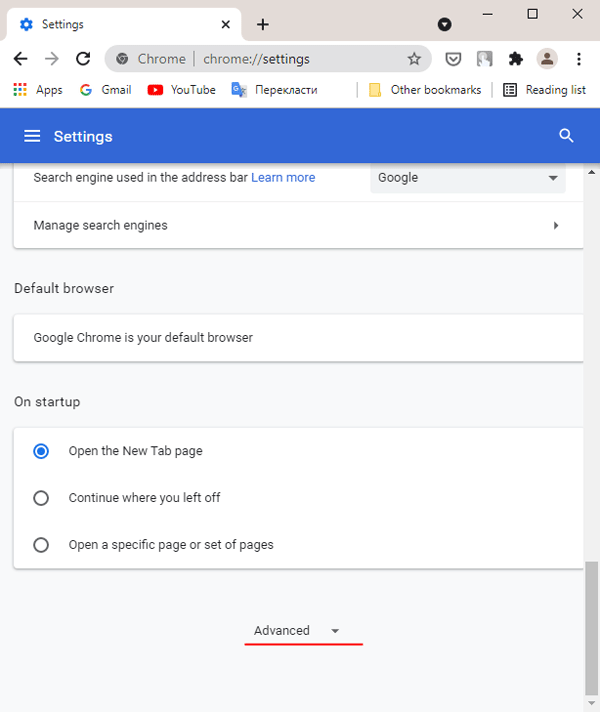
Step 2: Scroll to the bottom of the settings page and click on “Advanced“
Step 3: Find the “System” section and check whether the “Use hardware acceleration (if available)” option is enabled.
If this option is enabled, hardware acceleration is in use.
To disable hardware acceleration just pull the slider to the left (to the “off” state) and click the “Relaunch” button.
Important: make sure that all the data you were working on is saved and in a safe place, as all data will be lost during restart.
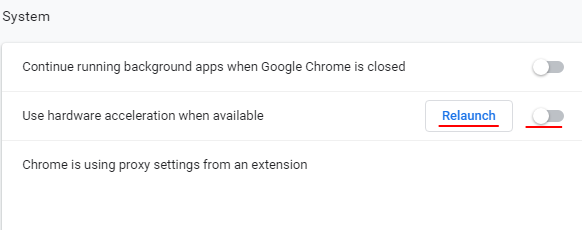
Accordingly, if you have disabled hardware acceleration – pull the slider to the right (it will turn blue), and then click “Relaunch“
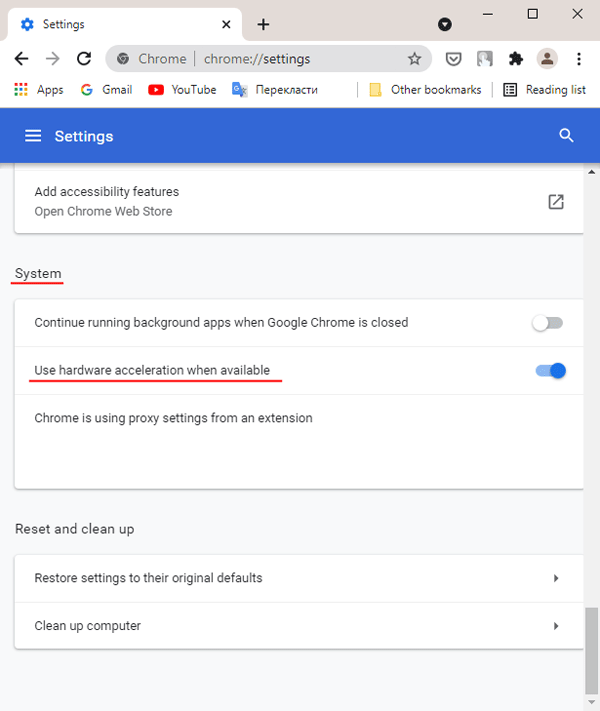
If you don’t want to restart your browser, just close the Google Chrome settings window. The changes will be applied the next time you launch Chrome. That means you can finish whatever you’re doing and then restart Google Chrome.
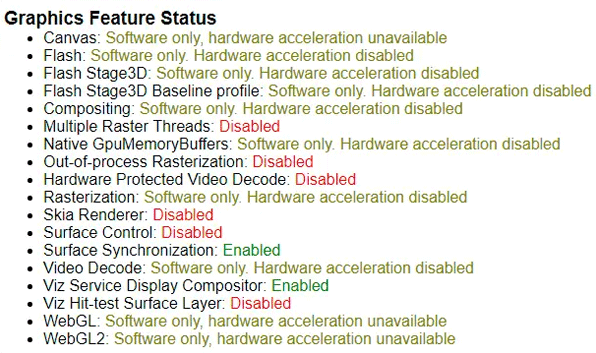
If you disabled the hardware acceleration feature and want to make sure it’s not working – type “chrome://gpu/” in the Google Chrome address bar and hit “Enter” to confirm the action.
You will see the status of graphics processing settings. Most of them will have the status “Software only“
How to force the hardware acceleration in Google Chrome?
Sometimes there are situations when Google Chrome refuses to enable hardware acceleration using the standard features. There may be a lot of reasons for this, ranging from incorrect settings to malware activity.
Luckily, users have the option of forcibly enabling hardware acceleration. It can be done by redefining one of the system flags.
To force the hardware acceleration in Google Chrome, you should:
Step 1: In the Google Chrome address bar, type “chrome://flags” and press “Enter” to confirm.

Step 2: Enter the phrase “Software” in the search field and enable the “Override software rendering list” option by changing the switch to “Enabled“. Then click the “Relaunch” button
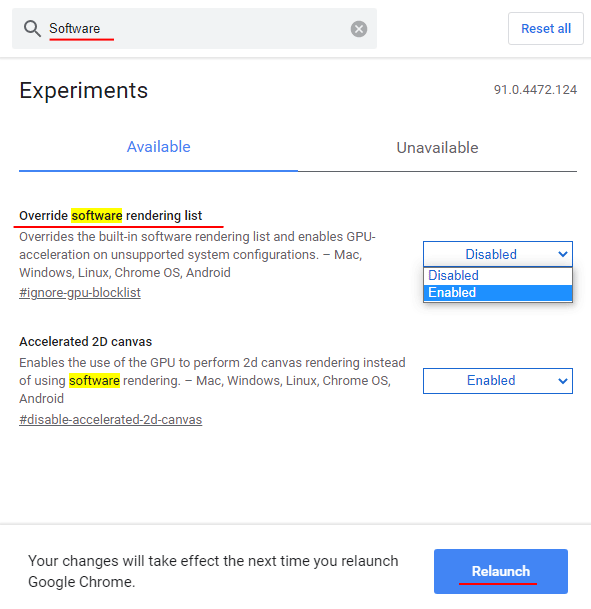
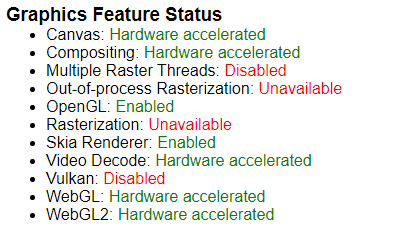
This should enable hardware acceleration. To check this, go to chrome://gpu
Now you should see “Hardware accelerated” next to each of the parameters.
How to enable or disable hardware acceleration in Mozilla Firefox?
If you prefer Mozilla Firefox you can also enable hardware acceleration to make the browser faster. This is very easy to do:
Step 1: Launch Mozilla Firefox by double-clicking on the appropriate icon on your desktop or any way you like. Then type “about:config” in the address bar and press “Enter” to confirm.
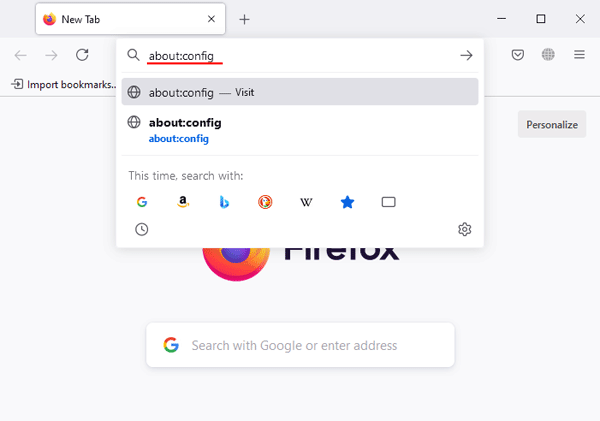
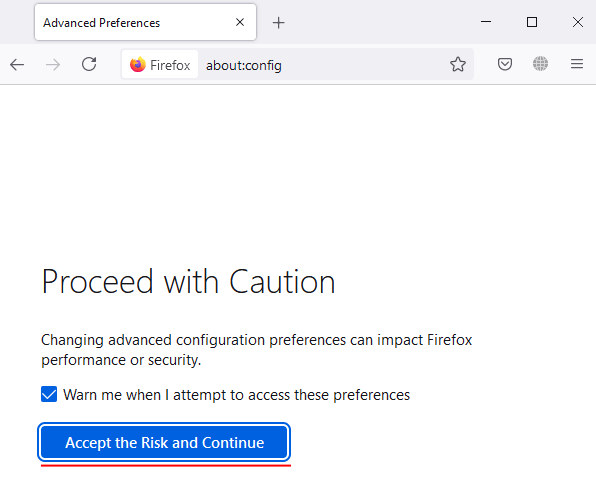
Step 2: A window will open in front of you, alerting you to enter the settings menu. Click “Accept Risk and Continue“
Step 3: In the search box, enter the phrase “layers.acceleration.force-enabled” and click on the arrow icon to change the status from “false” to “true“
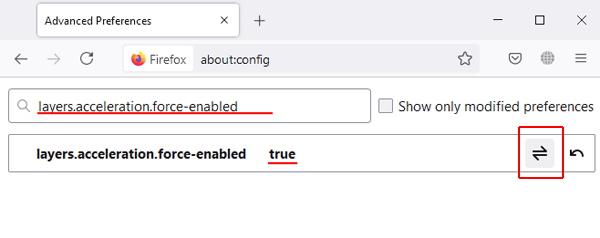
After that, you need to restart Firefox for the changes to take effect.
If you want to disable hardware acceleration for some reason – do the first two steps from the instructions above, then in the search box enter “layers.acceleration.force-enabled” again and change the status of the parameter from “true” to “false“. Restart the browser.

After that, hardware acceleration will be disabled again
To enable hardware acceleration, you can also use the Mozilla Firefox graphical interface. This option is great for those who do not like to bother with the address bar. Follow these steps:
Step 1: Launch Mozilla Firefox any way you like. Then click on the hamburger icon in the upper right corner and select “Settings“
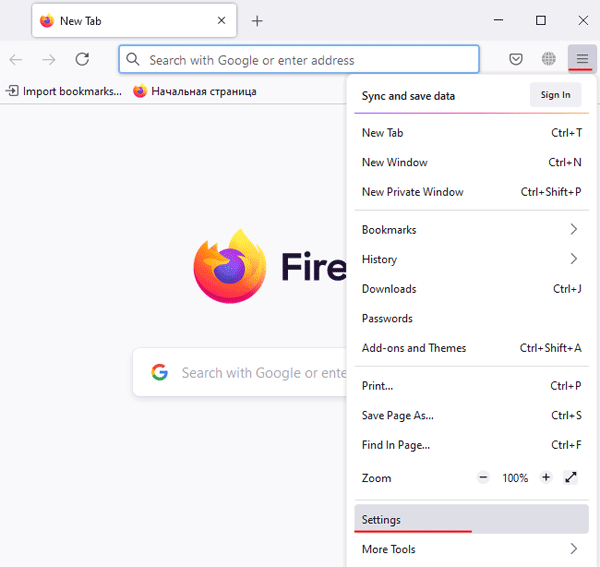
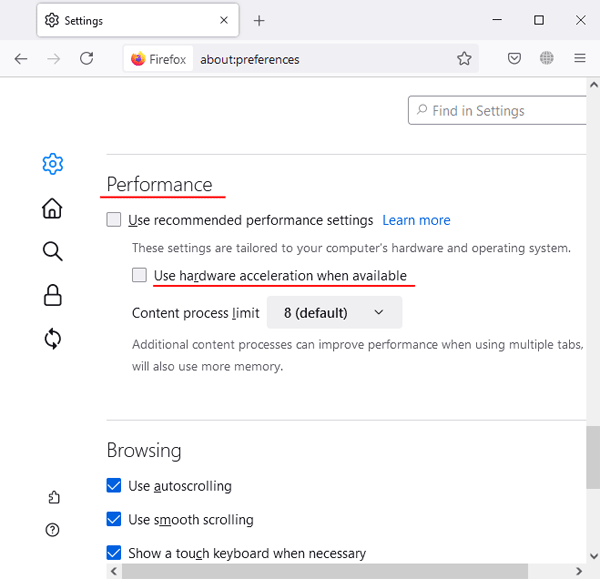
Step 2: Find the “Performance” section and uncheck the “Use recommended performance settings” box. Additional performance options will open up in front of you. Check the “Use hardware acceleration when aviable” box to activate hardware acceleration.
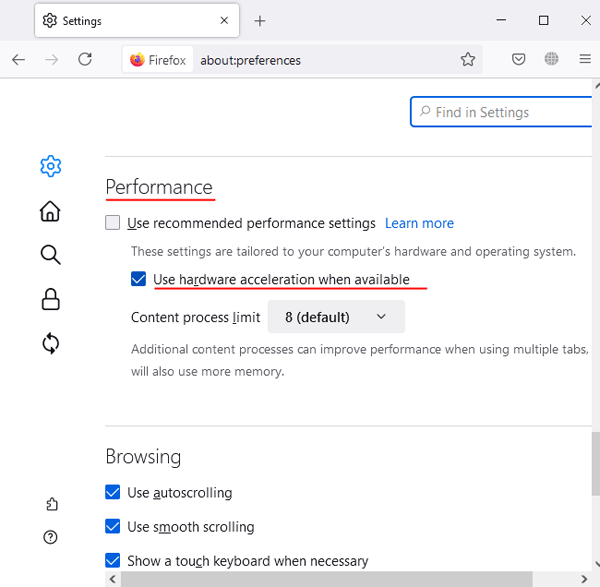
To disable hardware acceleration, repeat the first step, and then uncheck the “Use hardware acceleration when aviable” box
How to enable or disable hardware acceleration in the Opera browser?
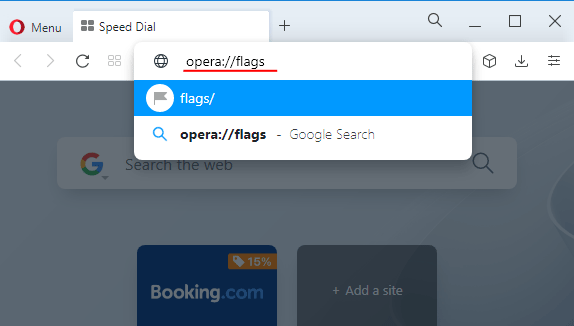
The Opera browser also supports hardware acceleration. The process of enabling this feature is somewhat similar to Mozilla Firefox. To enable hardware acceleration in Opera you should:
Step 1: Launch the Opera browser in any way you like. Then enter “opera://flags” in the address bar, and press “Enter“
Step 2: Type “#disable-accelerated-video-decode” in the search box and change the status of this option to “Enabled“
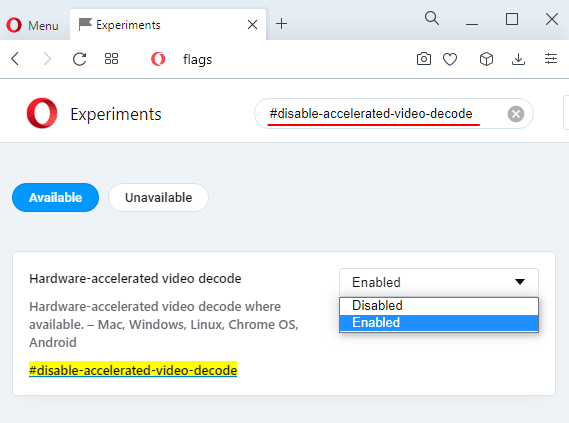
The hardware acceleration will be enabled immediately. If you want to disable it, just set it to “Disabled” using the steps above.
How to check whether there is an effect from enabling or disabling hardware acceleration in the browser?
Enabling or disabling hardware acceleration in the browser can both reduce the load on the operating system, and be used as a solution to the problem of frequent freezing of the browser. If with the second option is more or less understandable (if after turning off the acceleration are lags – then it was in it), but how do you know whether there is a performance gain? You can of course use special plug-ins to check page loading speeds, etc., but there is a faster and easier option.
If you want to know whether the load on the operating system has reduced – just run any site on which there is a complex animation and look in the task manager to reduce the load on the CPU compared to the disabled hardware acceleration. This information can be found in the “Performance” tab. Reminder, the best way to start the Task Manager is to use the “Ctrl + Alt + Delete” key shortcut
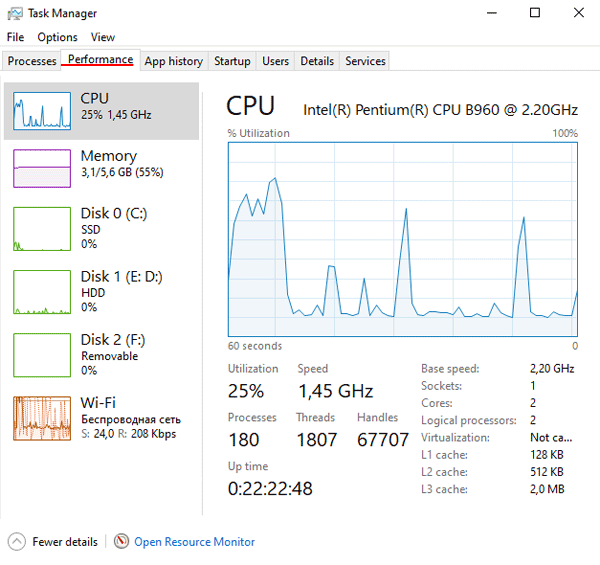
If you find this method too primitive, use any browser-based benchmark and compare the results before and after enabling hardware acceleration. For example, you can use a benchmark called Wirple. Just open the link, click on “HTML5 3D Benchmark“, and then click “Start test“

The testing process begins. Everything is fully automatic. At the end of the test you will be shown the result of the benchmark.
What to do if important data has been lost due to manipulation with the browser?
You should be careful when doing any kind of manipulation with the browser, as the possibility of losing important information is very high. The browser can stop turning on, work incorrectly, or completely switch to the initial state. In any of these cases, the user will lose such information as all saved passwords (including those from bank accounts, social networks, e-mail, etc.), all bookmarks, browsing history, etc.
Moreover, there are cases when due to incorrect functioning of a browser important information was deleted even from the hard drive.
Fortunately, the user can recover important information. To do this, it is best to immediately use professional software for recovering lost data – RS Browser Forensics. The main advantage of this program over its competitors lies in its advanced data recovery algorithms, which ensure the successful recovery of lost information in 99% of cases and in its intuitive interface, which makes the recovery process incredibly easy and convenient, meaning it can be used by any user, regardless of the level of computer skills.
As an example, we will recover our browser history.
To do this, we need to perform a few simple steps:
Step 1: Download and install RS Browser Forensics on your computer following the installation wizard tips. After that, launch the program.
Step 2: The main window of the program will open. Click the “System Analysis” button
Step 3: The analysis of your browsers for recoverable data will begin. Once it’s finished, select the user for whom you want to restore your Google Chrome bookmarks and history.

Step 4: In this step, choose the browser for which you want to recover your history and bookmarks. In our case we were talking about Google Chrome.
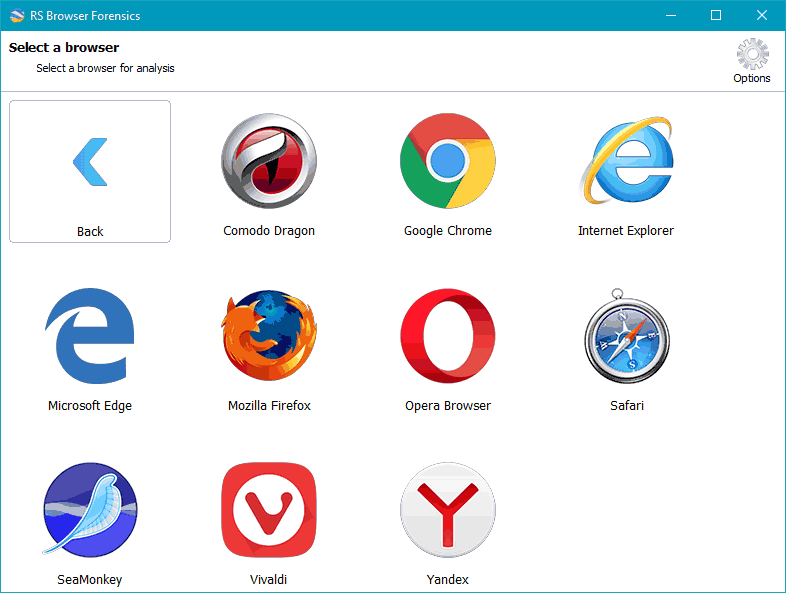
Step 5: The data analysis of the selected browser begins. When it is finished, you will see the browsing history. In the left column, you can see the types of data that can be retrieved. It can include bookmarks, browsing history, passwords, downloads, images, files, and addresses.
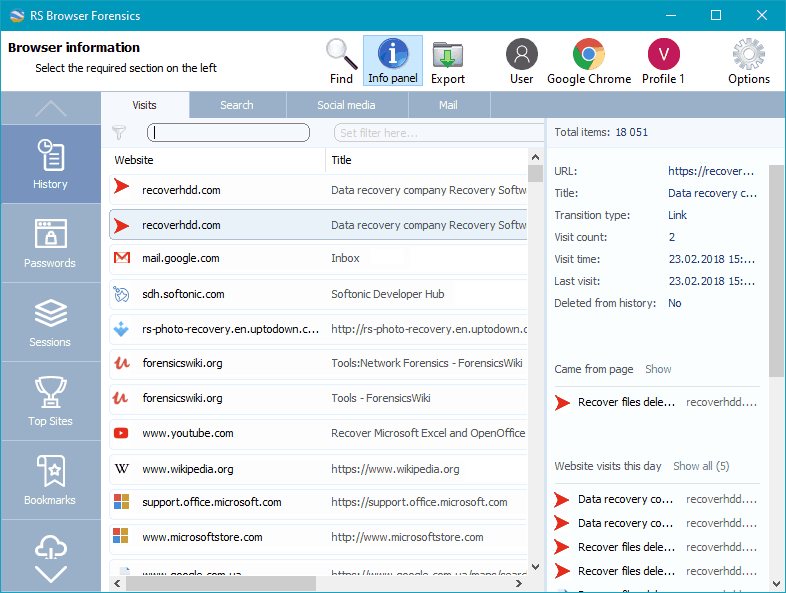
Select the record you are interested in and right-click on it. A context menu opens in front of you, where you can select three options:
- Open URL – allows you to open the site you were viewing at the specified time;
- Export — allows you to restore all sections or selected sections;
- Sort by — provides a convenient way to sort the data;
We will choose the second option to export the session.
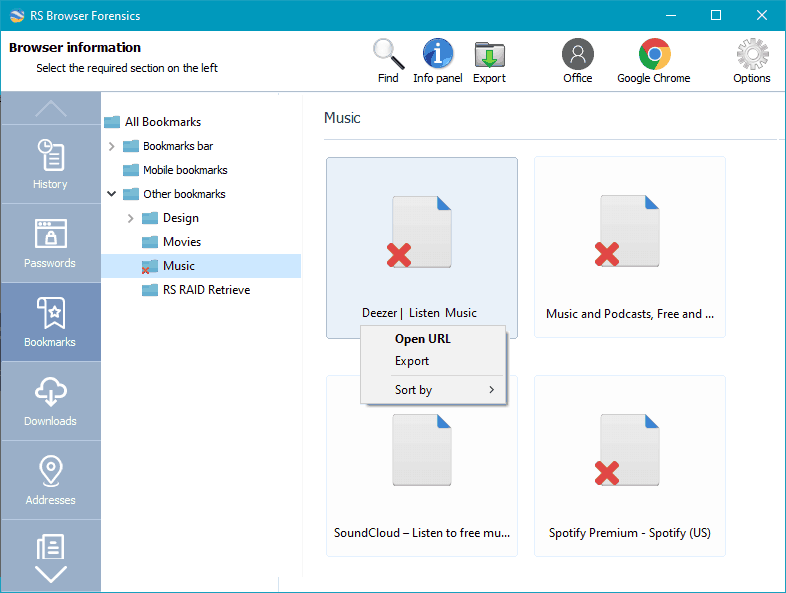
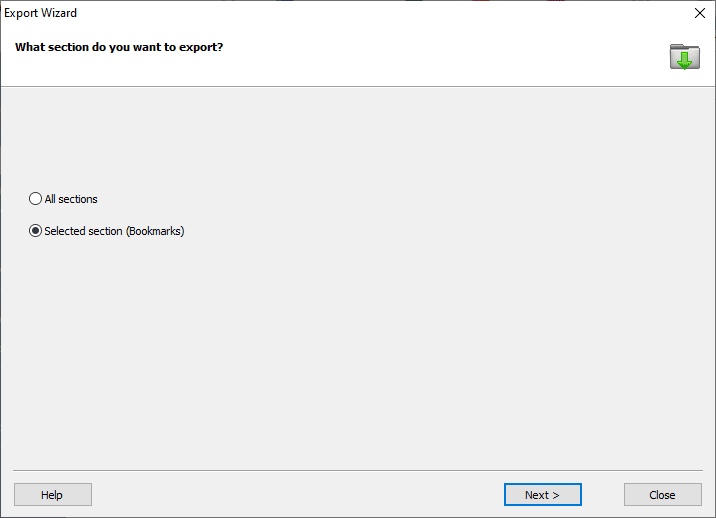
Step 6: We want to restore only Bookmarks in our example, so we choose “Selected section (Bookmarks)” and click “Next“
After that, you need to specify the location where the browsing history will be exported and the data format. The program supports exporting history in Excel, HTML, and PDF formats. Select the desired one and click “Next“
The data recovery process will start and usually takes a few minutes. Once it’s finished, your browsing history will be available in the specified path.
Recovering bookmarks and other types of data is done similarly to our example.
As you can see, the process of recovering Google Chrome data is simple and convenient. You don’t have to search for hidden files on your computer, rename them, etc. Just install the application and follow the program’s tips.


