Creating a RAID array on your server allows you to increase the data integrity level many times over in case any of the disks fails. In this article we will look at how to create a RAID array on Windows Server.

Contents
- What is Windows Server?
- Differences between Windows Server and a standard Windows operating system
- How to create a RAID array in Windows Server?
- How to identify a failed disk drive and replace it in Windows Server?
- How to repair a broken RAID array in Windows Server?
What is Windows Server?
Windows Server — is an operating system designed specifically for use on servers. It includes a set of special services and utilities that are designed to provide the fastest and most convenient server operation. To date, Windows Server is the most common system in the world. The reason is simple – it is a very flexible system, allowing its use in file and mail servers, DNS services, remote servers, multimedia servers, etc.
In addition, Windows Server is fast enough and provides the necessary data security level. Data security requirements have caused the system to be thoroughly tested for vulnerabilities and malfunctions, as well as adding new security features. One of them is the common language runtime environment. It is responsible for the overall security of the computing environment.
Among other things, to increase the data security level, the user can create a software RAID array by combining several hard drives.
Installing and administering Windows Server is easy, and the presence of policies significantly simplifies management. In addition, Windows Server allows you to automate many processes, which gives it one more advantage over competitors. It is also possible to combine multiple servers into one network. That is why many large companies choose it for their purposes.
Differences between Windows Server and a standard Windows operating system
The similarities between regular Windows and Windows Server can be seen in more than just the name. Microsoft has built both of these systems on the same code, they have very similar (almost identical) graphical shells (e.g. desktop, window, and start menu design, etc.) You can also run programs created for normal Windows on Windows Server and vice versa. That is, you can easily install Google Chrome or Adobe Photoshop on Windows Server. Windows Server as well as the usual Windows allows you to create a software RAID because it allows you to ensure the data integrity on the server in case of failure of one of the drives. However, in addition to a common core and common design, there are a number of features that make these systems completely different.
First of all, it should be said that the set of functions and utilities in Windows Server and the usual Windows will be very different. The reason is that the familiar Windows 7, 8, and 10 are designed for personal use on desktops, laptops, and tablets. Of course, there is no need to use such services as DHPC, remote Windows Deployment, Active Directory, and many other server services, as the ordinary user does not need them, and even if the need arises – they can be easily installed separately. At the same time in Windows Server, there is no need for the browser, multimedia players, games, and even a graphical interface, since you can administer the server remotely. That is why after installing this system on the server, the Server Manager opens immediately, which offers to disable the graphical interface and configure other basic functions.
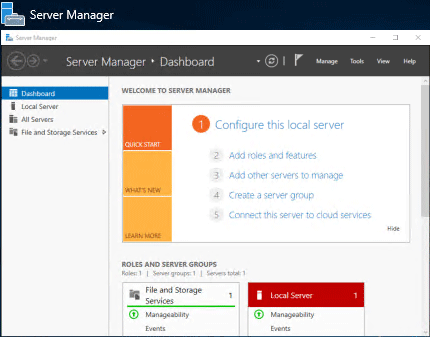
Thanks to this solution (disabling the graphical interface) it is possible to significantly speed up the system, since the part of resources, which was previously engaged in graphics processing, is now allocated for the needs of the server. Even Microsoft recommends disabling the graphical interface to improve performance.
Windows Server provides faster data transfer with the SMB Direct feature. In regular Windows, this feature is included in the Windows Pro version only.
In addition to the built-in feature set, the two systems differ in their support for more powerful hardware. For example, while the standard Windows supports up to 2 TB of RAM (and here we are talking about the Pro version, the standard ones support less), Windows Server supports up to 24 TB of RAM. Support for such large volumes due to the fact that the server is the more rational use of RAM than a desktop or laptop. For example, not every regular desktop PC will be able to recognize at least 2 TB RAM, not to mention 24 TB.
In addition to RAM, Windows Server can handle a large number of sockets. That is, if a regular operating system supports work with a maximum of two processors, the Windows Server can work simultaneously with 64 processors.
Finally, let’s talk about the price of the Windows Server. Since users of this operating system are mostly companies and small businesses – the price of it is noticeably more expensive and starts at $ 500 with the basic set of features and ends at $ 6,200 for the most demanding customers.
How to create a RAID array in Windows Server?
As mentioned above, it is possible to create a RAID array in Windows Server. It will ensure that your data is preserved in case one of the disks fails. It is recommended to create a software RAID before you disable the GUI of your server. The process of array creation is simple and looks the same as in Windows 10. For example, let’s create RAID 5 in Windows Server by previously connecting all the disks that will make up our array. In order to create RAID 5 in Windows Server you need to do the following:
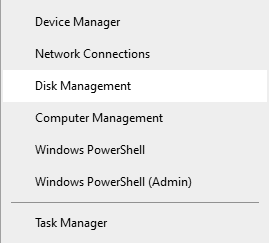
Step 1: Right-click on “Start” and choose “Disk Management“
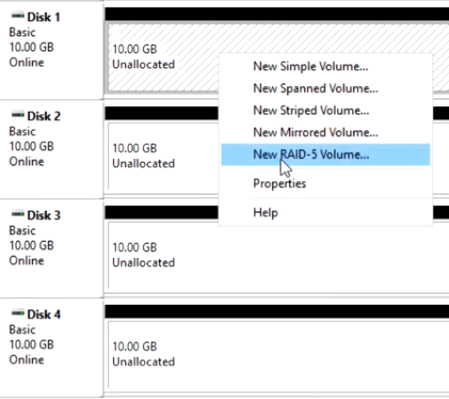
Step 2: The Disk Manager will display all connected disks. Right-click on one of them and click “New RAID-5 Volume“.
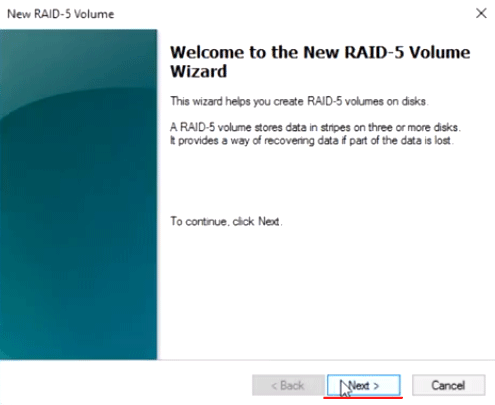
Step 3: The RAID-5 Volume Wizard will appear in front of you. Click “Next“, then add the drives to the array using the “Add” button and click “Next” again.
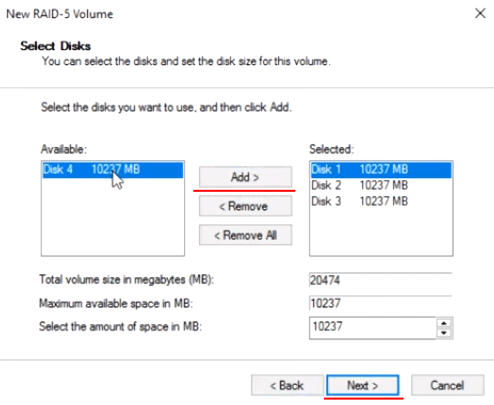
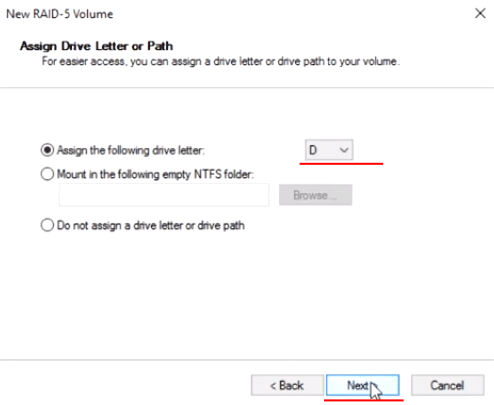
Step 4: Choose a letter for your array and click “Next“
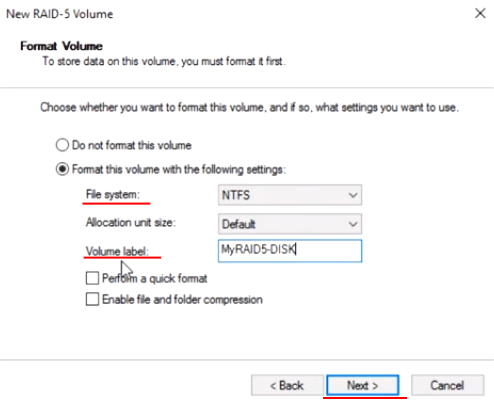
Step 5: Now select the file system and the array name. Confirm the action by clicking the “Next” button. The RAID-5 volume wizard will show you all the parameters for the future array. Click “Finish“.
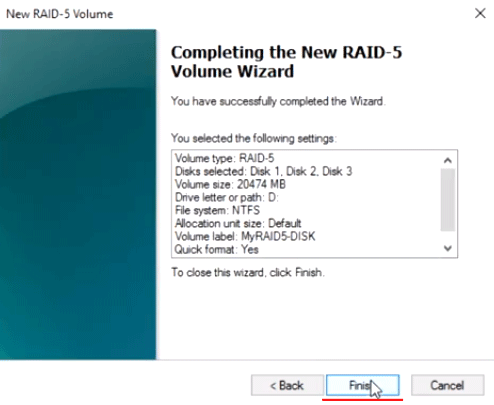
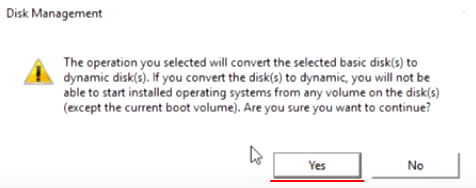
The system will warn you that the disks will be converted to dynamic and all information will be deleted. Confirm the start of the conversion by pressing the “Yes” button
The process of formatting and resynchronizing all disks will start. The time required for this process will depend on the size of your disks and the server performance.
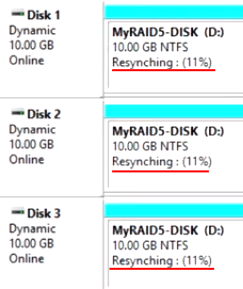
Once these processes are completed you will have a new RAID-5 array that you can work with as a regular drive. Now you can disable the GUI and work with the server remotely or via the terminal.
Note that you can also create RAID 0 (striping), RAID 1 (mirroring), and JBOD (merging all disks into one big one without striping or mirroring) using this method. To do this, select the option you need in the second step:
- New Spanned Volume – to create JBOD;
- New Striped Volume – to create a RAID 0 array;
- New Mirrored Volume – to create a RAID 1 array;
How to identify a failed disk drive and replace it in Windows Server?
Using RAID arrays allows you to save data in case one of the drives fails. However, if any drive fails you must replace it immediately, otherwise you may lose important information since some types of arrays will not survive the failure of one more drive (e.g. RAID-5).
But how do you know when a drive has failed and determine which drive has failed?
If either disk fails, you’ll notice big performance degradation. So if your server has started to slow down a lot – first of all, check whether all disks work normally. To do this:
Step 1: Press the “Win+R” key combination, then in the window that opens, type the “diskmgmt.msc” command, and click “OK” to confirm.

Step 2: In the Disk Manager window, the status of your array will be displayed as “Failed Redundancy“, and next to the failed disk the status will be “Missing” (other disks in the array will have the status “Online“)

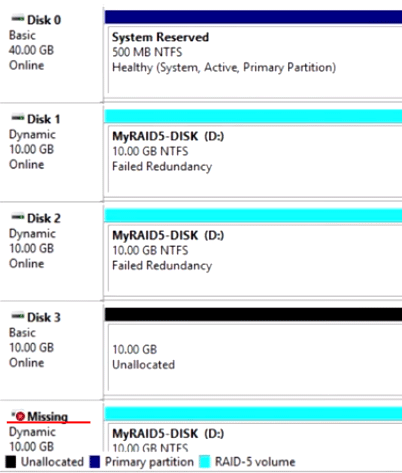
Once you have determined which drive has failed, replace it. To do this, connect the new disk to your system (with the power off beforehand), start the computer, and follow the two steps described above. Then, while in Disk Management follow:
Step 1: Right-click on the broken disk and click “Repair Volume“
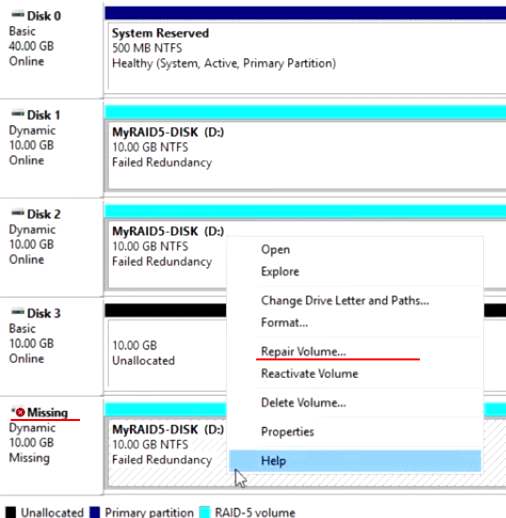
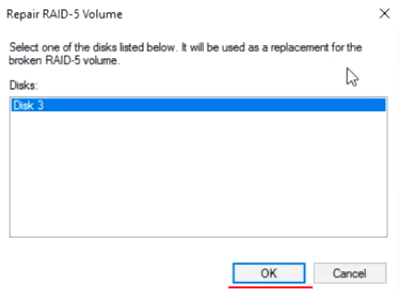
Step 2: In the window that appears, select the disk to be used in place of the broken one and click “OK“
Step 3: The system will warn you that the new disk will be converted to dynamic and that the information on it will be destroyed. Click “OK“

After that, the process of resynchronizing the disks will start (as when you create an array), after which your array will be completely recovered.
It is worth noting that if your array consists of disks of a few terabytes — you should be ready that the recovery process may take quite a long time.
How to repair a broken RAID array in Windows Server?
RAID arrays are a fairly reliable solution when it comes to disk performance, but data can also be lost for other reasons. For example, your RAID array may stop working due to a controller failure, which is responsible for data distribution between the drives. This is most often caused by failures in the operating system, a bit less often by power surges or a sudden power failure. Furthermore, people are prone to making mistakes and often data can be lost due to accidental deletion or array formatting, and sometimes incorrect user actions lead to completely recreating the array. Of course, in this case, the data are completely lost.
If such a situation happens to you, do not panic. The best thing to do is to immediately use RS RAID Retrieve, a professional solution for recovering lost data.

Data recovery from damaged RAID arrays
Thanks to the fact that Windows 7, 8, 10, and Windows Server are built on the same kernel – the program allows you to recover information in 99% of cases, and thanks to supporting for all modern file systems – it’s perfect for recovering lost data on your server.
The data recovery process is described in detail in the article “How to Recover Software RAID?“
In addition, RS RAID Retrieve is very convenient and easy to use, as well as not demanding on your system resources, and the intuitive interface of the program makes the recovery process fast and convenient.
We’d also like to note that the built-in RAID-constructor will automatically detect your array type, and the deep scan mode will help you recover even those files that were deleted several months ago.

