Data integrity and security is a very important issue for anyone who uses a computer. Mac users are no exception. In this article we will explain how to create a software RAID in Mac OS, why you should do it and what RAID type is the best to use.

Contents
- Why should you use RAID arrays on a Mac OS system?
- What is the best RAID type to use in Mac OS?
- Creating the software RAID in Mac OS.
- Creating the software RAID in Mac OS via terminal.
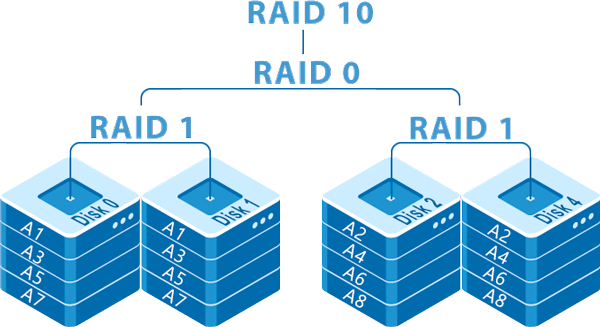
- How can I create RAID 5 and RAID 10 in Mac OS?
- How to add, remove, or replace a drive in a RAID array in Mac OS.
- How to add, remowe, or replace the drive in RAID array in Mac OS via terminal?
- How can I permanently delete a RAID array in Mac OS?
- Auto rebuilding a RAID-1 array in Mac OS.
Why should you use RAID arrays on a Mac OS system?
The amount of data being generated and transferred grows every year. It is increasingly difficult to find free space for files on the Mac, and it is necessary to organize backups, for which there is always a lack of disk space.
The RAID technology comes to the rescue, which can solve both issues of data security, and help with speed of access to data.
RAID (Redundant Array of Independent Disks) technology allows combining several physical drives into a single logical drive to either provide more reliable storage or to increase system performance.
Previously RAID was used on servers with large amounts of data or for added data protection. Since RAID technology has proven to be very useful, today a software RAID array can be created on almost any desktop or notebook computer. Apple hardware hasn’t been left out either and supports the creating of software RAID.
With RAID, a Mac with multiple drives can expand disk capacity, increase data access speeds, or even do built-in mirroring instead of Time Machine backups.
Another example of using RAID is to speed up older Apple computers. Suppose we have a MacBook that is a few years old and it is technically possible to install a second HDD or SSD drive. Using RAID 0 will allow such a computer to run many times faster than it did before.
Mac Pro with a few drives or Mac mini, upgraded with RAID 1, will have a built-in backup system to protect the data in case the drive fails.
Finally, you can take several small drives and combine them into JBOD for use as “file storage”.
The main thing is that you have at least two disks to create a RAID array at all. The rest is very easy.
What is the best RAID type to use in Mac OS?
Depending on the requirements of the particular user, different types of RAID can be used. When using a software RAID controller, it is best to use RAID 0, RAID 1, or RAID 5, as well as combined RAID levels such as RAID 10. JBOD can also be used. The reason for this is that with software RAID the entire workload of distributing data across the drives falls on the processor. And it is the RAID levels mentioned above creates the least amount of CPU overhead and provides the highest level of system performance or data integrity.
Let’s find out what each RAID level is and see which one works best for who:
RAID 0 (Striping) – is an array without redundancy. This array type includes two or more drives. The transferred data is divided into small pieces and written to all disks at the same time.
The more disks are combined into RAID 0, the faster write and read speeds can be achieved. The speed increase will be noticeable when dealing with large files on fairly productive computers.
The main disadvantage of this specification is an absence of reliability. Any file to be copied will be divided into parts, which will be stored on all disks of the array. If one of the drives fails, all data will be lost. It is difficult to recover a file without the parts that were stored on the failed drive.
As the number of disks in RAID 0 increases the speed of data processing, but it also increases the probability of system failure.
This type of RAID is suitable for those who want to get a great speed out of their Mac computer but who do not want to make data security a priority. RAID 0 is easy to create and configure in Mac OS.
RAID 1 is a mirrored array, it also consists of two or more drives. In this case, the file is not divided into parts but written synchronously to each disk.
Roughly speaking, you will always have as many copies of each file as there are drives in RAID 1.
This increases the system’s reliability many times over. RAID 1 will work and keep the data as long as at least one of the drives in the array remains functional. This is a kind of super data backup of your computer, protected many times against the failure of any one disk.
Disadvantages: such an array offers no gain in data speed. Writing and reading speed will be limited to the slowest disk in the system.
RAID 1 should be used when the integrity and safety of your data is a priority, and the system speed does not matter. A great solution is to create a RAID 1 array on SSD drives, because data security is very high, and SSDs provide a high speed.
RAID 5 – in its principle of functioning is very similar to RAID 1. In this case, you need at least 3 drives, one of which will store duplicated information. Besides almost the entire system capacity will be available to you except for one drive which is dedicated to data recovery. There is also an increase in performance, but not several times as much as with RAID 0. The main difference between RAID 5 and RAID 10 is the level of reliability and the available capacity. This array is designed for more specific tasks where a huge number of drives are combined.
The disk utility in Mac OS does not support creating a RAID 5 array, so to create one on your Mac, you will have to use third-party software.
The process of creating RAID 5 is described in the corresponding paragraph of this article.
JBOD is a simple merging of several disks into one. It is just a useful method of using several disks to create one big storage volume. It does not increase the disk’s speed and does not increase the data security. It is only recommended when you need one large volume, data security and speed are not important, and you have several free disks at hand.
Creating the software RAID in Mac OS.
If you want to create a RAID 0 or RAID 1 array on your Mac computer, no third-party applications are required. It is enough to use the standard “Disk Utility” application. (If you are using Mac OS X El Capitan then you will have to use third-party software. The process of creating a software RAID using third-party software is detailed in point #4 of this article).
Be sure to back up all your important files before you start the software RAID creation process as all data will be destroyed.
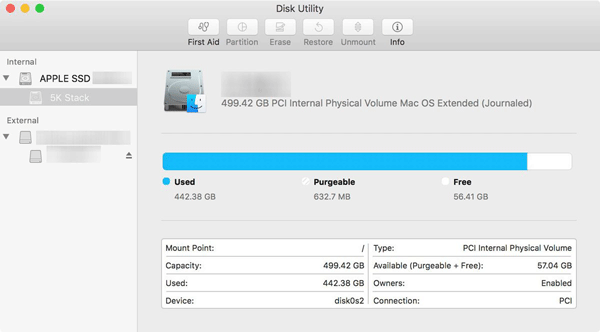
Step 1: Shutdown the computer and connect the drives that will make up your RAID array. After that turn on the computer and when the system will start run “Disk Utility”. (It is located in the “Utilities” folder in the “Applications” menu). The main window of Disk Utility will open in front of you.
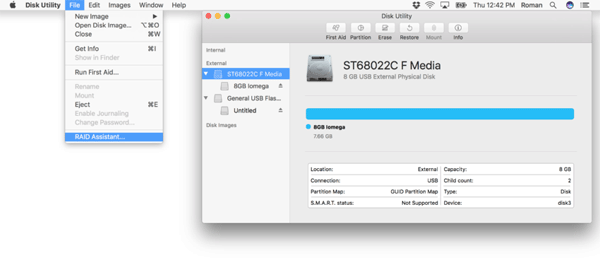
Step 2: Click the “File” menu and choose “RAID Assistant”.
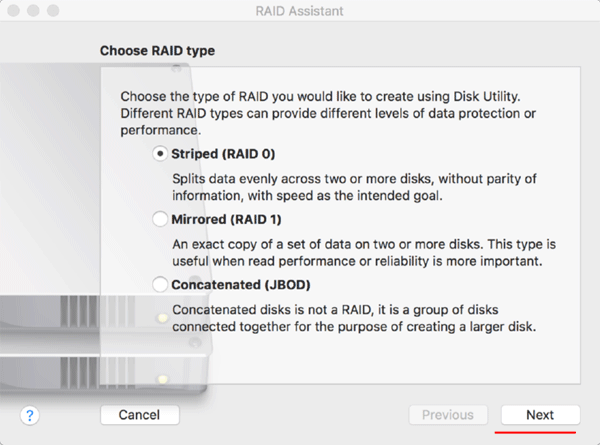
Step 3: You will see a menu for choosing the RAID type. Disk Utility supports RAID 0, RAID 1 and JBOD (if you want RAID 5 or RAID 10 read the fifth point of this article). Select the desired RAID type and click “Next”
Step 4: In this step select the storage devices. Disk Utility will show you the drives suitable for the RAID format you have selected. The application shows the disk and under each disk is a partition list on that device.
If you are creating RAID 1, then you need to decide if the drive should be RAID Slice or RAID Spare.
RAID Slice means that the drive is the active part of the array and stores your data.
RAID Spare is a disk waiting when a Slice-disk fails, after which the data will automatically be copied to the spare. If you have two disks, each disk must be set as a RAID Slice. If you have more than two, you can install one as a spare.
In the previous one we chose RAID 0 – therefore we don’t have a RAID Slice or RAID Spare option.
Select the disk drives you wish to include in the RAID and click “Next”.
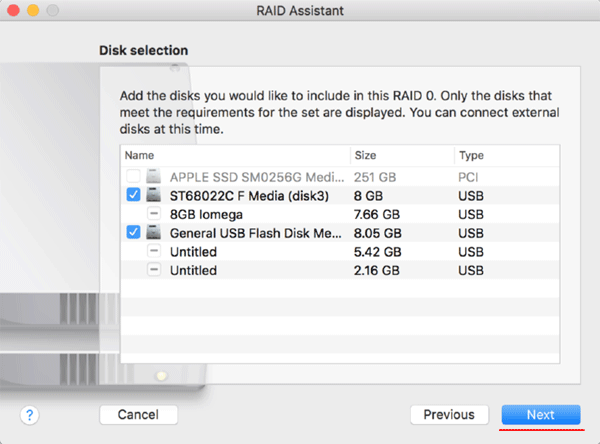
Step 5: Configure the properties of our new software RAID array:
- Name: Give your RAID a name, like on your hard drive.
- Format: Select Mac OS Extended (Journalling).
- Type: This is what you chose at the beginning of the process. To change this, you have to start over.
- Capacity: it depends on the disks you selected in the previous step. The default setting is the maximum possible array capacity.
- Chunk Size: as data is written to disks, it is chunked. If you are working with large files, such as video or 3D graphics, select 128K or 256K. If you are a more versatile user who emails, writes, or works in spreadsheets or databases, choose 32K or 64K.
If you are creating RAID 1, you will see the “Auto rebuild” option. It means that if the disk is deleted and then replaced, the data will automatically be restored to the new drive. Check this box if you want this option. If you don’t, you will rebuild the RAID using the Disk Utility application if necessary.
Once all properties are configured – press the “Create” button.
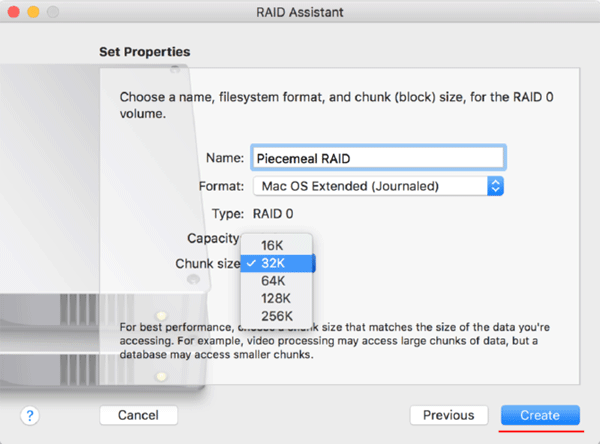
After you click “Create”, your Mac will start configuring your RAID array.
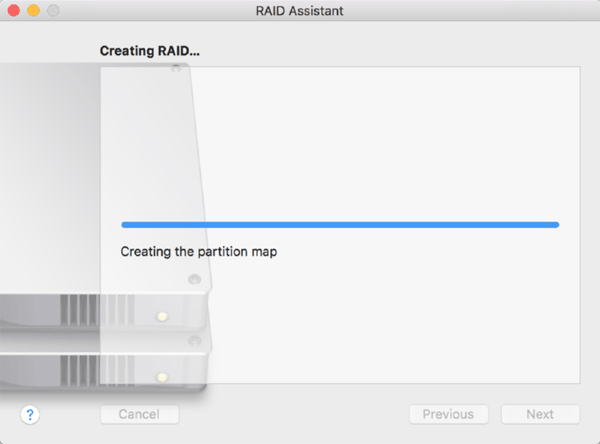
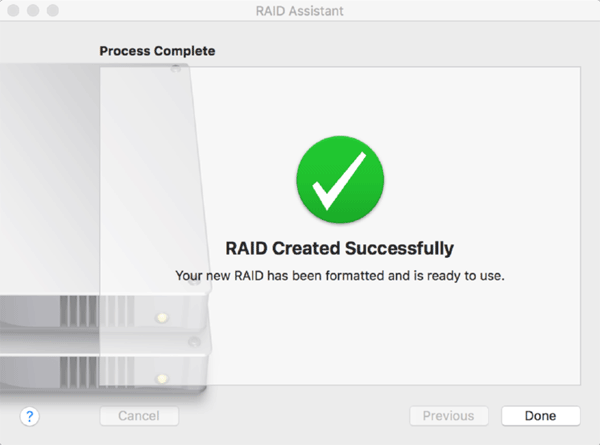
When the configuring is finished, you will see a notification on your screen and your RAID will be available for use.
Creating the software RAID in Mac OS via terminal.
In Mac OS you can also use the terminal to create a RAID array.
Unfortunately, only RAID 0, RAID 1 and JBOD can be created using this method as well as the Disk Utility.
To create a software RAID from the terminal we need at least two drives connected to our Mac computer.
So, let’s get started:
Step 1: Open the terminal (located in the Applicaions > Utilities folder) and enter the command “diskutil list”
You will see a list of the drives connected to your Mac. On the right side, you will see the drive identifiers. Remember or note the drive identifiers of the drives you want to use. In our case, the IDs are: disk2s2 and disk3s2
Step 2: Perform in the terminal the command “Diskutil appleRAID create stripe NewRAID HFS+ disk2s2 disk3s2” where:
- Stripe is the type of array we are creating. In our case “stripe” means RAID 0. If we want to create RAID 1 we use “mirror” instead of “stripe”, if we want to create JBOD we use “jbod” instead of “stripe”;
- NewRAID is the name of our array;
- HFS+ is the file system of the array;
- disk2s2 disk3s2 these are the disks we will create the array from;
After you press “Enter” the creating process of our array will start. Once it is done you will see the corresponding message in the terminal and the array will be ready for use.
If you want to destroy your RAID array just start the terminal as described above, type “Diskutil AppleRAID delete NewRAID” (where “NewRAID” is the name of your array), and press “Enter”. The system will automatically destroy your array and the drives will be available again individually.
To check the status of your RAID, type “diskutil appleRAID list” in the terminal and confirm it by pressing “Enter”. The terminal will display the status of your array and show whether there are any problems or not.
How can I create RAID 5 and RAID 10 in Mac OS?
If you want to create a software RAID 5 array, you have to use the SoftRAID program to create it, since Disk Utility supports RAID 0, RAID 1, and JBOD only. SoftRAID is also worth using if you have Mac OS X El Capitan installed since this Mac OS version lacks the Software RAID Wizard in Disk Utility.
Step 1: Download SoftRAID from the official website and install it like any other application. After installing, launch the application.
You will see the main program window, on the left side you will see all the disks connected to our computer, and on the right side, you will see the partitions and disks that make up the software RAID (if it was created before).

Step 2: Before you can create a software RAID you need to initialize the drives from which the RAID will be created with the software driver. To do this, select the disks you want to initialize, right-click and choose “Initialize”.
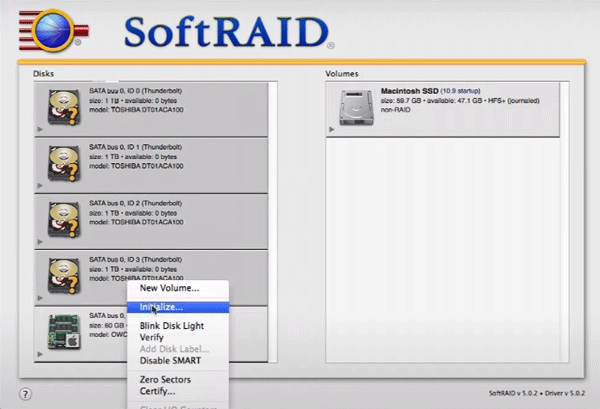
The system will start to initialize the drives and automatically them for software RAID creating.
Step 3: When the initialization process is completed, select the disks from which you want to create a software RAID, right-click and choose “New Volume”.
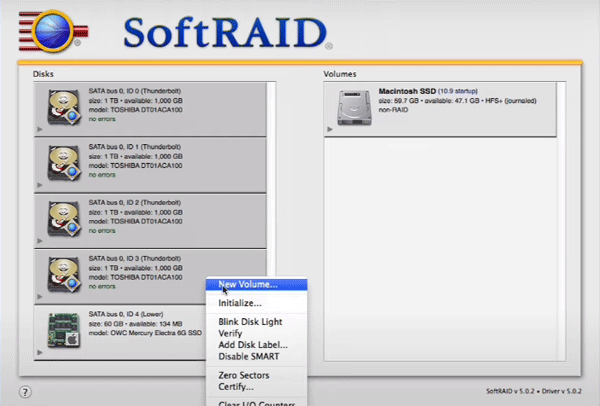
Step 4: You will see a window for selecting the properties of our future RAID:
- Volume Name – specify a name for your RAID array;
- RAID Type – select the RAID type from the drop-down list (we chose RAID 5);
- File System – the default is HFS+. We recommend leaving the default system;
- Optimized for – This option specifies the system our RAID 5 array will be optimized for. We also recommend leaving this option as default;
- Volume safeguard – This option provides additional protection for the RAID array. Leave the default value.
- Volume Size – the size of the future RAID 5 array. By default, the program automatically sets the maximum possible partition, but if necessary you can set a smaller size.
After all parameters are set up, the “Create” button will become active. Click it and wait for the end of the process of creation and array configuration.

After the RAID 5 creation process is finished, it will become available in the Finder and you can use it as a usual disk drive.
How to add, remove, or replace a drive in a RAID array in Mac OS.
If you have created a software RAID array, but with the time you want to increase the space, you can easily add one, two, or more drives.
If you are using RAID 0, RAID 1, or JBOD then you can use the built-in Disk Utility.
Step 1: Run Disk Utility. In the Disk Utility sidebar, select your RAID 1 (mirror) drive.
Step 2: To add a drive to RAID 1, click the “plus” (+) sign located a little above the Information pane.
Step 3: From the drop-down menu, select “Add RAID Slice” if the drive to be added will be actively used in the array, or “Add RAID Spare” if the purpose of the new drive is as a backup to be used in case one of the drives crashes or fails.
A sheet with a list of available disks and volumes that can be added to the mirror array will be displayed. Choose a disk or volume and press the “Select” button.
All files will be deleted on the drive you are going to add; Make sure you have a backup of important data.
You will see a warning message confirming that you are going to add the drive to the RAID array. Click the “Add” button.
Once the drive is added to the RAID set, click the “Finish”.
If we are talking about working with RAID 5 – then it is better to use SoftRAID.
To add a disk to a RAID 5 array you should:
Step 1: Launch the SoftRAID program. On the left side of the window you will see the drives connected to your Mac computer. The new disk will be marked with a question mark.
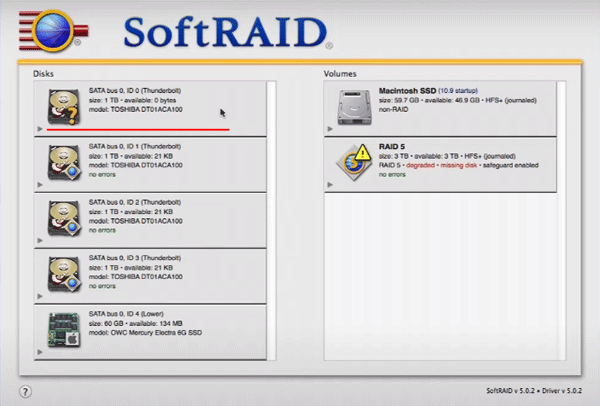
Step 2: Before adding a new disk to the RAID array, it must be first initialized by the software controller (just like we did with each disk when we created our RAID 5 array). To do this, right-click on the desired drive and select “Initialize”.
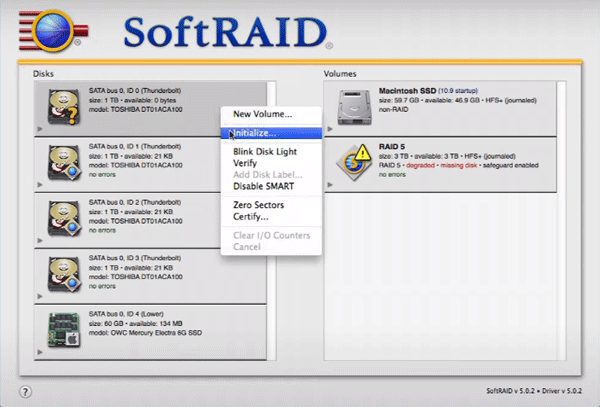
Step 3: Right-click on our RAID array and select “Add disc”
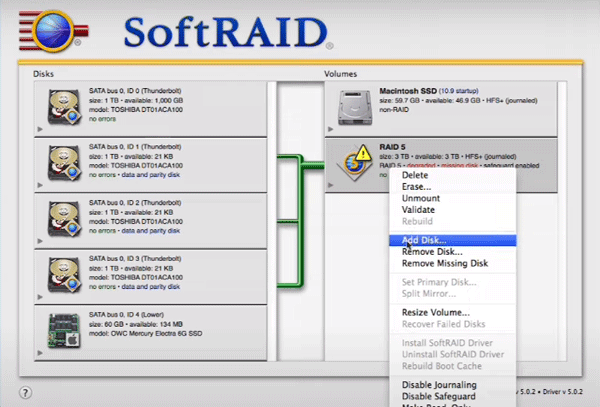
The adding of a new disk will begin. When it is complete, the drive will be added to the array and ready to use.
Removing disks from a RAID array is also easy and can be done using both “Disc Utility” and “SoftRAID”.
If you use “Disc Utility”, then to remove the disk you should:
Step 1: Open Disk Utility and select your RAID array on the sidebar of the program.
Step 2: The Disc Utility window will display all the drives that make up the RAID array. Select the disk that you want to remove, then click the “minus” (-) button.
Step 3: You will be prompted to confirm that you want to delete the disk. Click the “Delete” button.
This will begin the process of deleting and rebuilding the RAID array. When the disk is deleted, you will be notified.
If you use SoftRAID then to remove a disk from the RAID array you should:
Step 1: Launch the SoftRAID program. In the right part of the application window find our RAID array, right-click on it and select “Unmount”.
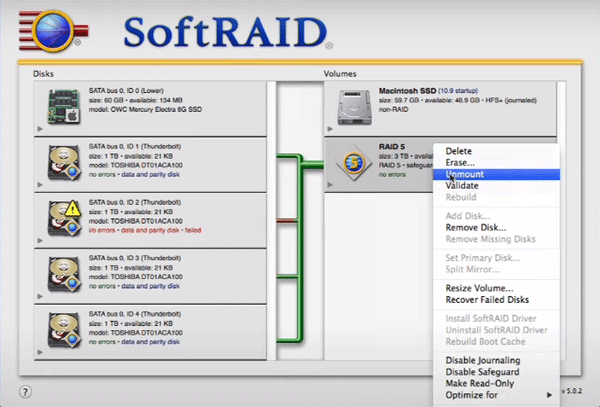
Step 2: Once the array is unmounted, select the disk you want to remove on the left side of the application window. Right-click on it and select “Blink disk light” It will mark the disk as inoperable and prepare it for deletion.

To replace a failed disk, first remove it from the array as shown above, replace the failed disk and then add it to the array as described above.
How to add, remowe, or replace the drive in RAID array in Mac OS via terminal?
You can also use the Mac OS terminal to add, remove, or replace a failed disk drive.
If you want to add a new disk to the array, you should do so:
Step 1: Launch the terminal (located in the “Applications” menu in the “Utilities” folder) and perform the “diskutil list” command to display the drives connected to your computer. Find the disk you need and on the right-hand side, you will see the diskID of that drive. Remember or write it down.
After that in the terminal perform the command “diskutil listRAID”. You will see a list of arrays in your system, and for each array will be available the array identifier (UUID). Write this down so we don’t lose it too.
Step 2: If you want to add Slice disk (the one, that will store information) — then in terminal type: “diskutil appleRAID add member diskID UUID” where diskID will be your disk identifier, and UUID will be your array identifier. After that confirm the action by pressing “Enter” If you want to add a new disk as spare then change “member” in the command to “spare”.
To remove a failed disk, the following steps are required:
Step 1: The first thing to do is to determine which disk is failed. To do this open a terminal as described above and enter the command “diskutil listRAID” You will see a list of arrays and a unique identifier for each array (UUID). Under the array name, you will see the number of disks the array consists of and in front of each disk you will see its status. Find the disk, which state is “offline” and remember or write its unique identifier (UUID). If you want to remove a working disk – then just find the disk you want to remove and remember its UUID.
Step 2: Enter the “diskutil appleRAID remove member UUID_of_FAILED_DRIVE UUID_of_RAID_ARRAY” command in the terminal
Replace UUID_of_FAILED_DRIVE by damaged disk identifier, and UUID_of_RAID_ARRAY by array identifier. Confirm action by pressing the “Enter” button.
Then the disk will be removed from the array. Replace it and add it as described above.
If automatic rebuilding is not enabled when creating RAID 1 array, then after replacing the failed disk such array must be rebuilt manually. To do it perform the command “diskutil appleRAID update AutoRebuild 1 UUID_of_RAID_ARRAY” in terminal, where “UUID_of_RAID_ARRAY” is replaced with identifier of our array.
After performing these actions, the array will automatically rebuild and will be available in the Finder.
How can I permanently delete a RAID array in Mac OS?
Deleting a RAID array is very simple, no matter what type of RAID is used. If you decide to remove your RAID, you should do as follows:
Step 1: Run “Disk Utility” and select your array in the sidebar of the program.
Step 2: Just above the information panel, click the “Delete RAID” button.
You will see a window warning you that you are going to delete the RAID array. If you are sure that the array does not contain any important information, click the “Delete Array” button.
The deletion process will begin and when it is complete you will see all of your drives individually.
Auto rebuilding a RAID-1 array in Mac OS.
After disconnecting a disk that is part of a mirrored RAID, if you return or replace a disk into the array, you will need to rebuild it to put the actual data on the disk. If you enabled “Auto rebuild mirror RAIDs” in the RAID options window while creating a RAID, the disk will be rebuilt automatically in the background – in this case the instructions of this article are not useful.
If you did not enable “Automatic rebuilding of mirror RAIDs” in the RAID options window when you created the RAID, you will need to rebuild the disk manually. To rebuild a disk in a mirrored RAID, follow these steps:
Step 1: Open Disk Utility. Select RAID array, then click “RAID” button.
Step 2: You will see a “Rebuild” button. Once you click it, the rebuilding process will start and when it is finished, the array is ready to use again.

