The RAID 5 array is quite widespread since it is unpretentious, fast, and reliable. But despite all the advantages of this configuration data loss still sometimes happens. In this article, we will consider the main causes of RAID 5 failures, and analyze how not to lose important information in the case of an array failure.

Contents
- What is RAID 5 and how does it work?
- How to create a RAID 5 in Windows?
- How to create a RAID 5 in Linux?
- What are the main causes of RAID 5 failure?
- How to replace a failed disk in the RAID 5 array?
- What do I do if my data is lost due to a RAID 5 failure?
What is RAID 5 and how does it work?
RAID 5 uses striping and checksum generation, which are used if one of the disks fails. However, unlike RAID 4 where a separate disk is used to store parity blocks, in RAID 5 the controller distributes the parity blocks to all disks simultaneously. It allows to evenly distribution of the load between the drives and ensure data safety in case of failure of any of the disks and allows high reading speed because data is read from all disks at the same time.
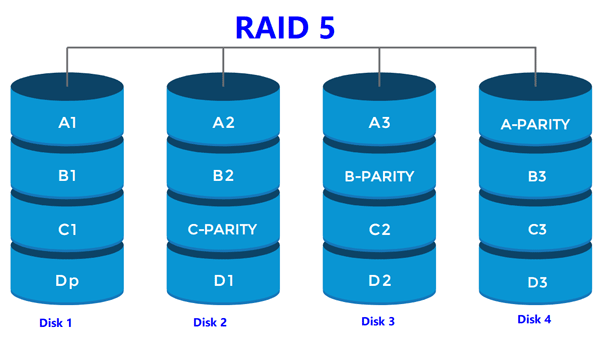
Besides, this principle allows realizing the processing of multiple requests, which RAID 3 and RAID cannot boast. The write speed will be a little slower due to the parity calculation, which requires some resources, but it will be noticeably faster than in RAID 3 or RAID 4.
If any of the disks fail, the array will go into “degradation mode“. Data will be available, but read/write speed will be very slow due to the necessity to constantly recalculate the information. The user can also add a Spare disk, which will be used automatically in case any of the drives fail. The process of copying data to the new drive will start automatically and the user will see a corresponding message. Here it should be said that the process of data recovery to a new drive can take quite a long time. Much depends on which controller you are using. Hardware controllers, although noticeably more expensive, but the presence of the third level cache allows to greatly speeds up the process of data recovery due to the faster parity data recalculation.
In the software controller, all the load falls on the CPU. That is, the recovery speed depends directly on the power of your system. In addition, when replacing a broken disk with a new one, the load on the other disks increases significantly, because both data and information needed for recovery are read from them at the same time.
Speaking of price, it is worth saying that RAID 5 is quite an interesting solution. The formula for calculating the amount of memory available to the user looks like C x (n-1), where n — is the number of disks and C — is the amount of memory. So with three, 1TB drives the user will have 2TB available, with four 1TB drives the user will have 3TB available, etc. That is always one less drive because even though there is no dedicated drive to store parity data, that data still takes up some free space just on all drives.
It is worth noting that the minimum number of disks for a RAID 5 array is 3 and the maximum is 16.
How to create a RAID 5 in Windows?
Windows and Linux operating systems allow you to build a software RAID 5 array using only built-in utilities. You can use such a RAID array for an introductory purpose, as well as primary storage or server. First, connect the disks which will make up the array to your system. Then, in order to create a software RAID 5 in Windows you should:
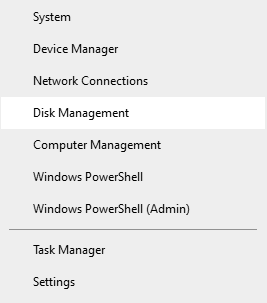
Step 1: Right-click on the “Start” button and select “Disk Management“
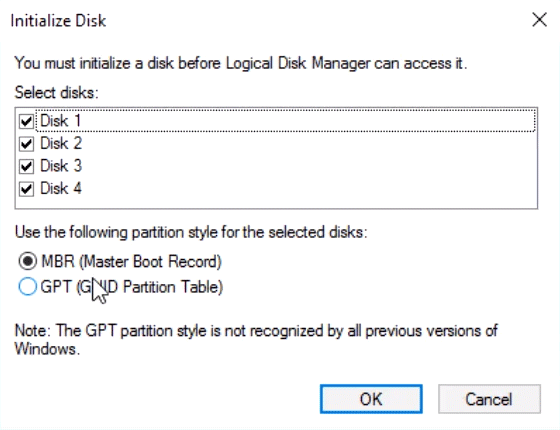
Step 2: The connected drives should appear in the Disk Management window and you will be prompted to initialize them. Select the partition table you want to use. MBR is a good choice if your disks are smaller than 4 TB. If your partitions are larger than 4 TB, you should select GPT. After you select the type of partition table, press “OK”.
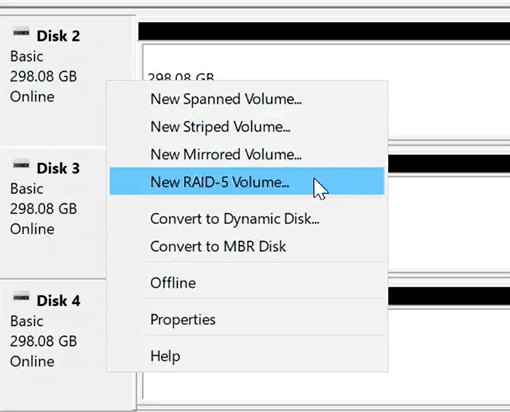
Step 2: Once the drives are initialized, they will appear in the Disk Management utility. Right-click on any disk that you plan to use in your RAID 5 array and choose “New RAID-5 volume…“
Step 3: The built-in array wizard opens in front of you. Click “Next“. Then select the disks that will make up the RAID 5 array and click “Next” again.
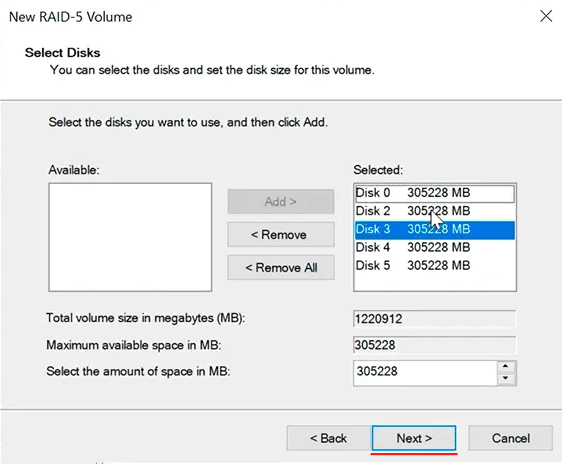
Step 4: At this step, choose the letter of the future RAID 5 array and then click “Next“.
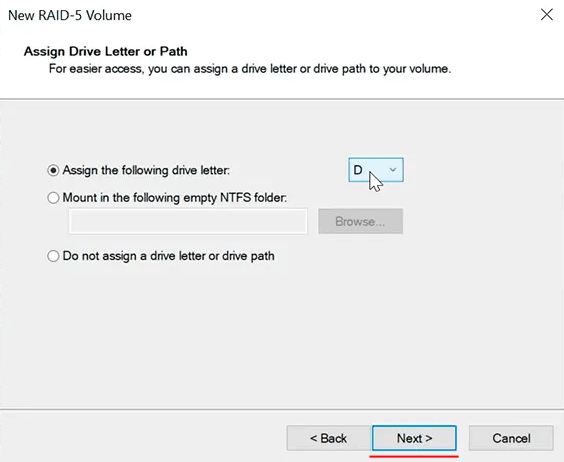
Step 5: Select the file system type for your RAID 5 array and enter the array name in the field below, then click “Next” again.
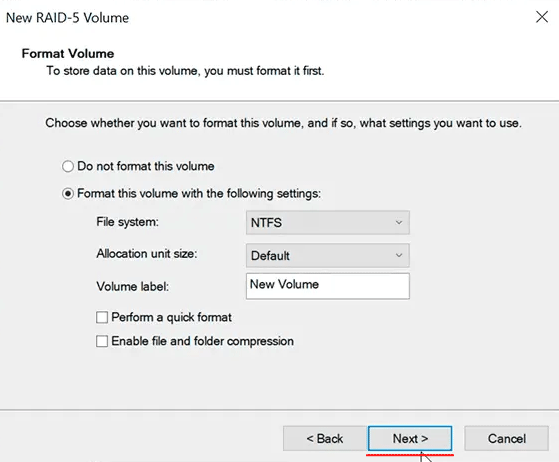
Step 6: The system will warn you that your disks will be formatted, converted to dynamic and that the data will be deleted. Accept by pressing “OK“
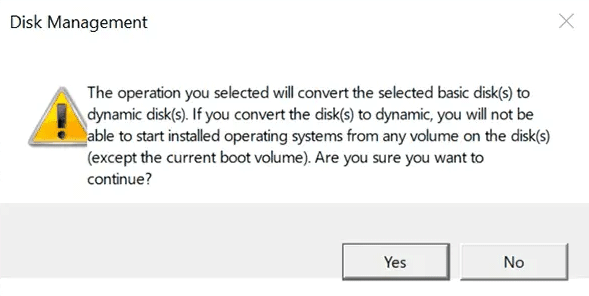
The RAID 5 creation process will begin. When it completes, your array will be ready for use and appear as a separate drive in “Disk Management” and Windows Explorer.
How to create a RAID 5 in Linux?
In Linux, the process of creating a RAID 5 array looks a little different. You can either use a terminal or a graphical shell called “Webmin“
Webmin is a handy control panel accessible via a web browser, and Webmin modules are the front-end to the console utilities.
A superuser account must be used to install it.
It is worth noting that installation of this utility is possible either through the terminal or through the Software Center (if such is available in your system). The second option is much easier – just download the Webmin package from the official website and open it in the Application Center.
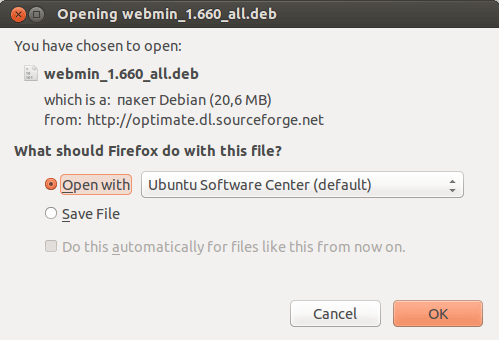
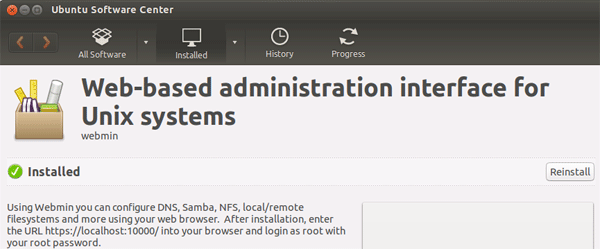
After downloading the installation package, Webmin and the modules required to fulfill the dependencies will be installed, which will be reflected in the Software Center with the status “Installed“
If you use a terminal to install the Webmin package – then follow these steps:
Step 1: Start the terminal, type the command sudo apt-get install perl libnet-ssleay-perl openssl libauthen-pam-perl libpam-runtime libio-pty-perl libdigest-md5-perl and press “Enter“. If necessary, type your password and hit “Enter” again.
This command will install the packages needed for Webmin to work.
Step 2: Add a Webmin repository so that you can install and update Webmin using your package manager. To do this, add the repository to the file /etc/apt/sources.list If there is no such file, create one.
Step 3: Open sources.list file with any text editor and add the line # Repository for Webmin deb http://download.webmin.com/download/repository sarge contrib at the end
Step 4: Type the command $ sudo apt-get update and press “Enter” to update the package index of our system.
Step 5: After that, download the Webmin PGP key using wget and add it to your system key list. To do this, run the command $ wget -q -O- http://www.webmin.com/jcameron-key.asc | sudo apt-key add
Step 6: Now update your package list to add the Webmin repository that your system now trusts. To do this, type the command $ sudo apt update again and press “Enter“
Step 7: All that remains is to install the Webmin package. Type in the terminal command $ sudo apt install webmin and press “Enter” again.
After performing these steps, the Webmin package will be installed and available for use.
To create a RAID-5 array you should:
Step 1: Run Webmin by typing in the url address: https://localhost:10000 and pressing “Enter” (please note that you must type in httpS and not http)
You will see the Webmin interface.
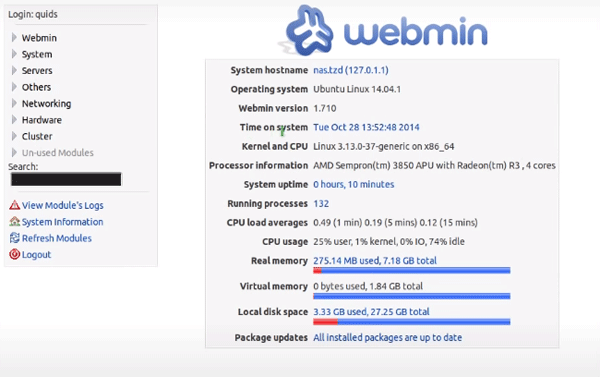
Step 2: On the left side of the browser window you will see the Webmin menu. Choose “Hardware” and click on “Linux RAID” in the list that appears
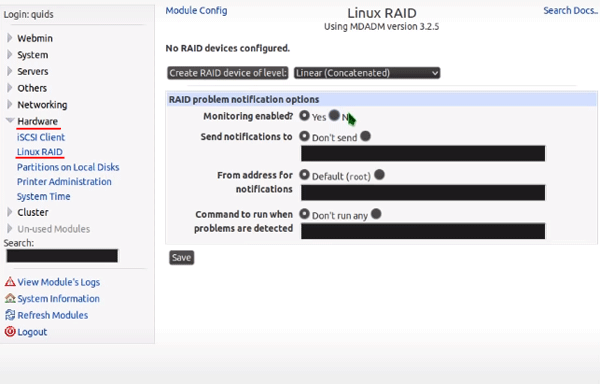
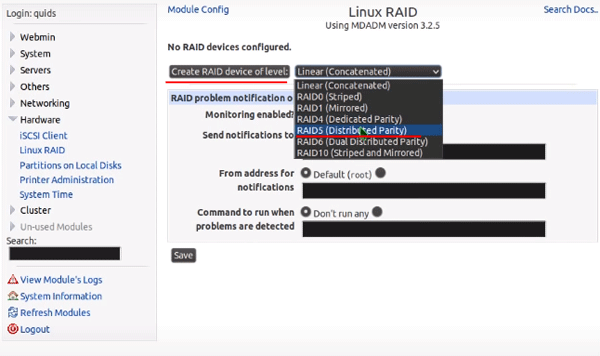
Step 3: Click on “Linear (Concatenated)” and choose the RAID 5 type. Confirm by pressing the “Save” button.
Step 4: In this step select the disks that will make up our RAID array. Leave all other settings as they are. Be sure to check that the “Force initialization of RAID” function is enabled as it is responsible for whether our array will build automatically after system reboot and click “Create“
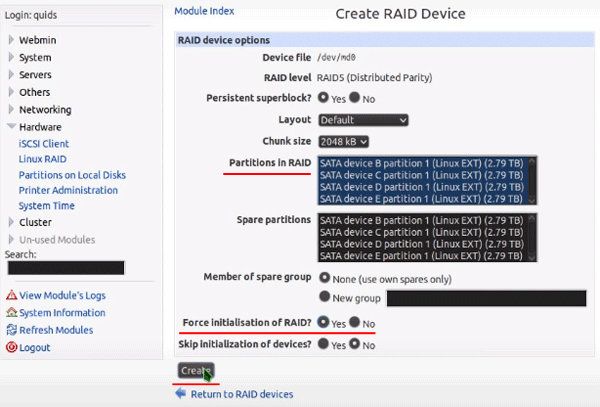
After that your RAID 5 array will be created and ready to use.
What are the main causes of RAID 5 failure?
RAID 5 is a fairly robust solution that is often used on small servers and NAS systems where the work is done mainly with large files. However, it is better not to use RAID 5 to work with databases, because in this case, the performance drops dramatically due to the huge number of small requests, which severely load the controller. For these purposes RAID 10 is a better choice. For more details on RAID types, you can read the article “RAID array types and their usage“
Among the main reasons for RAID 5 failure we can distinguish the following:
1. Electrical surges and sudden power outage – very detrimental to the RAID 5 array and can destroy both the disks and the controller. In any case, it is best to get an uninterruptible power supply.
2. There are a variety of reasons for a controller failure. Hardware controllers are highly dependent on power. That is why many of them have an additional power supply. Software controllers are directly dependent on the health of the operating system. Therefore it is strongly recommended to monitor the OS or ask a specialist to service your system regularly.
3. Viruses and adware software activity. It is especially actual for users of the Windows operating system (and Windows Server) because nowadays there is a great amount of malicious software of different kinds. First of all, it should be said that it is highly recommended to use a licensed copy of the operating system and programs because many pirate builds initially contain viruses that can damage both your system and hardware parts. For example, some viruses can automatically install, a hidden miner that will take up some system resources. But to prevent the user from noticing the performance degradation, the virus increases the voltage on the CPU, making it overclock. As a result, the lifetime of the computer is greatly reduced due to the increased load, and the user does not even realize it. So do regular checks of your files and system for viruses. You can read in more detail in the article “How to check your computer for viruses“
4. Failure of several disks at the same time. It happens from time to time, though quite rarely. The most common cause is a power surge or physical impact.
5. Too many bad blocks can also be a reason for RAID 5 failure. This is especially true for arrays that are not properly maintained. Since the array usually uses identical drives, they have about the same lifetime. If one of the drives fails due to exhaustion of its life, or bad condition – it makes sense to check the other drives because most likely they need to be replaced too, plus if any of the drives fails, the load on the rest will greatly increase. It can fail the other drives and the user will lose data.
6. Human factor is one of the most popular causes of RAID 5 failure and data loss. Sometimes users manipulate the array to reinitialize it. Other times users accidentally delete important information or format the array. In any of those cases, you will need to use professional data recovery software. We recommend using RS RAID Retrieve. It is very easy to use, and most importantly, it does not require much technical knowledge. Even novice users can use it. The process of data recovery from a RAID 5 array is described in detail in the last paragraph of this article.
7. Sometimes an array assembly error may occur after a system reboot. There may be several reasons: improperly connected drives (e.g. after scheduled maintenance), damaged cables, failures in the logical drive structure, etc. In any of these cases, the controller fails to build the array and the user will lose important data.
Any of the above reasons can cause the loss of important information. To prevent this, use only quality components and licensed software. In addition, properly and regularly maintain your array and the possibility of data loss will be greatly reduced.
How to replace a failed disk in the RAID 5 array?
The main advantage of RAID technology is replacing a broken drive with a new one without losing information (except for RAID 0). However, not all users know how to do it correctly and sometimes instead of replacing the drive they recreate the array and lose important data.
So to replace a failed RAID 5 disk you should:
Step 1: Back up all important files so that you don’t lose information in case something goes wrong.
Step 2: Turn off the power, then replace the damaged drive with a new one. After that, turn on the power again. Right-click on “Start” and select “Disk Management“

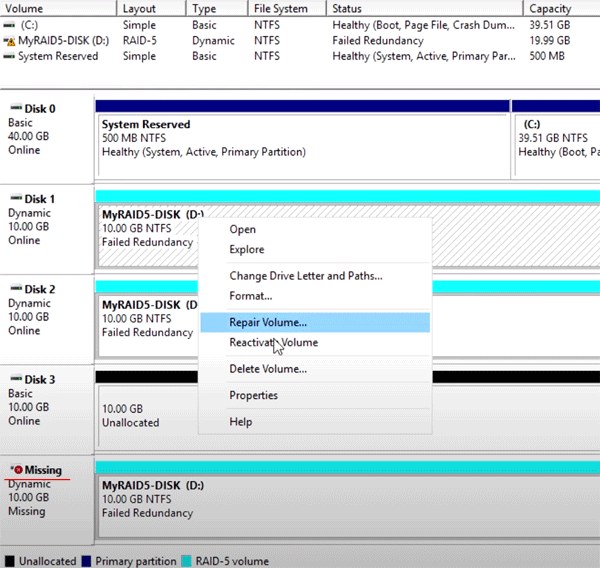
Step 3: The status of your array will appear as “Failed Redundancy” and the status of the drive you removed from the system will appear as “Missing“. To add a new disk to your RAID 5 right-click on any of the remaining disks in the array and choose “Repair Volume“
Step 4: In the window that appears, select the new disk you want to add and click “OK
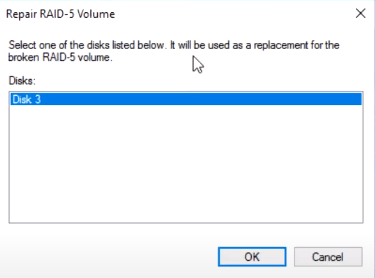
The process of adding the disk to the array will start, and the data will be synchronized. After that, the disk will be successfully added.
As you can see the replacement process is not complicated. The main thing is to do everything correctly using the instructions described above.
What do I do if my data is lost due to a RAID 5 failure?
The value of information in today’s world often exceeds the cost of the computer, server, or NAS system itself. It is especially true for large companies, where their future depends on the safety of their data. At the same time, information is no less valuable to regular users. It is difficult to find a person in today’s world who would not store any important photos, videos, or documents on his computer or personal server. And what if an important report or presentation is lost on the eve of a business meeting with partners or a person loses photos from a wedding or the birth of a child? In such a situation, the reason will not matter. It will be important to know how to recover valuable data correctly.
To recover the lost data from the RAID 5 array the first thing to do is to extract the data from the disks and only after that to restore the array functionality.
To extract the information from the disks, follow a few simple steps:
Step 1: Download and install RS RAID Retrieve. Launch the application after installing. The built-in “RAID constructor” will open in front of you. Click “Next“

Data recovery from damaged RAID arrays
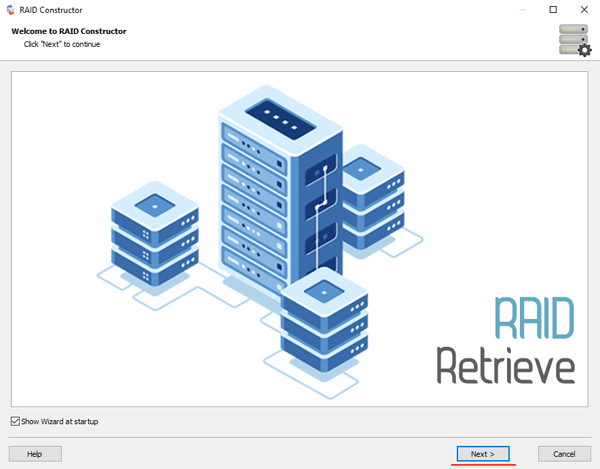
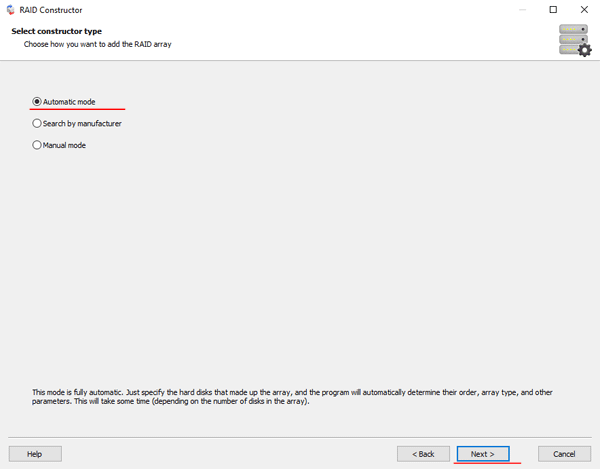
Step 2: Choose the method of adding a RAID array for scanning. RS RAID Retrieve offers three options to choose from:
- Automatic mode – allows you to simply specify the drives that made up the array, and the program will automatically determine their order, array type, and other parameters;
- Search by manufacturer – this option should be chosen if you know the manufacturer of your RAID controller. This option is also automatic and does not require any knowledge about the RAID array structure. Having the manufacturer’s information allows you to reduce the time to build the array, and is, therefore, faster than the previous option;
- Manual creation – this option is worth using if you know what type of RAID you are using. In this case, you can specify all parameters you know, and those which you do not know – the program will automatically determine
After you select the appropriate option – click “Next“.
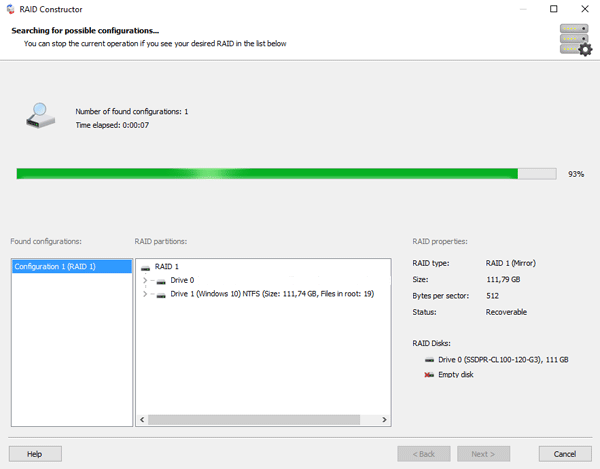
Step 3: Select the disks that make up the RAID array and click “Next“. It will start the process of detecting the array configurations. When it is complete, click “Finish“.
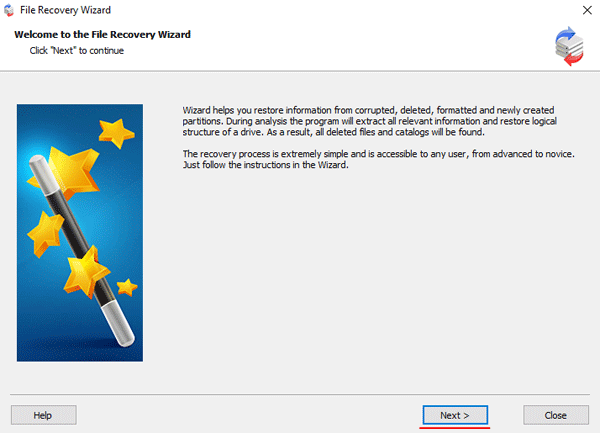
Step 4: After the constructor builds the array – it will appear as a regular drive. Double left-click on it. The File Recovery Wizard will open in front of you. Click “Next“
Step 5: RS RAID Retrieve will offer to scan your array for files to recover. You will have two options: a quick scan and a full analysis of the array. Select the desired option. Then select the file system type that was used on the array. If you do not know this information, check all available options, like on the screenshot. It is worth noting that RS RAID Retrieve supports ALL modern file systems.
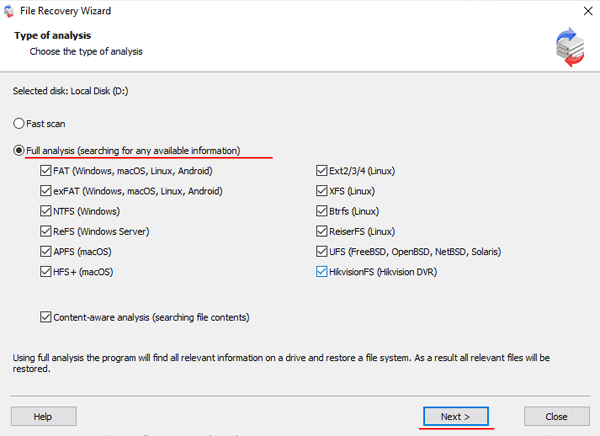
Step 6: The array scanning process will start. When it finishes, you will see the previous structure of files and folders. Find the necessary files, right-click on them and select “Recovery“

Step 7: Specify the location where the recovered files will be saved. This can be a hard drive, a ZIP-archive, or an FTP-server. Click “Next“
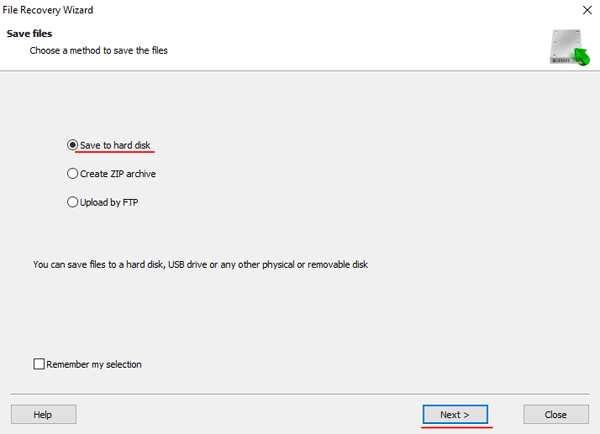
After clicking the “Next” button, the program will begin the recovery process. When it finishes – the selected files will be in the specified location.
After all, files are successfully restored – recreate the RAID 5 array, and then copy the files back.
As you can see, the RAID 5 data recovery process is quite simple and doesn’t require much PC knowledge, making RS RAID Retrieve the perfect application for professionals and novice users alike.

