For organizations relying on the NAS QNAP TS-216G, any disruption — RAID degradation, disk failure, or system corruption — can result in costly downtime. Understanding how data loss occurs on this model is essential for maintaining business continuity. This guide outlines the key risks affecting the NAS QNAP TS-216G and provides practical recovery strategies for professional environments

Detailed NAS Hardware Architecture and RAID-Level Technical Insights
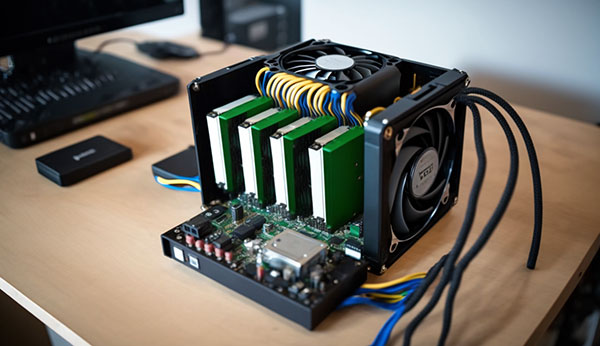
The QNAP TS-216G NAS provides a robust hardware platform featuring 2 SATA bays, a dedicated RAID controller, and support for EXT4 and Btrfs with full metadata journaling. RAID 0/1 implementations rely on stripe-based block distribution with synchronized parity-free writes. The system stores critical RAID metadata (superblocks, partition layout, chunk size, member order) on each disk, allowing reconstruction after partial array degradation.
During professional data recovery, forensic analysis focuses on block offsets, stripe sequencing, mdadm signatures, and file-system–level structures to reassemble the logical volume with byte-level accuracy.
How Data Recovery Works on QNAP TS-216G
Data recovery on the QNAP TS-216G is simpler than it seems. The system stores information on two disks that can work together as RAID 0 (speed) or RAID 1 (mirroring). If one disk fails or files are deleted, recovery software reads both drives, reconstructs the structure, and restores photos, videos, or documents. Even beginners can understand the process when guided by clear tools.
Main Features of the QNAP TS-216G NAS
| Drive Bays | Supported Drives | Hot Swappable | Supported RAID | File Systems | Maximum volume |
| 2 | 2.5" or 3.5" SATA | ✓ | RAID 0, RAID 1, JBOD | EXT4, BTRFS | 32 Tb |
As deployed in the QNAP TS-216G the storage stack is a classic Linux software-RAID architecture: RAID is managed with mdadm exposing RAID 0, RAID 1 or JBOD devices, optionally layered into LVM logical volumes and finally formatted with either EXT4 or BTRFS under QTS 5. There is no SSD cache layer on this model, so no additional caching metadata to consider. Model-specific failure points include corrupted mdadm superblocks or incorrect device ordering after drive removal, BTRFS tree or extent-map corruption, EXT4 journal inconsistencies, and OS-level faults in QTS 5 during upgrades. Limited system memory (2 GB) and the ARM platform constrain on-device recovery utilities and can contribute to incomplete metadata writes under heavy IO, increasing the risk of RAID/LVM or filesystem metadata corruption.
Logical inaccessibility typically arises when one layer cannot expose coherent metadata to the layer above: damaged mdadm metadata prevents array assembly, broken LVM metadata hides volume groups, and filesystem journal or BTRFS metadata damage prevents mounts. Recovery outside the NAS follows a strict forensic principle: create bit-for-bit images of all member drives, perform array assembly and volume activation on a controlled Linux host using mdadm (assemble or carefully --build with correct device order), restore or import LVM metadata, and then access filesystems read-only with btrfs-progs or ext4 tools (e2fsck/e2image) to extract data. Working on copies prevents additional writes by the ARM/QTS environment and preserves original mdadm/LVM/FS metadata for repeatable diagnostics.
Step-by-Step Guide to Recovering Data from a 2-Disk NAS QNAP TS-216G
In recent years, two-disk NAS devices like the QNAP TS-216G have become essential home and small-office data hubs. But when a RAID array collapses, a volume turns “degraded,” or the NAS simply refuses to boot, users often face a sudden crisis: terabytes of irreplaceable data seemingly lost. In this report, we analyze the practical recovery steps recommended by digital forensics specialists, explaining how to safely extract information even from failed RAID 1 or RAID 0 configurations.
-
Step 1 Power down the NAS and remove both drives.
Before any recovery attempt, experts emphasize shutting down the NAS fully to stop background processes from overwriting metadata. Remove the drives carefully and preserve their original order — RAID reconstruction relies on this sequence.
-
Step 2 Connect the disks to a computer for analysis.
Use direct SATA connections or certified USB-to-SATA bridges. Data-recovery analysts stress that both disks must be available simultaneously to replicate the original RAID logic.
-
Step 3 Launch RS RAID Retrieve.
This forensic-grade utility performs a non-destructive scan and attempts to interpret the RAID structure automatically — RAID level, stripe size, parity rotation, disk order and more.

Data recovery from damaged RAID arrays
Available for: Windows, macOS, Linux -
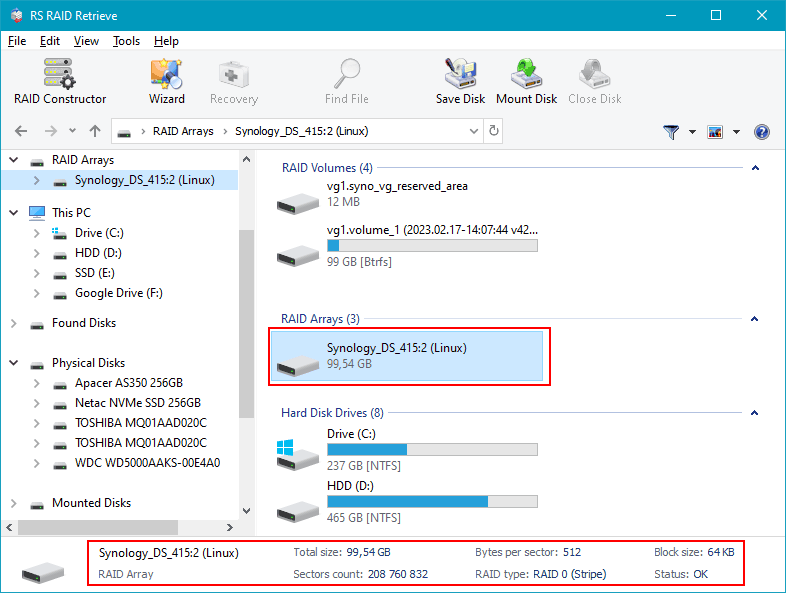
Step 4 Review the detected RAID configuration.
Although the software identifies most arrays correctly, mismatches can be corrected manually. This ensures the recovered file system mirrors the one originally stored on the NAS.
-
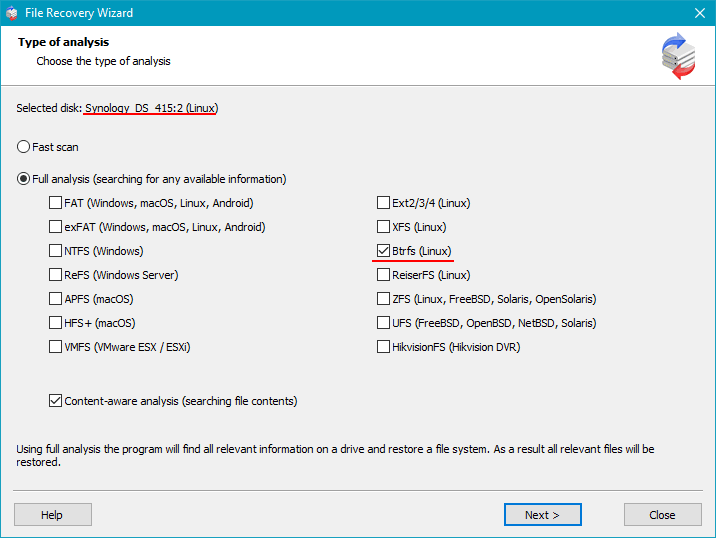
Step 5 Initiate a deep scan of the virtual RAID.
The program reconstructs directory structures, recovers lost partitions and searches for documents, videos, photos and long-deleted files using signature-based algorithms.
-
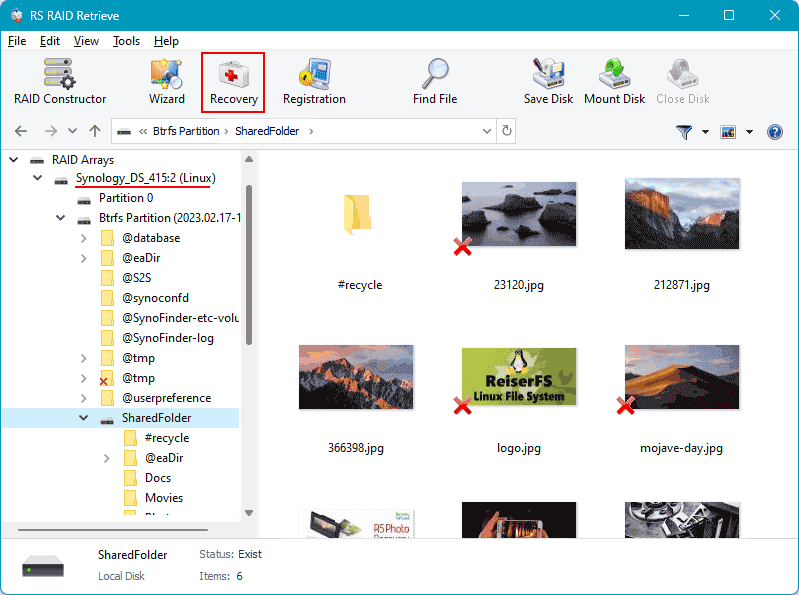
Step 6 Examine the recovery results.
When the scan completes, you receive a full folder tree with accessible and previously inaccessible data. Journalistic investigations into data-loss cases show that most home NAS failures allow 80–100% recovery.
-
Step 7 Export the recovered files safely.
Save data onto an external drive or another internal disk — never to the original NAS disks, which must remain untouched during the recovery process.
Experts warn: writing data back to the original NAS drives may permanently destroy recoverable information.
The main causes of data loss in NAS devices
Disk failure. Physical malfunction of HDD or SSD is a common reason for data loss, especially in 2-disk NAS systems affecting RAID0 and important for RAID1.
Human errors (deletion, formatting). Accidental deletion or incorrect formatting can result in inaccessible files, requiring prompt recovery actions.
Firmware or DSM update errors. Improper system updates may corrupt partition tables or file metadata, causing data loss.
Power problems and sudden shutdowns. Unexpected power interruptions during write operations can damage file systems and compromise RAID integrity.
Why RAID Fails in NAS QNAP TS-216G: An Inside Look at 2-Bay Storage Risks
Failures in two-disk NAS systems often come as a surprise, especially when users rely on RAID as a safety net. Yet recent industry reports show that RAID arrays — even in consumer-grade NAS QNAP TS-216G devices — face predictable, escalating risks over years of operation. Understanding how these failures emerge helps explain why data recovery becomes urgent long before the NAS itself stops responding.
Experts note that the most common catalysts for RAID degradation in compact home and small-office NAS units are neither dramatic nor sudden. Instead, they form a slow-burn scenario where minor hardware inconsistencies eventually align into a structural failure. Our editorial team analyzed user cases, recovery lab statistics, and vendor documentation to understand what truly drives RAID breakdowns in 2-bay systems.
- Drive desynchronization over time. Contrary to popular belief, RAID 1 does not guarantee permanent redundancy. When disks age differently, subtle performance drifts accumulate until the array can no longer maintain synchronous writes.
Thermal pressure inside compact enclosures. Two-disk NAS models often lack robust airflow. As temperatures rise, SMART errors increase and RAID controllers struggle to maintain stable parity operations — especially in RAID 0 or hybrid modes.
Controller strain during rebuilds. During a rebuild, NAS QNAP TS-216G devices can push both drives to their operational limits. If a second disk shows even minor inconsistencies, the process collapses and RAID fails entirely.
Firmware conflicts and delayed updates. Journaled file systems and RAID layers rely heavily on firmware coordination. Outdated microcode can introduce silent corruption — often discovered only when recovery is already necessary.
In the end, the story of RAID failures in two-disk NAS systems is a story of inevitability: drives age, parity weakens, and redundancy thins. What matters most is how quickly users react once early warning signs appear. And when those signs escalate — “Degraded Volume,” slow file access, unmountable shares — professional data recovery becomes not a last resort, but the only reliable path to preserving irreplaceable information.