Recovering data from a NAS Buffalo TeraStation TS6200DN becomes essential when the device stops responding, the RAID array degrades, or important files suddenly disappear. Disk failures, firmware issues, accidental deletion, or logical corruption can make the storage inaccessible. In this guide, we explain the main causes of data loss on the NAS Buffalo TeraStation TS6200DN and outline safe methods to restore access without risking further damage.
NAS Hardware Specifications and RAID Architecture
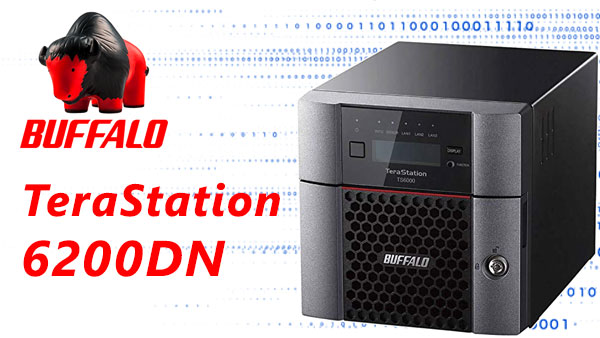
The Buffalo TeraStation TS6200DN NAS is equipped with 2 drive bays, supporting RAID 0/1/5/6 configurations depending on the installed firmware. Its controller manages data distribution across disks to ensure redundancy and optimized throughput. File systems include EXT4 and Btrfs, with the latter providing snapshotting and enhanced data integrity features.
During recovery operations, the RAID metadata, partition tables, and stripe order must be analyzed to rebuild the logical volume correctly.
Internal Factors Affecting Data Recovery on Buffalo TeraStation TS6200DN
Recovering data from the Buffalo TeraStation TS6200DN delivers clear benefits for home users and small businesses. With its two-bay architecture and RAID 0/1 support, data reconstruction becomes predictable and efficient. Modern recovery tools can rebuild damaged arrays, restore deleted files, and retrieve lost multimedia libraries, even after system failures or accidental resets.
Main Features of the Buffalo TeraStation TS6200DN NAS
| Drive Bays | Supported Drives | Hot Swappable | Supported RAID | File Systems | Maximum volume |
| 2 | 2.5" or 3.5" SATA | ✓ | RAID 0, RAID 1, JBOD | NTFS, EXT4, BTRFS, XFS | 32 Tb |
Storage architecture of the Buffalo TeraStation TS6200DN is a Linux-based appliance running TeraStation OS 6 on an Intel Atom C3338 CPU with 8 GB RAM, configurable as RAID 0, RAID 1, or JBOD and optionally using an SSD cache. The device implements software RAID using mdadm, layered above the block devices and the cache, with user data stored on filesystems supported by the unit (BTRFS, XFS, EXT4, NTFS, FAT32). Model-specific failure points include: mdadm superblock corruption or mismatched metadata after interrupted operations or firmware updates; SSD cache coherency faults producing stale writes; limited CPU and 8 GB memory causing timeouts or rebuild failures during large array reconstruction; and OS-level kernel or TeraStation OS 6 update regressions that alter device naming or RAID handling.
Logical data inaccessibility typically manifests when mdadm metadata is damaged, filesystem metadata (BTRFS/XFS/EXT4) becomes inconsistent, or the SSD cache presents a divergent view of blocks. The diagnostic and recovery principle is recovery outside the NAS: do not rebuild in-place on the appliance. Instead image each disk and the SSD cache if present, export images read-only to a forensic workstation, then reassemble arrays with mdadm --assemble --readonly (adjusting metadata offsets if required). Mount filesystems read-only for metadata extraction and use filesystem-specific repair tools on copies; this avoids Atom CPU and OS instability on the TeraStation and preserves evidence while enabling controlled reconstruction of files.
Your NAS Failed? Recover Every File with This High-Success 7-Step Method
When your 2-disk NAS collapses — whether from RAID damage, unexpected power loss, disk failure or accidental deletion — it feels like the world stops. But don’t panic: with the right recovery workflow, your photos, business documents, videos, archives and memories can still be restored. Follow this premium, high-success recovery method trusted by thousands of technicians and home users.
-
Step 1 Power off the NAS and safely remove both drives.
Shut down the device completely and extract the disks with care. Mark them as “Disk 1” and “Disk 2”. This preserves the original RAID order — a crucial condition for an accurate reconstruction.
-
Step 2 Connect the drives directly to your PC.
Use SATA ports or high-quality adapters. Both disks must be available simultaneously so the software can analyze block structures and reassemble the RAID layout.
-
Step 3 Launch a professional NAS recovery tool.
Open RS RAID Retrieve. It automatically scans the metadata, detects the logical RAID pattern, reconstructs the original volume and prepares it for deep analysis.

Data recovery from damaged RAID arrays
Available for: Windows, macOS, Linux -
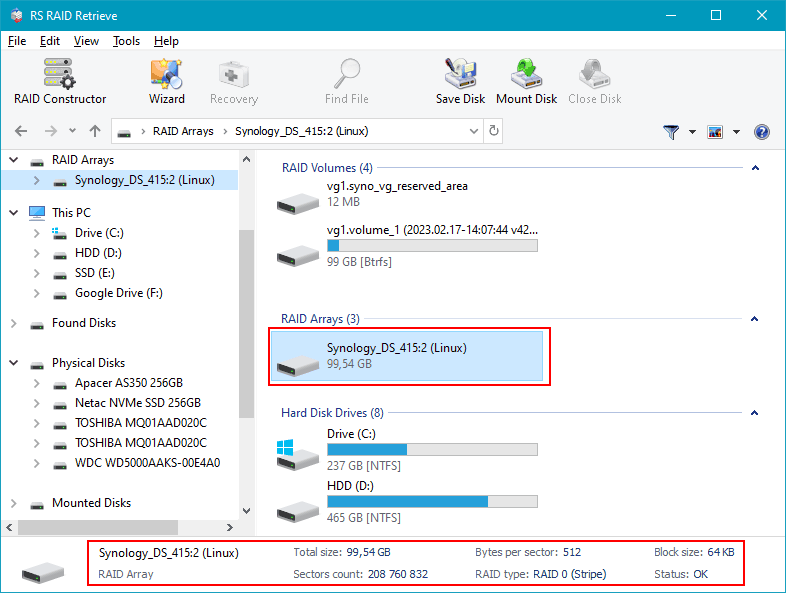
Step 4 Verify RAID configuration.
The program identifies RAID type, block size, disk order and parity rotation. You can adjust parameters manually if your NAS used a non-standard scheme.
-
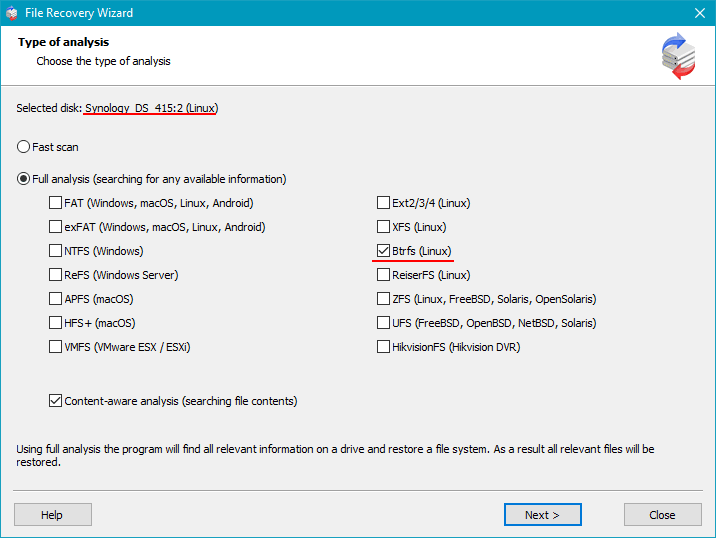
Step 5 Start deep scanning.
RS RAID Retrieve rebuilds directory structures, extracts deleted files, restores fragmented data and recovers documents, multimedia and archives even from damaged file systems.
-
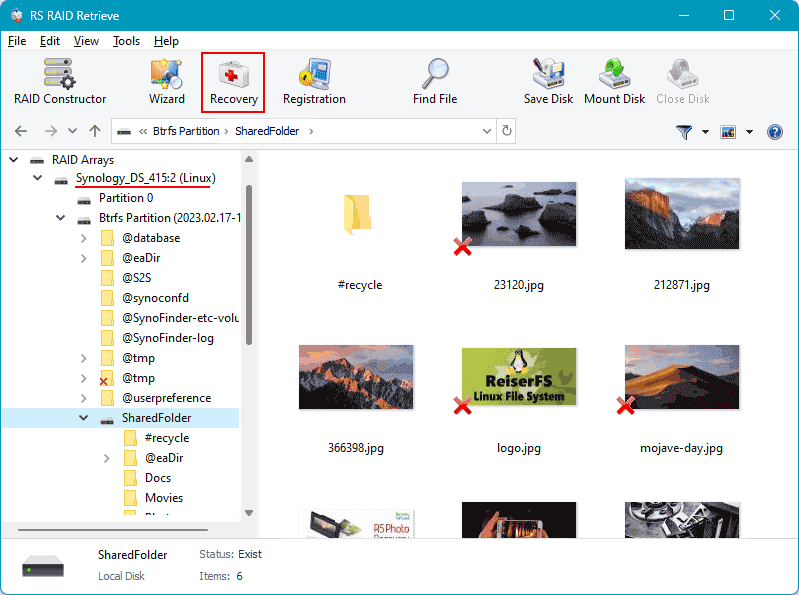
Step 6 Review recovered files.
Browse through folders, preview images and videos, check documents and confirm successful recovery before exporting them.
-
Step 7 Save everything to a safe location.
Choose an external drive or a separate partition. Avoid writing back to the original NAS disks to prevent overwriting.
Tip: The earlier you begin the recovery, the higher your data-restoration success rate.
The main causes of data loss in NAS devices
Disk failure. Physical malfunction of HDD or SSD is a common reason for data loss, especially in 2-disk NAS systems affecting RAID0 and important for RAID1.
Human errors (deletion, formatting). Accidental deletion or incorrect formatting can result in inaccessible files, requiring prompt recovery actions.
Firmware or DSM update errors. Improper system updates may corrupt partition tables or file metadata, causing data loss.
Power problems and sudden shutdowns. Unexpected power interruptions during write operations can damage file systems and compromise RAID integrity.
Why RAID Fails in 2-Disk NAS Buffalo TeraStation TS6200DN Systems — Key Causes and Early Warning Signs
RAID failures in 2-disk NAS Buffalo TeraStation TS6200DN systems follow a predictable pattern: performance degradation, disk desynchronization, and finally, a complete breakdown of the storage array. Understanding why these failures occur — and how to identify them early — is crucial for users who rely on their NAS for backup, multimedia libraries, work files, or continuous data access.
RAID mechanics and why issues escalate quickly. RAID arrays in small 2-disk NAS units depend on stable disk reads, synchronized metadata, and consistent throughput. When one disk begins showing SMART warnings, unstable sectors, or temperature spikes, the RAID integrity deteriorates. These seemingly minor issues often accelerate until the system becomes “Degraded,” enters a rebuild loop, or loses access to volumes entirely.
Most common SEO-relevant causes of RAID failure:
- Progressive bad sectors leading to inconsistent RAID parity or mirrored data;
- Metadata corruption caused by sudden shutdowns or unstable power environments;
- Non-NAS-rated drives reaching end-of-life after continuous 24/7 operation;
- Firmware conflicts or incomplete RAID rebuilds after a disk replacement.
Why 2-disk systems are especially vulnerable. RAID 0 loses all data if even one disk becomes unreadable. RAID 1 offers redundancy, but if the second disk begins degrading before the first is replaced — a common scenario — the entire array collapses. This risk is heightened in Buffalo TeraStation TS6200DN units that run multiple services (file sharing, media servers, virtual environments), adding additional load to drives.
SEO takeaway: Slow file access, degraded RAID status, disappearing disks, or unusual NAS noise should immediately prompt backup or data recovery actions. The faster the response, the greater the chance of full recovery from a 2-disk NAS Buffalo TeraStation TS6200DN.