Using RAID arrays allows you to increase data security. But we should not forget that RAID arrays can also fail. Often the cause is the peculiarities of the operating system. The most important point is that RAID failure often cannot be repaired with the built-in Linux tools. In this article, we will discuss the main causes of RAID failure on Linux and what to do if a RAID array fails.

Contents
- How to recover a RAID array if the built-in Linux tools do not help?
- Situations when it is better to use RS RAID Retrieve right away and the reasons for them.
- Conclusion
The Linux operating system allows you to work with both hardware and software RAID arrays. Moreover, Linux natively supports several basic RAID types. More information on RAID levels can be found in the article “RAID arrays – what are they, types, how to use them?“
If you want to know more information about creating software RAID on Linux, you can read the article “How to create a software RAID array on Linux?“. In the same article, you will find instructions on how to create combined RAID types (e.g. RAID 10).
How to recover a RAID array if the built-in Linux tools do not help?
The Linux operating system has a utility called mdadm for RAID management. It has good functionality, but sometimes there are situations where rebuilding a RAID array is not possible with the built-in tools, or it takes an enormous amount of time to rebuild. It is especially true for inexperienced users who use a RAID array for home-usage.+
For example, it is not uncommon for a system to accidentally delete a superblock from a disk. As a result, Linux does not know how to build a RAID array correctly, and it stops working.
Such situation can be observed with RAID 0 when the user wants to get maximum speed through striping.
It would seem to be not much of a problem since some file systems create two copies of a superblock (or more) – at the beginning and the end of the disk. But, in reality, to restore a superblock, you need a lot of knowledge and a lot of time to get the array back up and running.
For example, you can use the following algorithm to recover a superblock:
Step 1: Start the terminal. In GNU the keyboard shortcut “Ctrl + Alt + T” is used for this purpose.
Step 2: In the terminal that opens, run the following command:
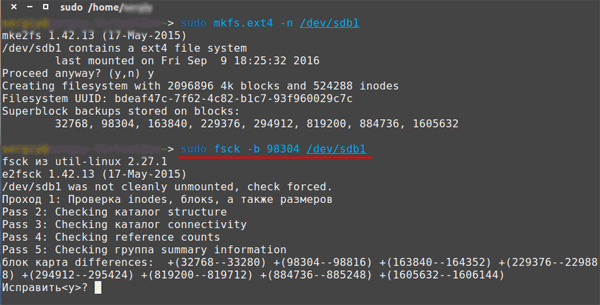
$ sudo mkfs -t ext4 -n /dev/sda1
…where ext4 is your file system, -n is the parameter that outputs information about the file system, including copies of the superblock, and /dev/sda1 is your disk.
Important: the block size must be the same as in the original filesystem. If it is different, the method will not work.

Step 3: In the screenshot above you can see six superblock backups (each number is the number of the block where the superblock copy is stored). Select any of them, and then run the command:
$ sudo fsck -b 32678 /dev/sda1
The terminal will ask if you want to fix the superblock. Press “y” on your keyboard and then “Enter” to start fixing the corrupted superblock.
Hint: if the repair attempt fails, repeat the command above for each superblock backup.
After that, the system will recover your superblock.
It would seem to be very simple, but unfortunately, it is so simple only in theory. In practice, very often, this method does not work. Moreover, each time you try to recover a superblock, the risk of losing all the data on the disk gets higher.
In such a situation, it makes more sense to use third-party RAID recovery software, as it saves time and nerves. Plus, you get a near hundred percent data recovery guarantee.
The best solution is to use RS RAID Retrieve software. The program is incredibly easy to use due to its built-in RAID constructor with auto mode support. It will build your RAID array automatically.
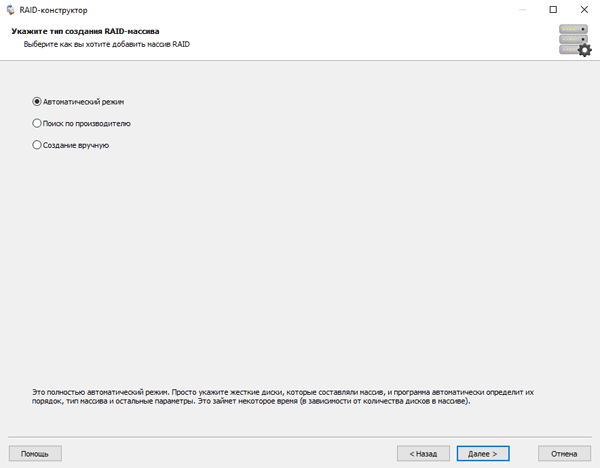
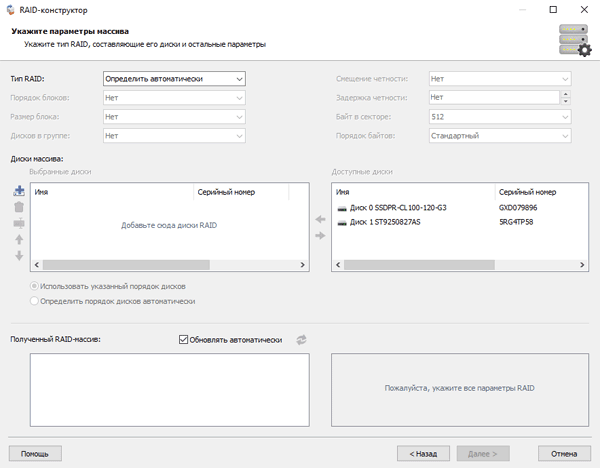
If there is a need, you can specify the required parameters manually in the semiautomatic or manual mode.
It is impossible not to mention the support of ALL modern file systems. Thanks to this, you will be able to extract your data and restore the RAID array no matter what operating system it was running on.
For a complete list of situations when it’s not worth the hassle and better to use RS RAID Retrieve right away, see the next paragraph of this article. For now, let’s take a look at what the RAID recovery process looks like, regardless of its type:
Step 1: Download and install RS RAID Retrieve. Launch the application after installing. The built-in “RAID constructor” will open in front of you. Click “Next“

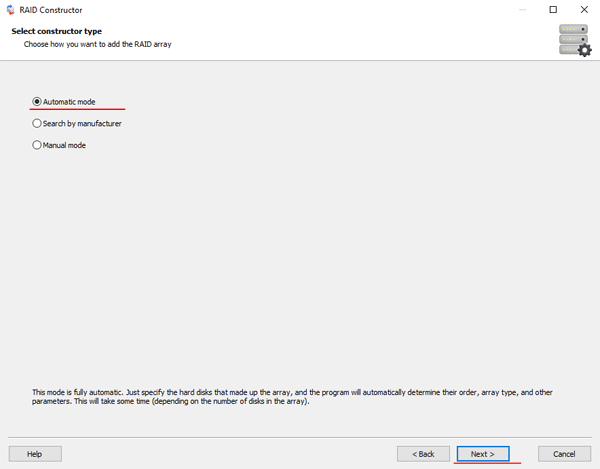
Step 2: Choose the method of adding a RAID array for scanning. RS RAID Retrieve offers three options to choose from:
- Automatic mode – allows you to simply specify the drives that made up the array, and the program will automatically determine their order, array type, and other parameters;
- Search by manufacturer – this option should be chosen if you know the manufacturer of your RAID controller. This option is also automatic and does not require any knowledge about the RAID array structure. Having the manufacturer’s information allows you to reduce the time to build the array, and is, therefore, faster than the previous option;
- Manual creation – this option is worth using if you know what type of RAID you are using. In this case, you can specify all parameters you know, and those which you do not know – the program will automatically determine
After you select the appropriate option – click “Next“.
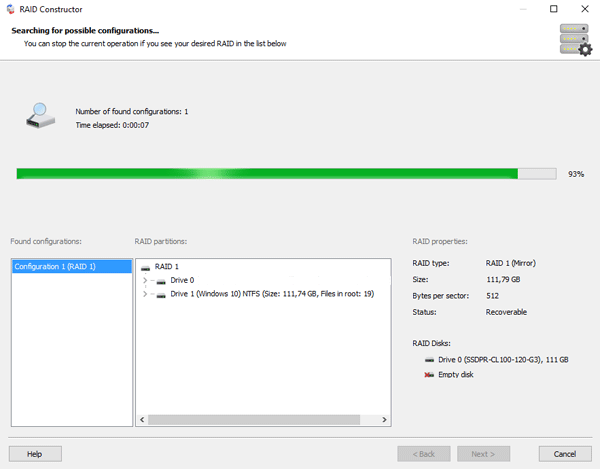
Step 3: Select the disks that make up the RAID array and click “Next“. It will start the process of detecting the array configurations. When it is complete, click “Finish“.
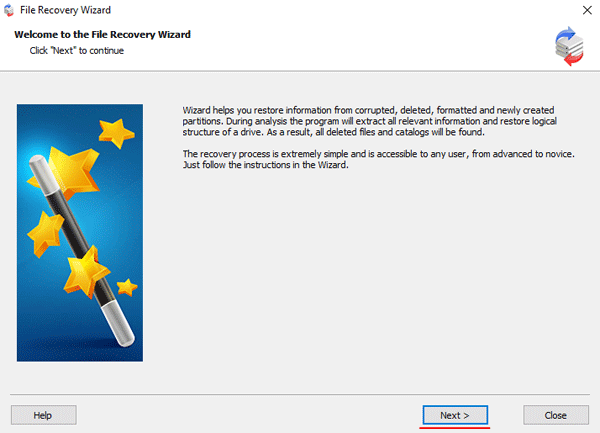
Step 4: After the constructor builds the array – it will appear as a regular drive. Double left-click on it. The File Recovery Wizard will open in front of you. Click “Next“
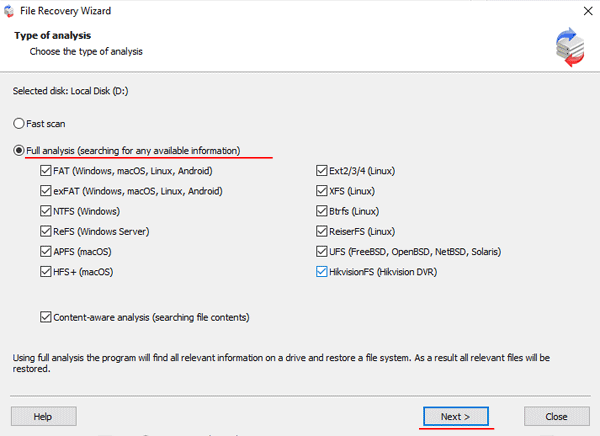
Step 5: RS RAID Retrieve will offer to scan your array for files to recover. You will have two options: a quick scan and a full analysis of the array. Select the desired option. Then select the file system type that was used on the array. If you do not know this information, check all available options, like on the screenshot. It is worth noting that RS RAID Retrieve supports ALL modern file systems.
Step 6: The array scanning process will start. When it finishes, you will see the previous structure of files and folders. Find the necessary files, right-click on them and select “Recovery“

Step 7: Specify the location where the recovered files will be saved. This can be a hard drive, a ZIP-archive, or an FTP-server. Click “Next“
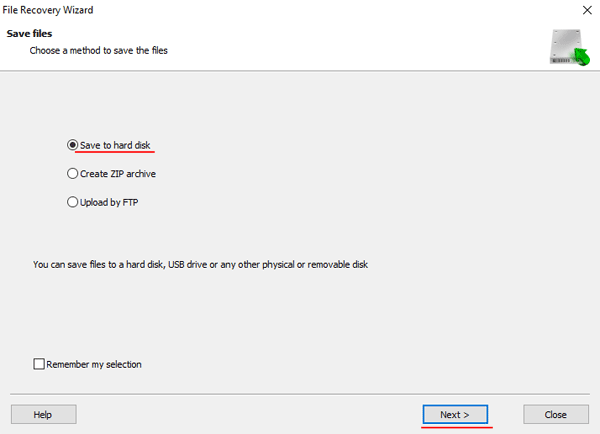
After clicking the “Next” button, the program will begin the recovery process. When it finishes – the selected files will be in the specified location.
After all, files are successfully restored – recreate your RAID array, and then copy the files back.
As you can see, the RAID data recovery process is quite simple and doesn’t require much PC knowledge, making RS RAID Retrieve the perfect application for professionals and novice users alike.
Situations when it is better to use RS RAID Retrieve right away and the reasons for them.
As mentioned above, sometimes there are situations where it is better not to waste your time and immediately use professional third-party applications to restore the performance of the RAID array. Examples of such situations are described below.
2.1 Superblock problems on Linux
It is relevant only for RAID arrays without redundancy (RAID 0). Often the Linux operating system automatically deletes a superblock from the disk, and it is impossible to predict the deletion. The reasons can be very different, ranging from user actions to failures in the Linux distributive. In addition, often the reasons for superblock deletion are power failures, which in turn lead to system failures that damage the superblock.
To prevent superblock corruption you need to monitor the RAID disks status, and the whole operating system carefully.
Often the causes of failures are logical errors or a large number of bad sectors. Accordingly, regular scanning of the drives is recommended.
Also, make sure that you have an uninterruptible power supply. It will help to prevent many problems in the future.
2.2. RAID controller problems on Linux
The RAID controller is the most important element of a RAID array. In some cases, it is even more important than the disks. It is the one that distributes data between the disks, remembers the disk order and location of the initial blocks of data where all data begins to be read, and much more.
Accordingly, if something happens to the disk you can easily replace it. But if something happens to the controller – the whole RAID array will crash, regardless of its type and disk count.
The problem is that the Linux operating system does not know where the initial block of information is stored and therefore cannot assemble the RAID array.
Naturally, the command to force an array does not work.
A broken RAID controller cannot be restored using the built-in Linux tools. There is no point in even trying. There is a clear need for a professional RAID recovery tool. We recommend RS RAID Retrieve. The recovery process was explained in detail in the previous paragraph of this article.
The reason RAID arrays crash most often is controller failure. Especially it is actual for the software RAID controllers since they entirely depend on the working capacity of the operating system.
Therefore you need to use only licensed software and carefully monitor your Linux distribution to prevent errors.
Power surges and sudden power outages are the main causes of controller failures. Problems with the Linux distribution are less common.
It is worth noting that hardware RAID controllers usually have a built-in battery. Thus, they are less sensitive to power fluctuations. But they are also more expensive. After all, a software RAID controller is practically free.
2.3. Sudden RAID initialization
RAID initialization refers to the initial setup, assembly, and startup of a RAID array. That is, the disks are formatted, and a new logical structure is created on them. Of course, it leads to the loss of all data.
Unfortunately, the built-in Linux tools are not helpful in such a situation and worsen the situation even more.
To understand why this is the case, you have to understand how the operating system deletes the data.
When you delete information, Linux does not physically remove the data. It only deletes a link to the file, making it invisible, and thus allowing it to be overwritten with other data. (By the way, this is the reason why information is deleted much faster than written).
Accordingly, every extra manipulation increases the risk that an important file will be overwritten by other information.
Unfortunately, Linux does not have a RAID recovery tool for now, but if you use RS RAID Retrieve you can save your data and retrieve your RAID array with no problems.
So as soon as you detect a problem with your Linux distribution or RAID array – immediately recover your data in a safe place with RS RAID Retrieve.
It is worth noting that most often the RAID initialization is due to user action. Less often it is due to a Linux system failure.
So perform operations that you are 100% sure of and maintain your Linux distribution regularly.
2.4. RAID building errors
Sometimes users may see a situation where a RAID array does not want to build. In some cases, the command helps:
$ sudo mdadm --assemble --scan -force
Instructions on how to use the command and how to rebuild a RAID array automatically after a reboot can be found in the article “How to create the software RAID on Linux?“
Unfortunately, it often happens that you cannot build a RAID array, and the Linux tools are completely useless. In that situation, it is better not to waste your time and immediately turn to professional RAID recovery software from third-party developers. You can read about the easiest way to retrieve a broken RAID array in the first paragraph of this article.
Conclusion
If you find problems with your RAID array — first of all analyze whether your important data was stored on the disks. Often the value of the information exceeds the cost of the equipment by several times. Moreover, it is not uncommon for data loss to result in financial loss. That is why it makes more sense to use RS RAID Recovery, which will 100% restore of the lost data, rather than risk losing all the information.
Besides, if it was not a question of valuable information we could just format the disks and rebuild the RAID array, right? But in practice, technological advances have resulted in data becoming more valuable every year.
Don’t lose your data, and if it does happen, use only professional programs to retrieve your RAID array.

