Two disks are gone in a single-parity array, or three in a dual-parity setup. Unraid cannot start the array, and even if it could, the data on the failed disks is mathematically unrecoverable through parity alone. This is the scenario where storage redundancy ends and data recovery begins.
What happens next depends on a property of Unraid that becomes its main advantage in catastrophic failures: the data that was on surviving disks is still there, untouched, fully readable — each disk is an independent filesystem that requires no other disk to be accessible. This article covers how to extract what remains, and what tools make that extraction practical from a Windows machine.
Why Unraid Fails Differently Than RAID 5 and RAID 6
In a RAID 5 array, file data is broken into fixed-size chunks and distributed in stripes across all member disks. No single disk holds a complete file. A stripe of N+1 disks contains data fragments from N disks and one parity block. Lose any two disks and every stripe that touched either disk is incomplete — which means the entire array becomes unreadable, regardless of how many disks survived.
Unraid writes files whole to individual disks. A file that was written to Disk 2 exists entirely on Disk 2. Disk 3 knows nothing about it. The parity disk holds the XOR of all data disks at the sector level, which allows reconstruction of any one lost disk — but the data disks themselves are independent, self-contained volumes.
| Failure scenario | RAID 5 (single parity) | Unraid (single parity) |
|---|---|---|
| 1 disk lost | Array degraded, data accessible via parity | Array degraded, data accessible via parity |
| 2 disks lost | Entire array unreadable — all data gone | Surviving disks fully readable; only failed disks’ data is lost |
| 3 disks lost | Entire array unreadable | Surviving disks fully readable; data loss scoped to failed disks only |
| All but 1 disk lost | Entire array unreadable | Last surviving disk is independently readable |
| All disks lost | Total data loss | Total data loss |
The consequence is significant. In a RAID 5 array with six disks, losing two means losing everything stored across all six. In an Unraid array with six disks, losing two means losing only the data that was physically located on those two specific disks — the remaining four are readable today, right now, without any rebuild operation.
Parity is needed for reconstruction, not for reading surviving disks.
Once parity is exceeded, it becomes irrelevant to the recovery process for surviving disks. Each data disk is formatted as a standard XFS or BTRFS volume. You can connect any surviving disk to a Linux machine and mount it directly — the data is there, no parity required. The challenge is that Windows cannot read XFS or BTRFS natively, which is where recovery software becomes necessary.
What Is Actually Lost When Parity Is Exceeded
Understanding the exact scope of data loss prevents both over-pessimism and under-preparation. The following visualizer shows a six-disk Unraid array with single parity, where two data disks have failed.
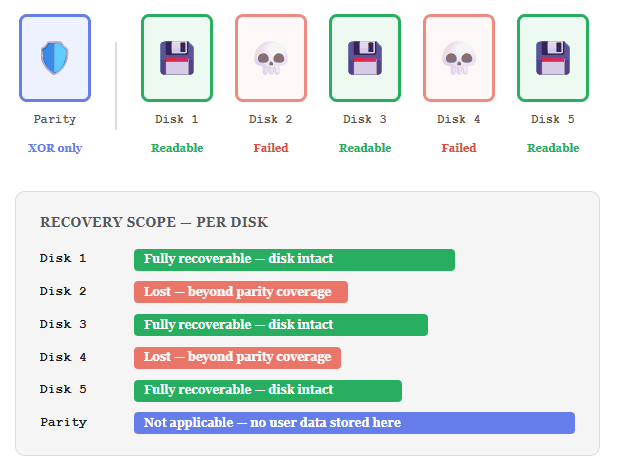
The data loss boundary maps directly to the physical disks t hat failed. Nothing on Disk 1, 3, or 5 is affected. Files that were stored on Disk 2 or Disk 4 are gone — not because parity failed in some general way, but because those sectors no longer physically exist.
Recoverable without software
Any file that resided entirely on a surviving disk. Mount the disk on a Linux machine and copy the data. No array reconstruction needed. No parity disk needed.
Recoverable with software
Files on surviving disks when Unraid itself cannot start, the boot device is gone, or the array configuration is lost. RS RAID Retrieve reads disk metadata and reconstructs the array structure without a running Unraid server.
Not recoverable
Any file that was stored on a physically failed disk, where the number of failures exceeded parity coverage. No software can reconstruct data from sectors that no longer exist.
Before You Start: Steps That Determine Whether Recovery Succeeds
In a catastrophic failure, the actions taken in the first minutes after discovery have more impact on the final outcome than the recovery software used afterward. Several common responses make the situation worse.
Do not attempt to restart the Unraid array
When more disks have failed than parity can cover, Unraid may attempt to start in a degraded state, run parity checks, or write emulation data based on an incomplete disk set. Any write operation at this point — including parity updates triggered by array startup — risks overwriting data on surviving disks with incorrect values derived from the incomplete XOR computation. Power the server off and do not bring it back up until the surviving disks have been imaged.
Do not run New Config and reassign disks
Reassigning disk slots in Unraid and starting with a new configuration causes Unraid to treat the array as freshly built. It will recalculate parity from whatever disks are present, which overwrites the existing parity disk content. If you later determine that a disk was misidentified, the parity data needed to verify or reconstruct anything is gone.
What to do instead
Identify which disks are physically present and readable
Using SMART data from a live system or, if the server is already off, by connecting disks one at a time to a test machine. Separate disks into three groups: fully operational, partially readable (SMART errors but spinning), and completely dead (not detected by BIOS). This determines your recovery scope before any software is involved.
Image degrading disks before doing anything else
Any disk showing non-zero Current_Pending_Sector or Reallocated_Sector_Ct values is actively degrading. Image it before recovery, not after. Use ddrescue with a map file to handle read errors gracefully and allow interrupted sessions to resume:
Run recovery operations against the image, not the degrading disk. A disk that fails mid-recovery without an image is unrecoverable.
Label disks with their original slot numbers
Unraid stores array configuration — which serial number maps to which slot — on the flash boot device. If the boot device is also gone, slot order must be reconstructed from disk metadata. Label each disk with its original Disk N number before removing anything from the server. RS RAID Retrieve can infer slot assignments from disk metadata, but a physical label eliminates ambiguity during manual configuration.
Connect all surviving disks to a Windows PC
Use direct SATA connections where possible. For more than four disks, a PCIe SATA expansion card is preferable to USB-SATA adapters, which introduce I/O reliability issues on sustained large reads. Include the parity disk — RS RAID Retrieve uses its metadata to confirm the array configuration even though parity cannot reconstruct the lost disks in this scenario.
Recovering Data from a Destroyed Unraid Array with RS RAID Retrieve
With the surviving disks connected to a Windows machine, RS RAID Retrieve handles the tasks that would otherwise require a running Linux environment: reading XFS and BTRFS filesystems, reconstructing the Unraid array structure from disk metadata, and providing a browsable file tree from which you can selectively copy data to a healthy destination.
What RS RAID Retrieve does in this scenario
The program reads Unraid metadata from each connected disk, identifies which disks are present and which are missing, and assembles a virtual representation of the array with placeholder entries for the failed disks. It then provides access to the file systems on surviving disks — XFS and BTRFS — which Windows cannot read natively. For the failed disks, it correctly marks their data as unrecoverable rather than showing empty or corrupted content.

Data recovery from damaged RAID arrays
Launch RS RAID Retrieve and let it scan all connected disks
On startup, the program reads the Unraid superblock metadata written to each member disk during array initialization. From this metadata it determines the array configuration: total disk count, slot assignments, parity layout, and filesystem type per disk. If all surviving disks are connected and their metadata is intact, the array appears in the Drive Manager automatically with failed disks shown as missing.
If automatic detection fails — use Manual Mode
Open the RAID Constructor and select Manual Mode. Set the array type to Unraid. Add the available disks and insert empty placeholders for each missing disk using the “+” button. Set the sector offset — Unraid uses 64 or 2048; verify by opening any data disk in the hex viewer and locating the start of the XFS or BTRFS superblock signature (XFSB or _BHRfS_M). Click Preview — if the directory tree is visible, the configuration is correct.
Open each surviving disk and run a scan
Right-click a surviving disk in the Drive Manager and select Open. Choose Fast Scan for disks whose filesystems are intact. If the Fast Scan returns an incomplete file tree or no files, run Full Analysis — this performs a sector-level signature scan and can recover directory structures even when the filesystem metadata is partially damaged. Run scans on each surviving disk independently; the failed disks will show no recoverable content.
Preview and select files for recovery
The file tree shows the directory structure of each surviving disk as it existed at the time of failure. Use the preview pane to verify file integrity before committing to recovery — documents, images, and media files can be opened directly in the preview. Prioritize files you cannot replace: documents, databases, photos. Large media libraries where individual files are independently accessible are lower priority and can be recovered in a second pass.
Copy recovered files to a separate healthy disk
Select the target files and folders, click Recovery, and specify an output path on a disk that is not part of the Unraid array. Do not write recovered files back to any of the source disks. After the copy completes, spot-check a sample of each file type — open archives, play a video segment, verify a database file is not zero-byte — before considering the recovery complete.
✓ What to expect from a successful recovery run
RS RAID Retrieve will present the full directory tree of each surviving disk. Files on those disks will be intact and recoverable with original names and paths. The failed disks will appear in the array view with no accessible content — this is correct behavior, not a program error. The total recoverable data is exactly what was stored on surviving disks at the time of failure.
Working with Partially Readable Disks
Catastrophic failures often involve at least one disk that is not cleanly dead — it spins, is detected by the BIOS, but produces read errors on some sectors. These partially readable disks are the most time-sensitive component of the recovery: they are still yielding data, but each power cycle and each failed read attempt accelerates mechanical wear.
A degrading disk that can be read today may not be readable tomorrow.
Reallocated sector counts that increase between two SMART readings taken hours apart indicate active degradation. Do not leave a degrading disk connected and idle while planning the recovery. Image it immediately, then work from the image.
Imaging a degrading disk with ddrescue
ddrescue is the standard tool for this task because it handles read errors gracefully — it skips unreadable sectors on the first pass, completes as much of the image as possible, and then retries failed sectors in subsequent passes. This contrasts with dd, which halts on the first read error by default.
	# First pass: read everything readable, skip errors, save map file
	ddrescue
	-d -r0
	/dev/sdX /mnt/recovery/disk_image.img /mnt/recovery/disk_image.map
	# Second pass: retry failed sectors up to 3 times
	ddrescue
	-d -r3
	/dev/sdX /mnt/recovery/disk_image.img /mnt/recovery/disk_image.map
The map file records which sectors were successfully read and which failed. If the disk fails mid-session or you need to stop and continue later, rerunning the command with the same map file resumes from where it left off without re-reading already-captured sectors.
Feeding the image into RS RAID Retrieve
Once the image is complete, it can be used in place of the physical disk. In RS RAID Retrieve, use Connect Image to attach the .img file as a virtual disk. The program treats it identically to a physical device. This approach has two advantages: the degrading hardware is no longer under read stress during recovery, and if the recovery process needs to be repeated with different settings, the image is always available in its original state.
ddrescue output — what the numbers mean:
- rescued: bytes successfully read and written to the image. This is your recoverable data volume.
- errsize: bytes that could not be read. These sectors will appear as zeros in the image; any file whose data landed on these sectors will be incomplete.
- errors: count of distinct unreadable sectors. A count in the hundreds on a multi-terabyte disk typically means most files are intact; a count in the millions means substantial data loss within the image itself.
- run time vs. remaining: if remaining time is measured in days, the disk is too degraded for a complete image — stop after the first pass and work with what was captured.
What You Can and Cannot Recover in This Scenario
The outcome of a beyond-parity failure in Unraid is more predictable than in classical RAID systems, because the damage boundary is defined by physical disk boundaries rather than stripe distribution. The table below summarizes the recovery path for each component of the array.
| Disk state | Data on that disk | Recovery path | Tool |
|---|---|---|---|
| Surviving — healthy SMART | Fully recoverable | Direct read via RS RAID Retrieve or Linux mount | RS RAID Retrieve / mount
|
| Surviving — degrading SMART | Mostly recoverable; some sectors may be lost | Image with ddrescue first, then recover from image |
ddrescue + RS RAID Retrieve |
| Failed — not detected | Not recoverable through parity | Hardware-level recovery (professional lab) if critical; otherwise accept loss | Data recovery lab |
| Parity disk — healthy | No user data stored | Connect to help RS RAID Retrieve confirm array config; not used for data extraction | RS RAID Retrieve (metadata only) |
| Boot flash — dead | Array config only; no user data | RS RAID Retrieve reconstructs config from disk metadata; new flash can be created after | RS RAID Retrieve |
After recovery: rebuild the array from scratch, do not patch the old one.
Once data has been recovered to a safe location, the appropriate next step is a fresh Unraid installation with new or verified disks, followed by a full parity build before loading data back. Attempting to continue using a partially failed array — replacing only the dead disks and running a rebuild — leaves the surviving disks in whatever state they were in during the failure event. For arrays that experienced two simultaneous disk failures, that state warrants careful scrutiny of the remaining hardware before trusting it with production data again.