Apple has created an incredibly beautiful and user-friendly operating system that thousands of users have come to love. However, Mac OS uses APFS and HFS+ file systems instead of the familiar FAT or NTFS. In this article, we will look at how to open a flash drive formatted on a Mac in Windows.
Contents
- Installing HFS+ drivers in Windows
- Using HFSExplorer (HFS+)
- Using Paragon HFS+ for Windows and Paragon APFS for Windows to provide full support for HFS+ and APFS in Windows
- Using MacDrive to make a HFS+ flash drive work in Windows
- Using RS MAC Recovery to provide HFS+ and APFS supporting in Windows simultaneously
- How to convert a HFS+ or APFS flash drive to NTFS or FAT?
The name of the article already tells you that Windows cannot open hard drives and flash drives created in Mac OS using the built-in tools. It is due to the different file systems that these operating systems use. However, below we will describe several ways that will allow the user to open external drives and flash drives with APFS and HFS+ file systems in Windows.
Installing HFS+ drivers in Windows
This method is useful for those who only need to read data from the drive, as it is read-only. Before installing the driver, make sure that no other HFS+ file system software is installed on your computer, as installing HFS+ drivers may cause the software to become inoperable.
To install the HFS+ file system drivers, the following steps are required:
Step 1: Download the drivers from this site. Unzip the data from the archive to any folder that is convenient for you. You will see two registry files and two folders: x86 and x64.
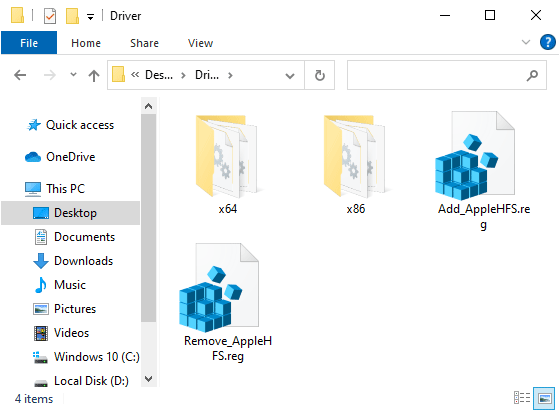
Step 2: Determine the bit rate of your operating system in order to know which files in which folder we will need to work with. To do this, right-click on “This PC” and choose “Properties“. A window will open in which you will see the type and bit mode of your operating system.
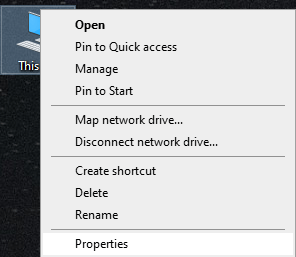
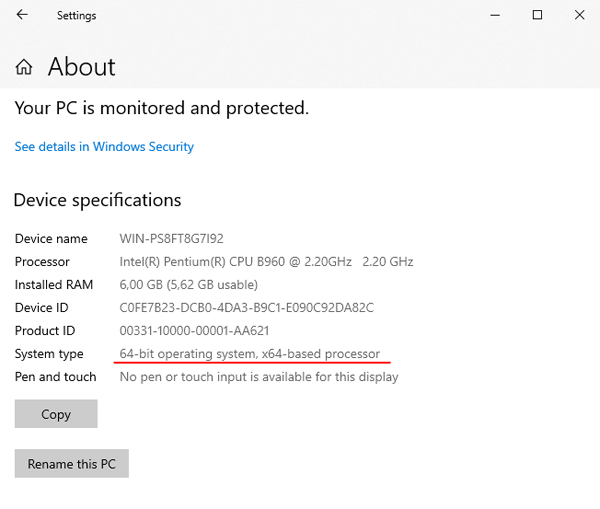
In our case, we are using a 64-bit operating system.
Step 3: Copy the ApplsHFS.sys and AppleMNT.sys files to the folder C:\Windows\System32\drivers (the system will alert you that you are trying to copy files into the system folder. Confirm by pressing “OK“).
Step 4: Double-click on the file “Add_AppleHFS.reg” to add it to your Windows registry. Confirm by clicking “OK” and then restart your computer.

You will now be able to view the data on HFS+ drive, and copy it to your computer if necessary.
Using HFSExplorer (HFS+)
One more way to view files on a flash drive formatted in Mac OS and copy them to your Windows computer for further work is the program HFSExplorer. It is completely free, but as in the first case, the data will be available for reading only. That is, you will not be able to delete files from the flash drive or copy new files to it. Just reading. It is also worth noting that HFSExplorer requires Java. You can download it from this link.
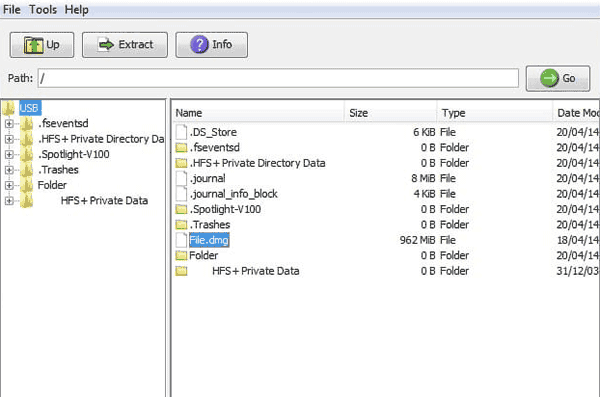
To open an HFS+ flash drive, connect it to your computer, click on “File” in the upper left corner, and then choose “Load File System From Device“. The program will do the rest. You will just see the contents of the connected drive and you can copy files from it to your computer by simply dragging and dropping them.
Unfortunately, the HFS Explorer does not support Windows Explorer integration. Therefore, you will be able to work with files in the program window only.
If you need to modify files on HFS+ and APFS drives, and to write the data to them, use the methods described below.
Using Paragon HFS+ for Windows and Paragon APFS for Windows to provide full support for HFS+ and APFS in Windows
If in addition to reading you need to write files to a flash drive or an external hard drive formatted on a Mac – you can use the programs Paragon HFS+ for Windows and Paragon APFS for Windows. Both of them provide full integration with Windows Explorer, which means you can just open your flash drive in Windows Explorer and work with it. No installation of Java or other components. In addition, almost any application will be able to work with your flash drive, be it a photo manager or any other software.
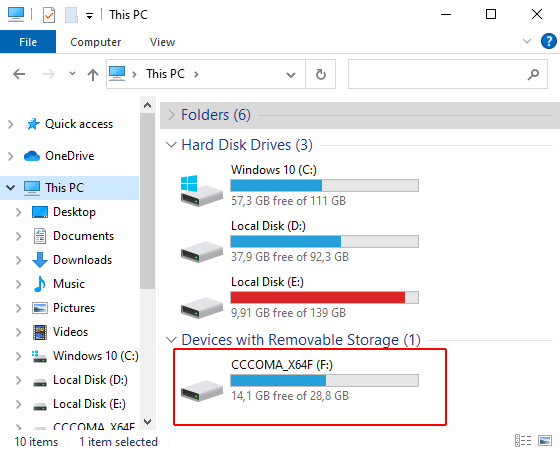
The other reason to use Paragon HFS+ for Windows and Paragon APFS for Windows is the high transfer speed. It is especially noticeable when compared to HFSExplorer.
However, you have to pay for speed and usability. The program costs $24. There is also a 10-day trial version available.
It is worth noting that if you get an “inaccessible_boot_device” error, enter your BIOS or UEFI and set the SATA settings to “IDE“, then boot your operating system in Safe Mode (How to do this you can read in the article “How to boot Windows in the Safe Mode?“), and perform “System Restore“. After that, enter BIOS/UEFI again and set “ACHI” in the SATA settings again.
Using MacDrive to make a HFS+ flash drive work in Windows
One more application that allows you to provide full work with drives formatted in Mac OS is called MacDrive.
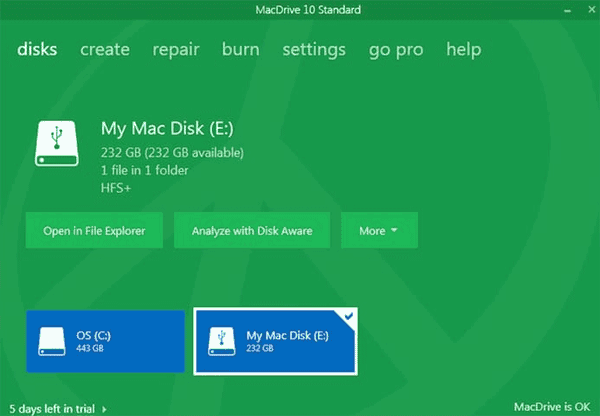
This application, as well as programs from Paragon, provides integration with Windows Explorer, making it very easy to use.
The program costs $50. There is also a 5-day trial period.
However, MacDrive only supports work with drives formatted in HFS+ only. If you need to work with a drive that uses the APFS file system, it is better to use the following method.
Using RS MAC Recovery to provide HFS+ and APFS supporting in Windows simultaneously
All of the above methods have one major disadvantage – they allow support for either the HFS+ or APFS filesystem only. For example, if you are using software from Paragon Software, in order to provide support for both file systems you will have to purchase both Paragon HFS+ for Windows and Paragon APFS for Windows. In other words, the user will have to pay twice.
To avoid wasting extra money, use RS MAC Recovery software.
The program is very convenient to use and allows you to work with both the APFS and HFS+ formatted flash drives. In addition, with RS MAC Recovery you can also recover lost data. It’s also worth noting that thanks to the deep scanning function, you can recover files that were lost even several months ago.
To copy files from a flash drive formatted in Mac OS should:
Step 1: Download and install the RS MAC Recovery program. After that, launch the application by double-clicking the corresponding icon on your desktop. The built-in File Recovery Wizard will open in front of you. Click “Next“
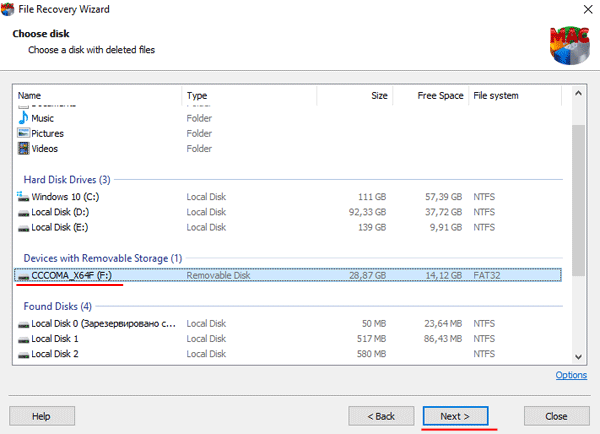
Step 2: Select your Mac OS formatted flash drive to scan for files to copy.
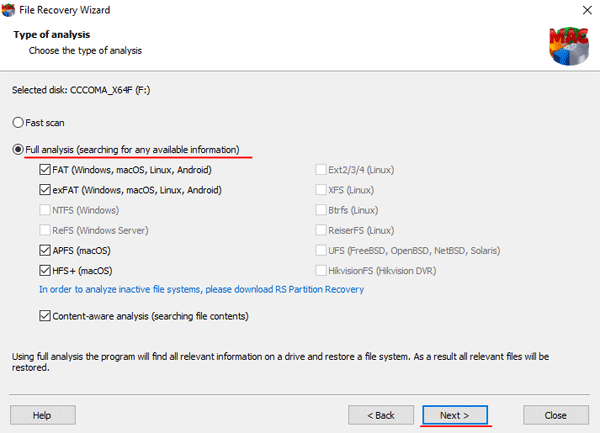
Step 3: Choose a scan type for your flash drive. RS MAC Recovery offers two types of scanning: quick scan and full disk analysis. The first option is worth choosing to extract files from the flash drive, and the second option is worth choosing to recover lost data.
In addition, at this stage, you can choose the file system that was used on your drive. It will speed up the process of recovering lost files. The program supports ALL modern file systems, which makes it a very useful tool when it comes to data recovery.
Once all the is set up click “Next“
Step 4: Once RS MAC Recovery has finished analyzing the flash drive, it will show all the files that can be recovered. Select the files you want to extract from the flash drive, right-click on them and select “Recovery“
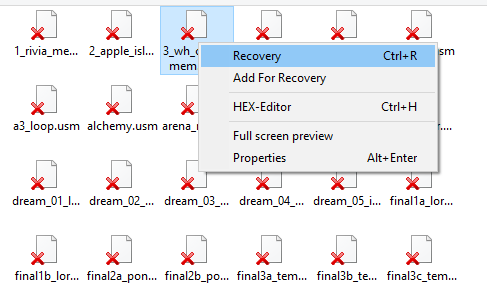
Step 5: Select the location where the selected files will be saved. RS MAC Recovery offers you three choices: hard drive, ZIP-archive, and FTP-server. Choose the most useful option, and click the “Restore” button.
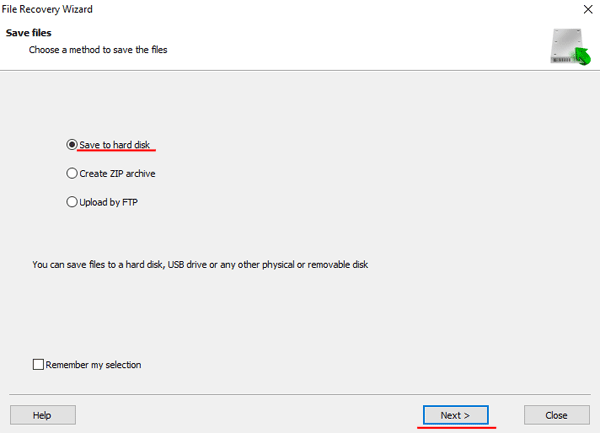
As you can see, RS MAC Recovery is very easy to use and allows you to extract the data not only to the computer but also directly to the server. That makes it great for system administrators with a high level of PC knowledge, as well as for novice users who do not have deep knowledge of the computer technologies.
How to convert a HFS+ or APFS flash drive to NTFS or FAT?
If you don’t like to install a lot of extra programs and components (like Java) to make your Mac flash drive work in Windows – you can convert the file system into a native Windows one. This is quite simple to do and allows for full integration into Windows Explorer so that after the conversion the flash drive will use a Windows native file system (NTFS or FAT32).
To convert an HFS+ or APFS file system into FAT or NTFS, first format it with the file system you want and then recover files on it. This can be done in a few simple steps:
Step 1: Open the “This PC” window, right-click on your Mac flash drive and choose “Format“
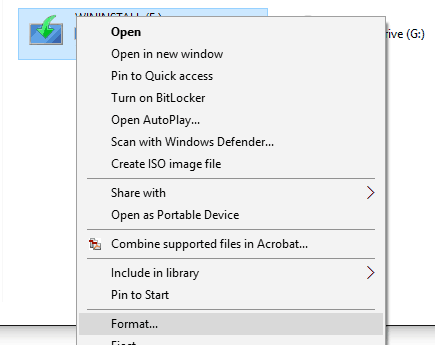
Step 2: In the window that opens, select the desired file system and specify the name of your flash drive. Be sure to check the box next to “Quick (Clear Table of Contents)” It will greatly speed up the file recovery process.
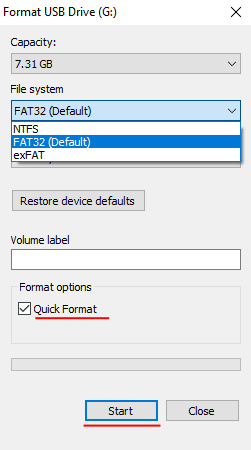
This will start the process of formatting the flash drive and when it is finished, you will get a working flash drive with a file system native to Windows.
Step 3: Now you need to recover the files that disappeared during formatting. To do that, follow steps 1 – 5 from the previous paragraph of this article.


