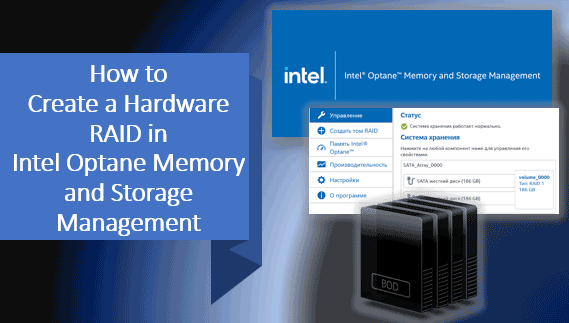
How to Create a Hardware RAID on an Intel Platform, i.e., on a computer with an Intel processor and motherboard chipset? This can be done using the BIOS tools or by using the Windows application Intel Optane Memory and Storage Management.
Below, we will explore how to create a RAID using this program, how to recover it in case of degradation, and how to delete it. But first, let’s discuss the technology behind Intel’s hardware RAID implementation – Intel Rapid Storage.
Contents
- Hardware RAID Technologies
- Intel Rapid Storage Technology
- Configuring Storage Settings in BIOS
- Intel Optane Memory and Storage Management Program
- Creating RAID
- RAID Initialization and Partition Creation in Windows Environment
- RAID Initialization in Intel Optane Memory and Storage Management
- RAID Degradation and Recovery
- Removing RAID
- Data Recovery in the Event of RAID Failure
Hardware RAID Technologies
Hardware RAID on a computer can be implemented using the motherboard’s capabilities, provided it supports this feature. Whether it does or not can be determined by checking its specifications on the manufacturer’s website.
In most cases, the implementation of hardware RAID on motherboards is managed by chipsets from AMD and Intel. These companies have integrated RAID technologies into their chipsets.
AMD’s modern technology for this purpose is called RAIDXpert2. You can find detailed information about it in the article Creating hardware RAID on the AMD platform.
Intel’s current RAID implementation technology is known as Intel Rapid Storage Technology, or simply Intel Rapid Storage. This is the technology we will be discussing.
Intel Rapid Storage Technology
Creating a RAID is not the only purpose of Intel Rapid Storage Technology. Essentially, it is a storage technology. Translated, it means fast storage technology.
It enhances the performance of storage devices through its efficient management of SATA device command queues. It also reduces power consumption.
What does this technology offer in terms of RAID implementation?
Intel Rapid Storage allows the creation of disk arrays from HDDs, SATA SSDs, and M.2 PCI-E (NVMe) SSDs.
It offers 4 typical RAID configurations (levels):
- RAID 0 (minimum of 2 disks);
- RAID 1 (minimum of 2 disks);
- RAID 5 (minimum of 3 disks);
- RAID 10 (minimum of 4 disks).
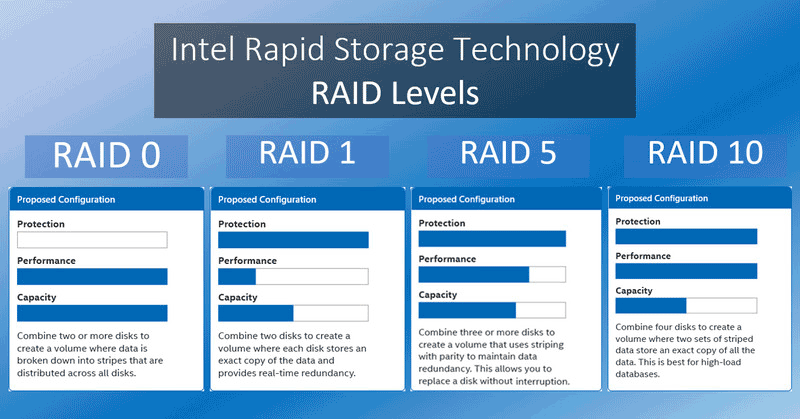
For detailed information on these configurations and their features, refer to the article “What is RAID, and how different types of RAID are used.”
Intel Rapid Storage also has its own feature called Recovery configuration. It uses the RAID 1 mechanism to copy data from a specified disk to another specified disk. This copying can be done automatically or manually by the user as needed. Essentially, it acts as a backup. A minimum of 2 disks is required.
Hardware RAID using Intel Rapid Storage is possible on desktops, laptops, servers, and embedded systems on the Intel platform.
Not all chipsets support RAID. Among modern (and relatively modern) desktop chipsets, these include Q170, H270, Q270, X299, Z270, B365, H370, Z370, B460, Q470E, W480, W480E, Z490, H470, H570, Q470, Q570, W580, Z590, B660, H670, Q670, Q670E, R680E, W680, Z690.
Not all of these support RAID for M.2 PCI-E (NVMe) SSDs. Mainly, the mentioned representatives of the 600 series, except for B660, support it. Some rare chipsets from earlier series with configuration limitations (only RAID 0, 1, 5) – B365, H370, Z370 – also support it.
Notable features of Intel Rapid Storage Technology related to RAID implementation include:
- The ability to configure a spare disk for fault-tolerant RAID. If one of the array disks fails, automatic rebuilding will occur using the spare disk;
- Smart Response Technology – a caching technology to enhance RAID performance. It supports different modes focusing on speed or data protection;
- Intel VMD (Volume Management Device) and the Intel VROC (Virtual RAID on CPU) based on it – technologies for virtual RAID organization using the processor for M.2 PCI-E (NVMe) SSDs. They provide performance and hot-plugging, simplifying maintenance. Intel VROC is currently available only for Xeon Scalable server processors. Intel VMD is available with desktop Intel processors starting from the 11th generation.
Intel Rapid Storage operates on Windows starting from version 7. In most cases, RAID will be detected through the operating system’s drivers.
Using Intel VMD is possible on 64-bit Windows 10 and 11. If using this technology, the RAID driver must be installed manually.
In Linux, RAID functionality using basic capabilities is implemented through DM-RAID and Linux MD RAID.
How to create a disk array in Windows using Intel Rapid Storage Technology? Creating RAID in Windows 7 and 8.1 is done in the BIOS. Detailed instructions can be found in the article on creating RAID in BIOS using an Asus motherboard as an example. In 64-bit Windows 10 (starting from version 1809) and Windows 11, RAID can be created using the Intel Optane Memory and Storage Management program.
Configuring Storage Settings in BIOS
Before creating a RAID on an Intel platform, it is necessary to enable Intel Rapid Storage and perform other storage configuration settings in BIOS. To learn how to enable Intel Rapid and perform the required BIOS settings, you can refer to the example using an Asus motherboard BIOS.
Once the necessary BIOS settings are completed, proceed to work with the Intel Optane Memory and Storage Management software.
Intel Optane Memory and Storage Management Program
Intel Optane Memory and Storage Management is a user interface designed to leverage two Intel technologies simultaneously. The first is Intel Optane Memory, which enhances the overall performance by pairing traditional HDDs with high-performance Intel Optane drives.
The second is the use of Intel Rapid Storage for RAID implementation, which is our primary focus. Creating RAID configurations with this program is simpler and more convenient than doing so in the BIOS. The program features a user-friendly interface and, most importantly, offers additional capabilities.
When comparing the program’s features with the implementation of Intel Rapid Storage in the BIOS of the mentioned Asus motherboard, the latter falls short. It lacks the functions offered by Intel Optane Memory and Storage Management, such as:
- The ability to apply or not apply RAID initialization;
- Setting and changing the caching mode;
- Assigning spare disks;
- Configuring automatic rebuilding during hot disk replacement.
However, unlike the BIOS of motherboards, the program does not support creating a Recovery configuration.
To use the program, the Intel Rapid Storage driver is required. It can be downloaded from the support section on the motherboard’s specifications page. Download the drivers for SATA, which include drivers for both SATA and M.2 PCI-E. They usually also include the installer for the Intel Optane Memory and Storage Management program.
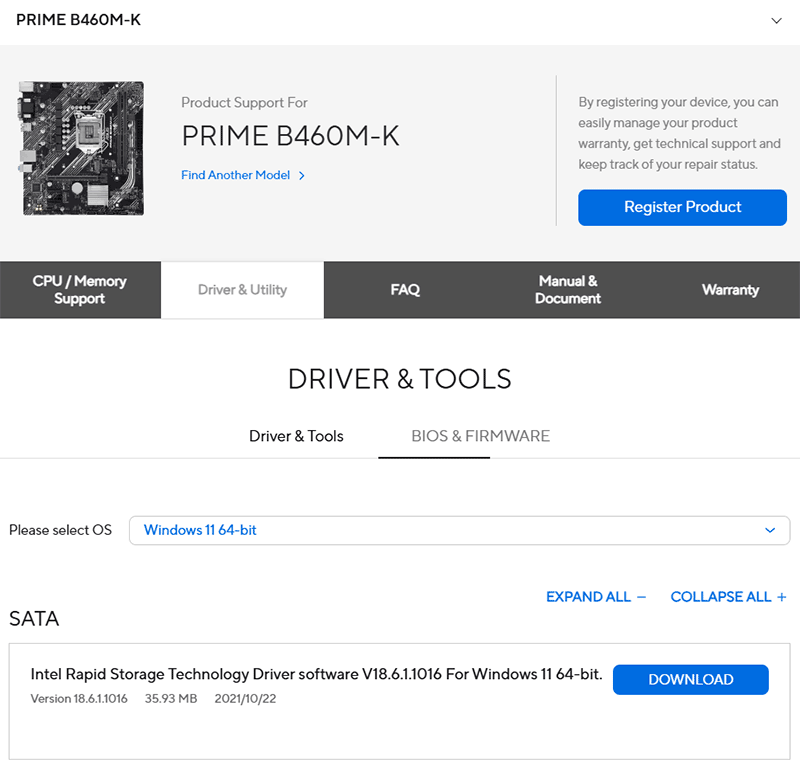
First, install the driver, then the program. If the program is not included in the driver package, it can be installed from the Microsoft Store.
In the program, the first step is to go to the “Manage” section. Here, all the internal disks of the computer are displayed. This is also where you can manage the created RAID later. If necessary, you can use the mentioned software feature to assign spare disks for fault-tolerant RAID configurations.
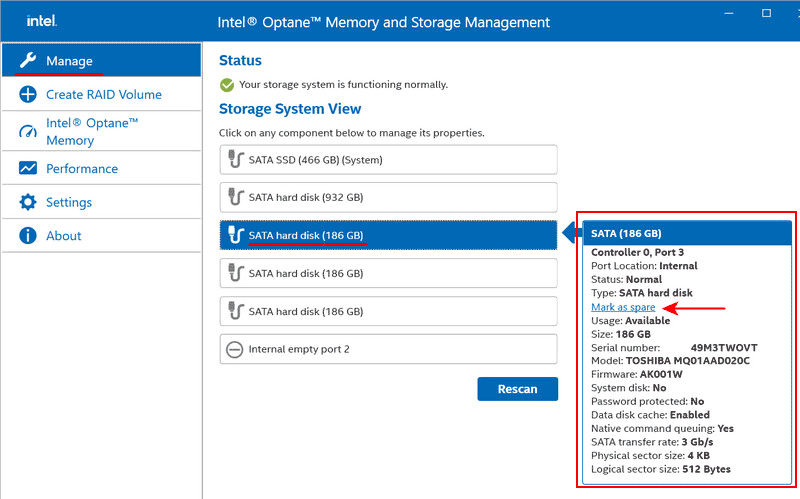
Creating RAID
Let’s proceed with creating a RAID.
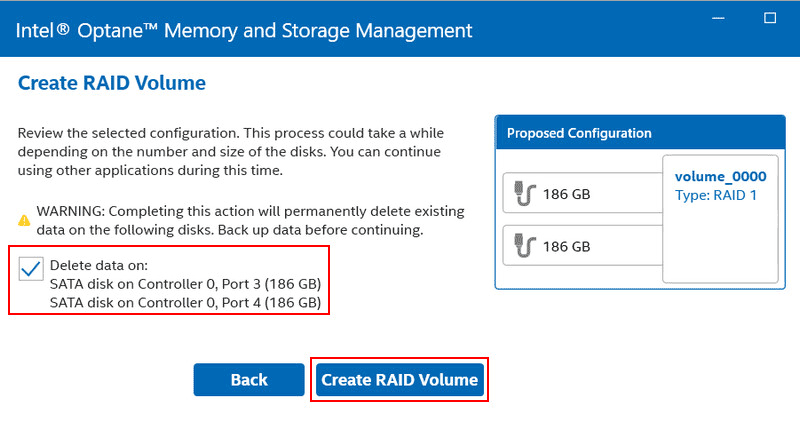
Important: If there is valuable data on the disks prepared for RAID, it must be transferred elsewhere. During the creation and initialization of the array, all data will be destroyed. If recovery is possible, it will only be through effective data recovery software such as RS Partition Recovery.
Create a RAID in the program section “Create RAID Volume”. Optionally, change the array name from the default to your own. Specify the controller – SATA for SATA devices or PCI-E for M.2 PCI-E devices. Choose the configuration – RAID 0, 1, 5, or 10.
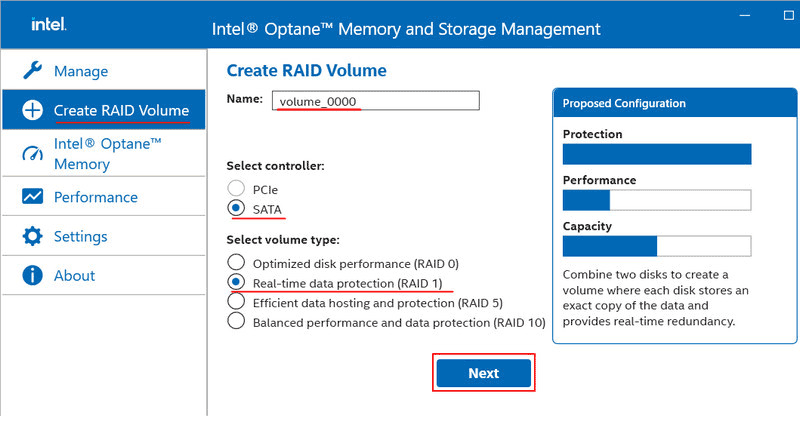
Select the disks that will be part of the array. Other parameters can be left at their default settings.
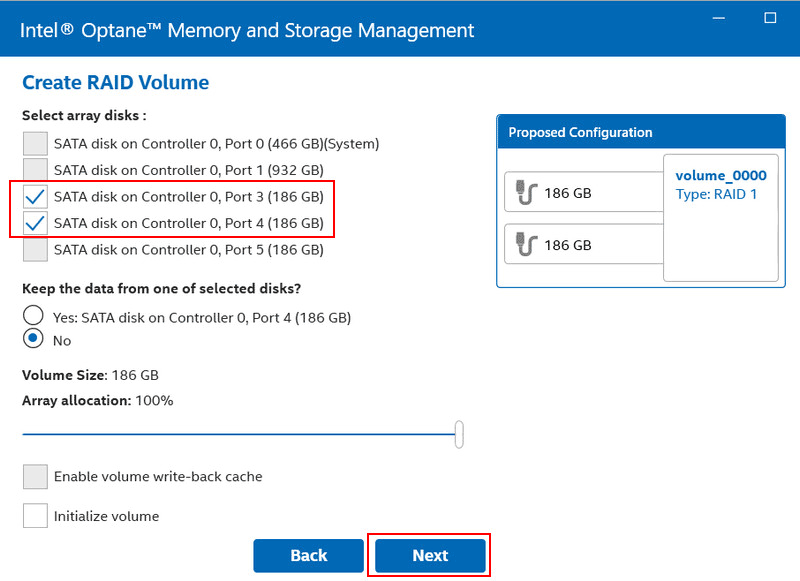
Check the box to delete data from the disks. Click “Create RAID Volume”.
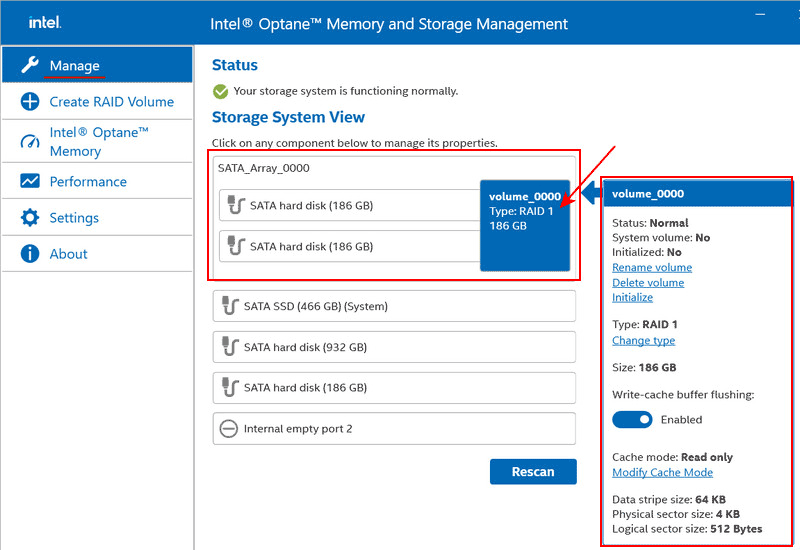
The newly created RAID will now appear in the program section “Manage”. By clicking on it, operations for managing it will become available. We will return to one of these operations later.
RAID Initialization and Partition Creation in Windows Environment
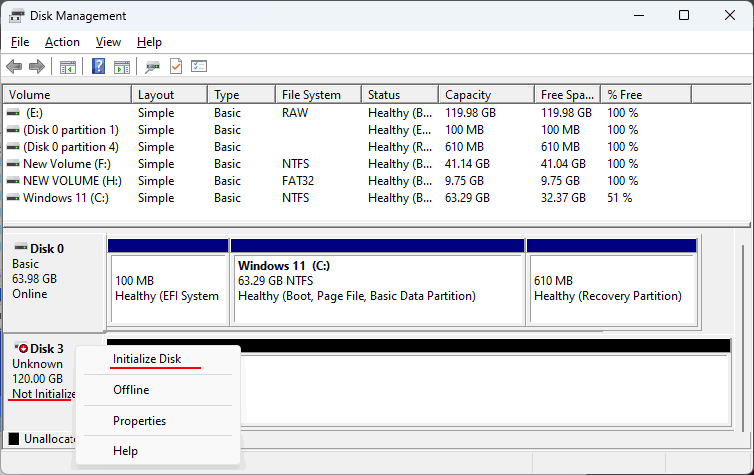
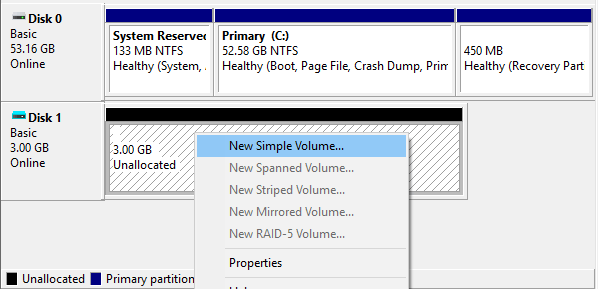
Let’s open the Windows Disk Management utility (accessible via the Win+X menu). We will perform the initialization of the created array as with any new storage device. If this process does not start automatically upon opening Disk Management, right-click on the RAID, and select “Initialize Disk” from the context menu.
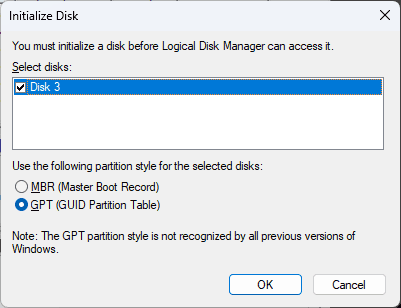
Leave the default or specify the desired partition style.
Next, create a partition or multiple partitions on the disk space. In the context menu on the space, select “New Simple Volume” and follow the volume creation wizard.
RAID Initialization in Intel Optane Memory and Storage Management
We can perform a different type of initialization—specifically RAID initialization. This operation is carried out by the RAID software itself. Sometimes it happens automatically, and other times it is done manually by the user.
This initialization option is available when creating a RAID using Intel Optane Memory and Storage Management. We intentionally skipped it to highlight its importance. You can perform it separately after creating the RAID, or not at all, depending on the situation.
RAID initialization is an operation for fault-tolerant arrays, conducted to enhance reliability. It physically clears the disk blocks of data. Metadata on the cleared disks is updated, improving the likelihood of recovering newly written data. Disk blocks are checked for issues.
RAID initialization runs in the background, allowing you to use the array during the process. It takes a long time; the larger the total space of all disks, the longer it takes. The computer should not be turned off until the process is complete.
For example, if you are simply exploring RAID capabilities, initialization may not be necessary.
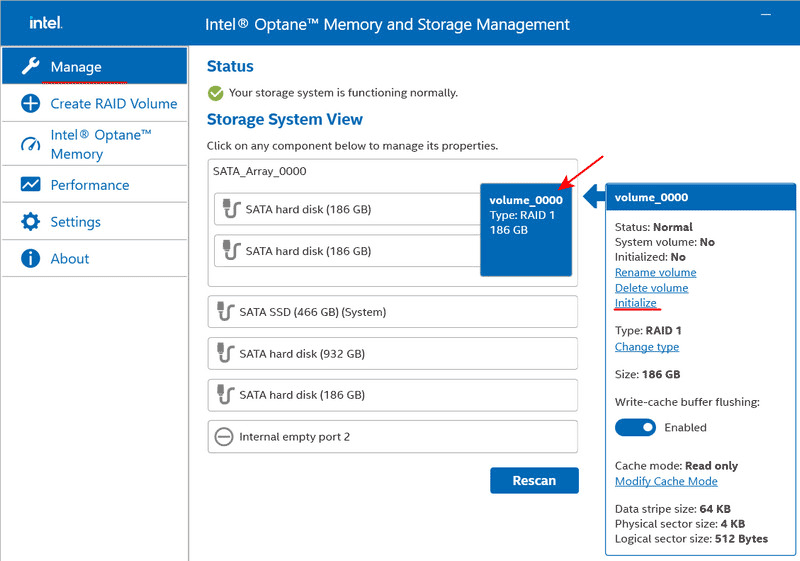
To start RAID initialization, go to the “Manage” section of the program, click on RAID, and select “Initialize.”
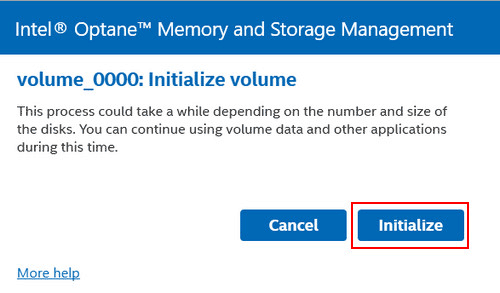
Confirm the start of the initialization by clicking “Initialize.”
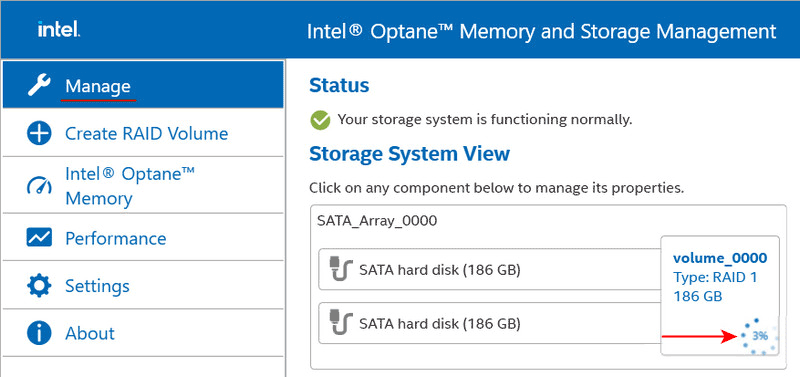
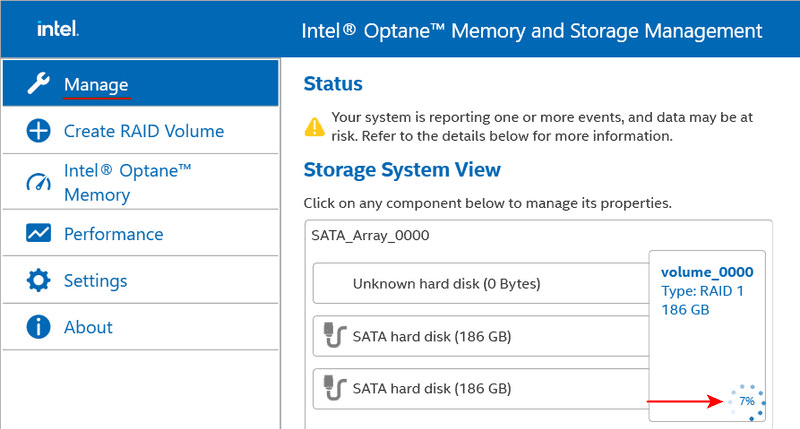
You can track the progress of this operation in the “Manage” section of the program.
RAID Degradation and Recovery
During the operation of a RAID system, the software will monitor the array’s status. In case of any issues, it will notify you with a Windows tray alert. One such issue is the degradation of fault-tolerant RAID levels like 1, 5, and 10.
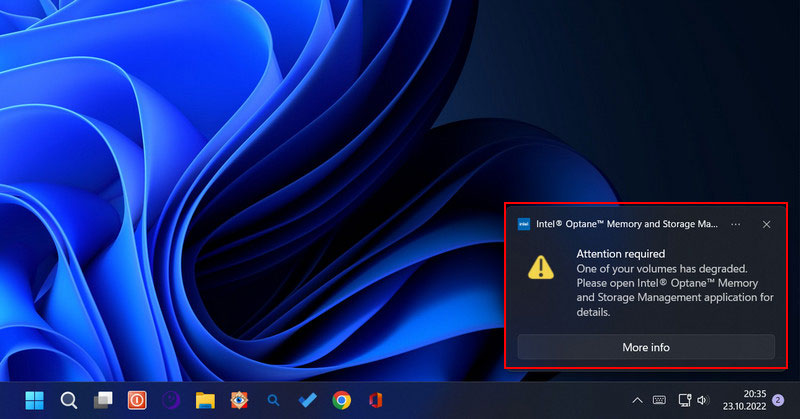
This occurs when one of the disks in the array fails. If a spare disk is not assigned and the RAID does not automatically rebuild using it, you will see a message about potential data loss in the “Manage” section of the program. In the array properties, you will see the problematic disk with its status indicated, such as missing.
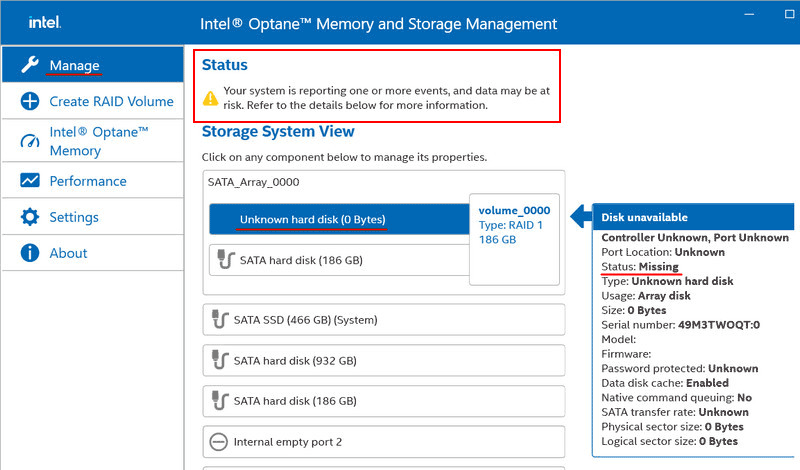
To address the issue with the problematic disk, check the connection contacts and perform diagnostics. For detailed steps on handling a problematic disk, refer to the article “Signs of a Hard Drive Failure”. If necessary, replace the disk.
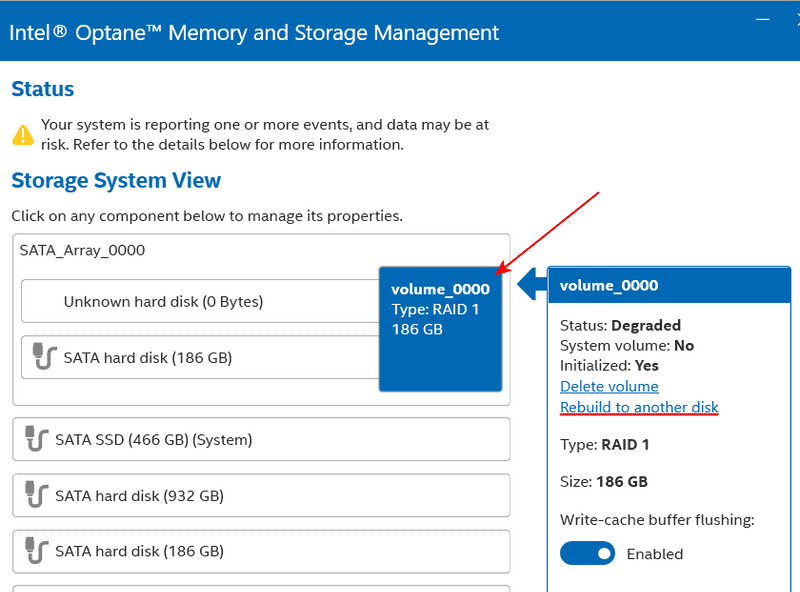
Next, in the RAID properties under the “Manage” section of the program, initiate the “Rebuild to another disk” operation. This involves rebuilding the RAID using a new disk, effectively restoring the array.
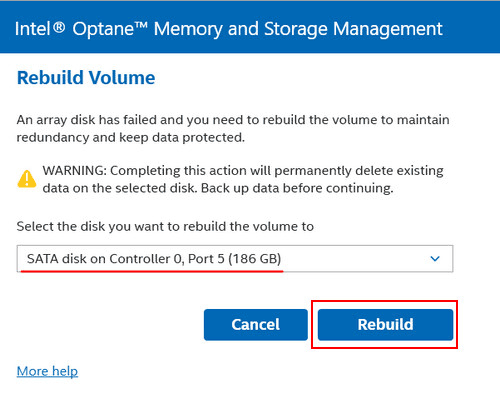
Select the new disk and click “Rebuild.”
You can monitor the progress of the operation in the “Manage” section of the program. Do not turn off the computer until the recovery is complete.
Removing RAID
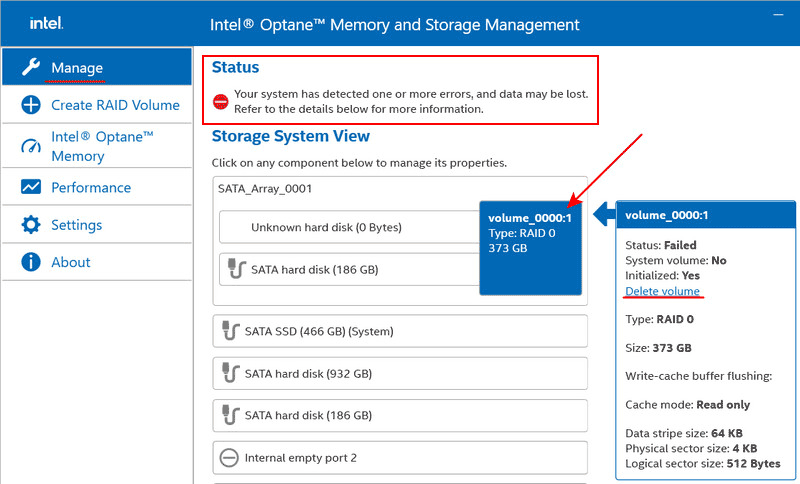
RAID 0 is not fault-tolerant and does not provide data protection or array recovery. If even one disk fails, RAID 0 becomes inoperative. In this case, the “Manage” section of the program will display an error notification indicating data loss.
If the connection to a RAID 0 disk cannot be restored, the array should be deleted. Deletion is the only operation available for this array configuration. Click “Delete volume.”
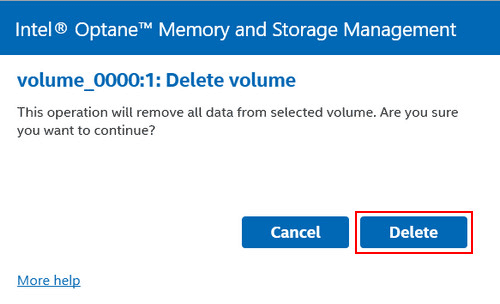
Confirm the deletion by clicking “Delete.”
Other RAID configurations can be removed in the same way if they are no longer needed.
Data Recovery in the Event of RAID Failure
How to recover data when a RAID array fails and its status in the BIOS is marked as “Failed”?
A RAID failure is essentially its collapse. Such an array needs to be deleted and recreated. For RAID 0, which lacks fault tolerance, as mentioned, failure occurs when one of the disks fails. Data from a failed RAID 0 can be recovered only if all the disks in the array are recognized by the computer.
Data protection against disk failure is available only in fault-tolerant RAID configurations like RAID 1, 5, and 10. However, any RAID array can fail, including fault-tolerant ones. This can happen for various reasons, such as unsuccessful recovery after a disk replacement.
Another example is the failure of a RAID controller on the motherboard or the motherboard itself. With a new board or RAID controller, the array might not recover or might recover unsuccessfully, leading to failure.
Note: For guidance on what to do if the RAID controller on the motherboard or the motherboard itself fails, refer to the article “RAID Controller Failure”.
Data recovery is possible in the event of a RAID 1, 5, or 10 failure even if one of the disks is not recognized by the computer.
The software can recreate the RAID without a RAID controller, with incomplete disk sets, recovery errors, etc., and allows data extraction.
Download and install the software.

Data recovery from damaged RAID arrays
Note: If the operating system is unavailable, the RS RAID Retrieve software can be launched on a Win10XPE LiveDisk.
RAID arrays in the software typically appear as RAID arrays. However, with Intel Rapid Storage technology, both RS RAID Retrieve and other programs, as well as the operating system itself, will see such a RAID as a regular physical disk named Intel Raid Volume.
If one of the disks in the array is missing, the RAID may appear not as Intel Raid Volume but as one of the remaining disks.
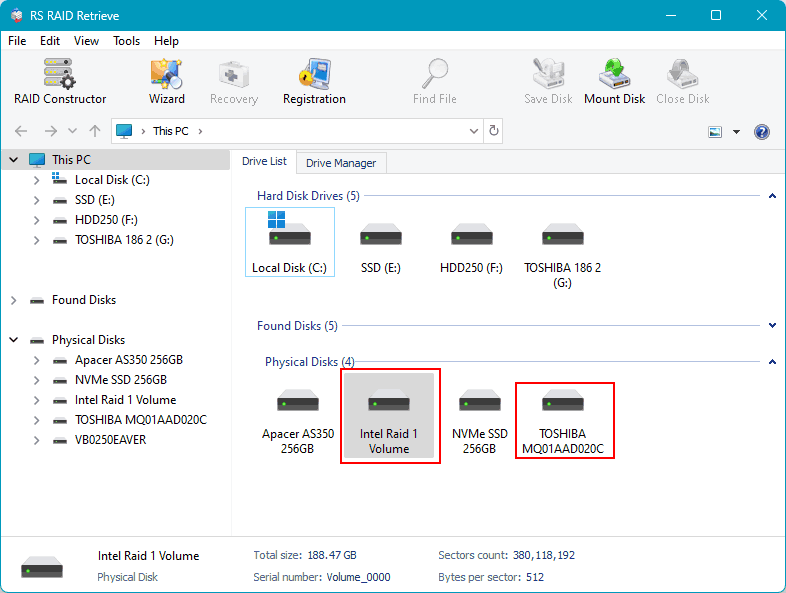
If neither the RAID nor its individual disks are displayed in the RS RAID Retrieve software, you need to delete the failed RAID to access each physical disk individually.
After deleting the RAID, do not perform any operations on the disks. Immediately launch RS RAID Retrieve and start the RAID constructor either at the program’s start or in its window.
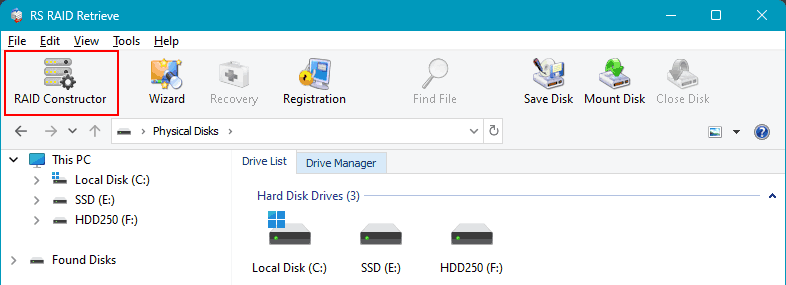
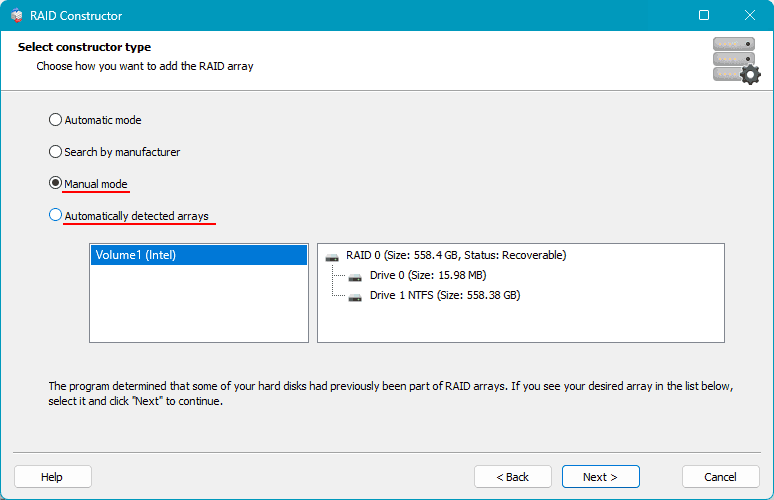
The software may automatically detect that some of the computer’s disks previously formed a RAID array and will suggest configurations for these arrays. You can choose one. If RS RAID Retrieve does not detect previously existing arrays and does not suggest their configurations, select “Manual Creation.”
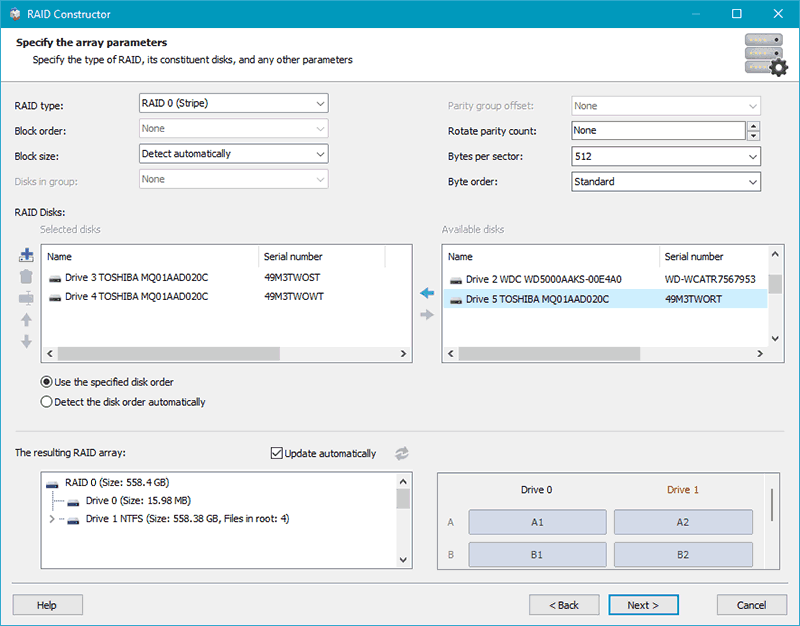
Next, configure the deleted RAID. If it’s a configuration suggested by the software, you can adjust some RAID parameters. If creating the RAID manually, specify the disks included in the array and other parameters. Click “Add.”
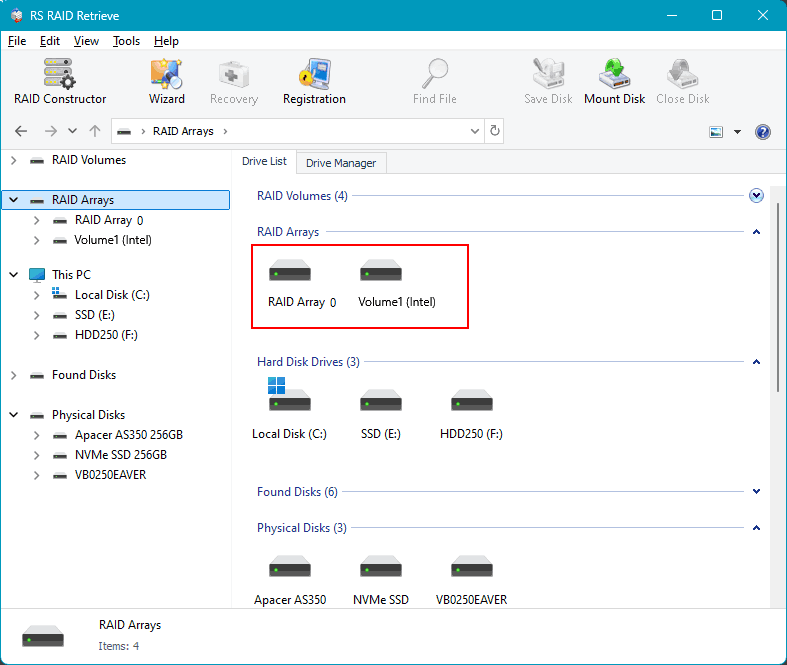
The configured array will be displayed in the RAID arrays block. There may be several in the case of configurations suggested by the software. Click on the array.
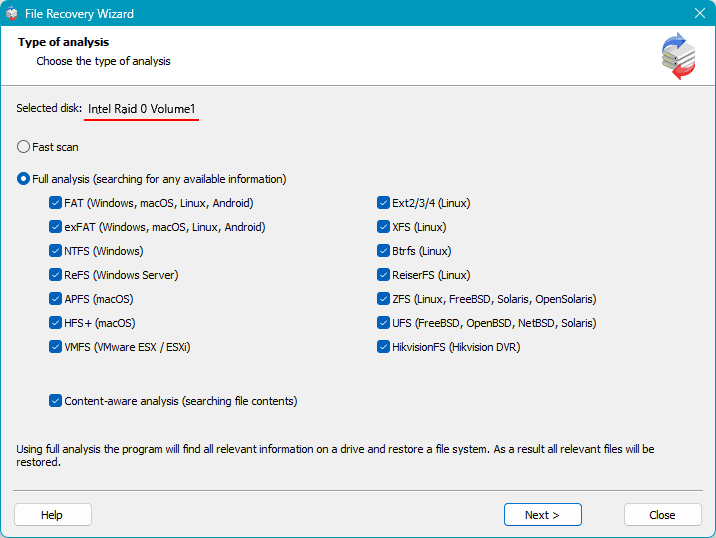
Then start the data analysis for recovery. There are two types of analysis. One is quick scan, which is a rapid analysis used for recovering recently deleted data and extracting existing data.
The other type is full analysis, which takes longer but is effective in complex data recovery scenarios such as long-term deletion, partition formatting, disk repartitioning, etc.
In the event of RAID failure and deletion, first try a quick scan. If it does not find the necessary data, restart the recovery from the configured RAID and use a full analysis.
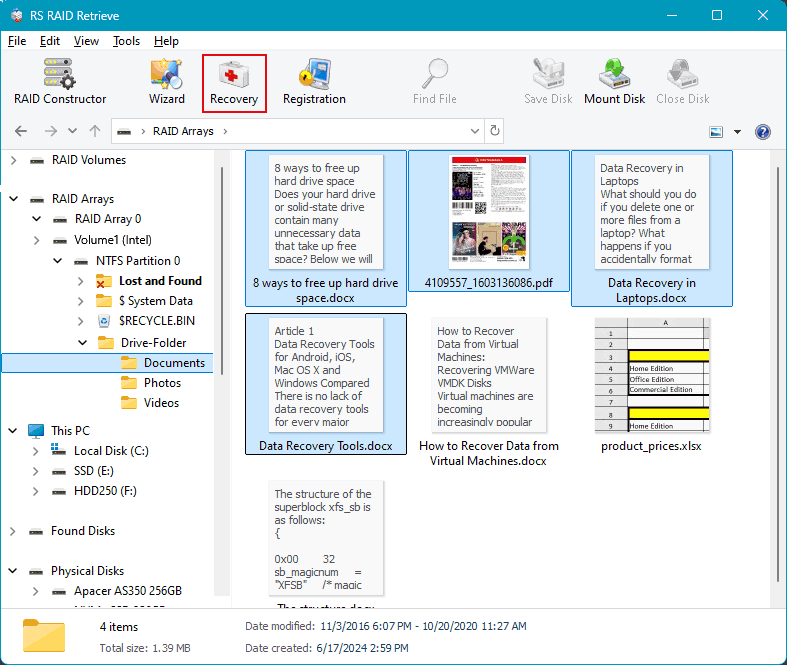
After the analysis, you will see the data available for recovery. Click to select the data you want to recover and press the “Recover” button.
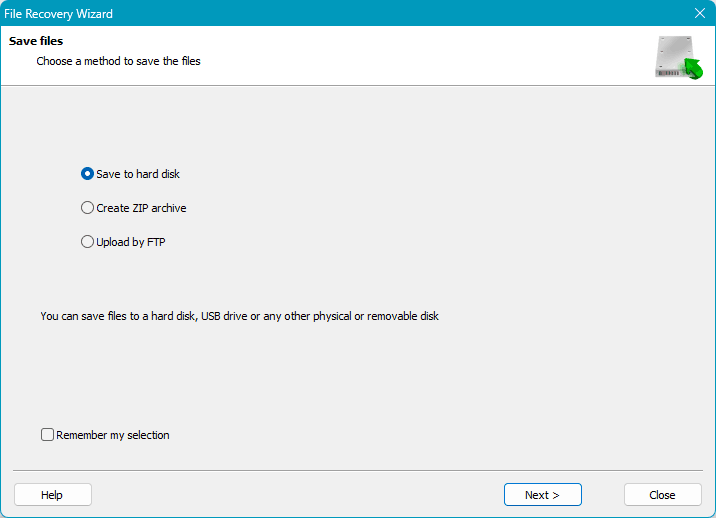
Next, specify the method for saving the recovered data and indicate the save path.
