If your NAS QNAP TS-264-8G suddenly stopped working or your files disappeared, you’re not alone. NAS devices are reliable, but disk failures, RAID errors, or accidental deletion can still cause data loss. In this article, we explain in simple terms why the NAS QNAP TS-264-8G may lose data and what you can do to recover your files safely.

Understanding NAS Hardware and RAID Capabilities
The QNAP TS-264-8G NAS is equipped with 2 drive bays that can be configured using RAID 0 or RAID 1. RAID 0 spreads data across both disks for higher speed, while RAID 1 mirrors every file to ensure protection against a single-disk failure. Supported file systems — EXT4 and Btrfs — add stability and integrity through journaling and advanced metadata handling.
Understanding these fundamentals helps during data recovery, as each RAID level stores information differently and affects how files can be reconstructed after an incident.
Key Specifics of Data Recovery on QNAP TS-264-8G
Recovering data from a QNAP TS-264-8G NAS requires understanding how two-bay systems manage storage. These devices typically support RAID 0 for performance and RAID 1 for redundancy. In RAID 0, losing a single disk causes the entire array to fail, making specialized software essential for reconstruction. In RAID 1, data mirroring increases protection, but corruption of both drives or damage to EXT4/Btrfs file systems still requires connecting disks directly to a computer for recovery.
Two-bay NAS units are frequently used for storing photos, videos, and work archives, so recovery often focuses on personal media and office documents.
Main Features of the QNAP TS-264-8G NAS
| Drive Bays | Supported Drives | Hot Swappable | Supported RAID | File Systems | Maximum volume |
| 2 | 2.5" or 3.5" SATA | ✓ | RAID 0, RAID 1, JBOD | EXT4, BTRFS, ZFS | 44 Tb |
On the QNAP TS-264-8G the storage stack is layered: physical disks are aggregated by a software RAID layer (commonly mdadm for QTS RAID 0/1/JBOD setups, with ZFS available only when a ZFS-based firmware is used), optional LVM-like volume management, and filesystems such as EXT4 or BTRFS sitting on top; an SSD cache adds another write/read tier. Model-specific failure points include corrupted RAID superblocks or lost mdadm metadata after unexpected power loss, BTRFS COW/metadata tree corruption exacerbated by incomplete SSD cache flushes, and QTS 5 firmware or package upgrades that change on-disk layout or driver behavior. Memory faults or OS kernel panics can poison in-memory metadata and result in inconsistent on-disk state; the SSD cache can hide or accelerate corruption propagation when its metadata is damaged.
Logical inaccessibility typically arises when RAID metadata, filesystem on-disk structures or volume headers diverge: the kernel cannot assemble the array, mount fails due to damaged BTRFS extents or missing EXT4 superblocks, or a ZFS pool is marked degraded. Recovery outside the NAS follows strict forensic principles: create bit-for-bit images of each bay, avoid further writes, and perform offline assembly/analysis (e.g., assemble mdadm arrays read-only or import ZFS pools and examine checksum-protected blocks). Where metadata is partially present, reconstruct RAID parameters from backups or remaining superblocks and export filesystems read-only to extract user data. Checksums in BTRFS/ZFS guide block-level repair or selective data extraction; when metadata is irrecoverable, targeted reconstruction of RAID layout and manual inode/tree repair on the imaged devices is the diagnostic path to salvage data.
Step-by-step guide to recover data from NAS QNAP TS-264-8G
Data recovery from a two-disk NAS (QNAP TS-264-8G) is possible even in cases of RAID failure, file-system corruption or a complete hardware malfunction. Follow this clear and accessible guide, designed both for beginners and for users discovering NAS recovery procedures for the first time.
-
Step 1 Power off the NAS and remove the drives.
Shut the NAS down completely and carefully remove both disks. Note their original order (Disk 1 / Disk 2), which is essential for correct RAID reconstruction.
-
Step 2 Connect the drives to your computer.
Use internal SATA ports or USB–SATA adapters. Both drives must be connected simultaneously so the software can analyze the RAID metadata.
-
Step 3 Launch the NAS recovery software.
Open RS RAID Retrieve. The program will detect RAID signatures, analyze blocks and reconstruct the original NAS structure.

Data recovery from damaged RAID arrays
Available for: Windows, macOS, Linux -
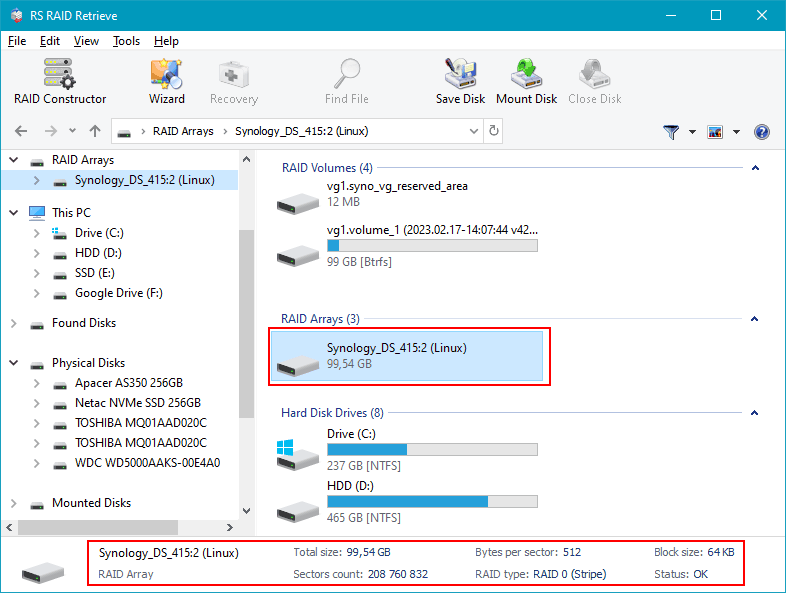
Step 4 Review or manually adjust RAID parameters.
Automatic detection works in most cases, but you can fine-tune the RAID level, block size or disk order if needed.
-
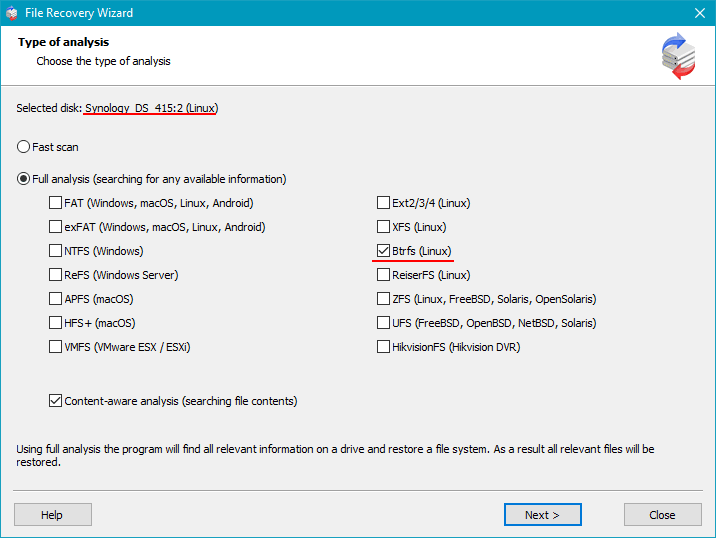
Step 5 Start a deep scan.
Run a full analysis to rebuild the folder tree and recover deleted files, even if fragmented.
-
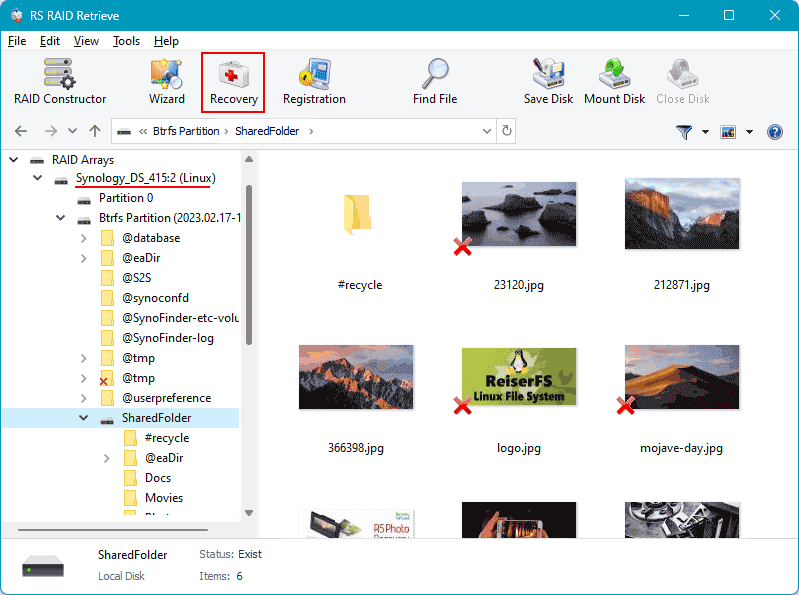
Step 6 Review the scan results.
When the analysis completes, the complete NAS structure appears. Check that your documents, photos, videos and archives are accessible.
-
Step 7 Save your recovered data.
Store the files on another disk or an external drive. Never write anything to the original NAS drives.
Tip: Keep the NAS disks in read-only mode to avoid permanent data loss.
Why RAID Fails in 2-Bay NAS QNAP TS-264-8G: Key Causes You Shouldn’t Ignore
When a 2-bay NAS QNAP TS-264-8G begins acting unpredictably, many users discover too late that their RAID array is already compromised. Understanding the real reasons behind RAID failure helps you react before your data becomes inaccessible — or permanently lost. Modern NAS systems are reliable, but even the best devices can fail due to physical wear, configuration issues, or overlooked warning signs.
One of the most common triggers is uneven disk aging. In 2-disk NAS setups, both drives often run continuously for years, accumulating bad sectors or slow read/write areas that gradually push the array into a degraded state. Another critical factor is firmware-based RAID management: a small glitch, unpatched bug, or failed background sync may silently corrupt metadata, eventually leading to RAID collapse.
Environmental stress also plays a surprisingly large role. Overheating, unstable power, or vibration can shorten drive lifespan and create hidden read errors that later manifest as array failure. As soon as users notice unusual noises, unexpected slowdowns, or file access errors, the degradation is usually already in progress. This is why timely diagnostics and proper data recovery procedures are essential.
- Disk desynchronization and reconstruction errors often appear after power outages or forced shutdowns.
- SMART-related warnings signal growing risks of head crashes or platter wear.
- RAID misconfiguration after expansions, resets, or accidental rebuilds frequently results in metadata conflicts.
Recognizing these issues early can protect your NAS QNAP TS-264-8G from full RAID failure and significantly increase the chances of successful data recovery.
Common Causes of Data Loss in NAS Devices
Data loss in NAS systems often occurs due to RAID failures, accidental deletion, firmware corruption, disk degradation, and power outages. Misconfigured RAID arrays or simultaneous disk failures also frequently lead to inaccessible volumes or damaged file structures.