Microsoft has just recently presented a new version of its operating system called Windows 11. However, many users have encountered the error “This PC can’t run Windows 11”. In this article, we will discuss the causes of this error, as well as methods of solving it.
Contents
- The main reasons for "This PC can't run Windows 11" error?
- How to enable TPM 2.0 in the BIOS or UEFI settings?
- How to enable the Secure Boot in BIOS or UEFI?
- How to check if the TPM 2.0 module is installed on your computer?
- Can I add a TPM 2.0 chip to my computer?
- How to install Windows 11 on a computer with no TPM?
- How to install Windows 11 on an unsupported computer through the Windows Update?
- What ot do if important data was lost?
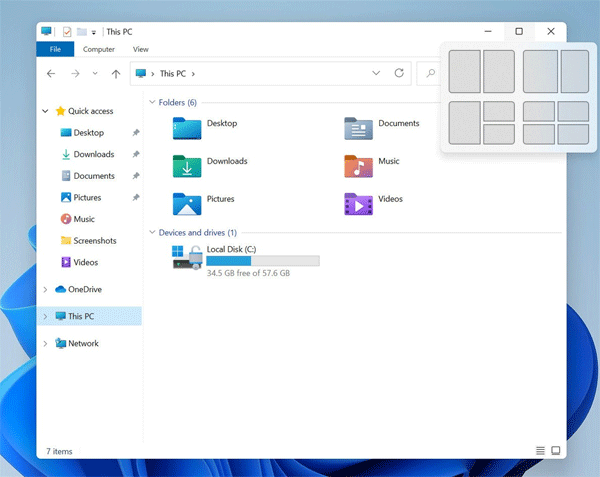
Windows 11 brought many innovations for its users such as a new design (containing a lot of blur and new icons), windows with rounded edges, a new Start menu, a new experience with windows (now when you hover over the window deployment icon, an additional area appears at the top right showing how you can place the window to divide the workspace more efficiently), a new taskbar (centered), a more convenient work with working additional monitors (the system remembers the position of the windows), supporting the Android app, and much more.
The Microsoft representatives also claimed that a lot of changes had been done inside the system. It allows the system to become faster and increase the loading games speed up to 20% due to the introduction of DirectStorage technology, which loads the video data directly into the video card, bypassing the CPU (the same technology is used in XBOX).
Naturally, the number of people who wanted to upgrade from the already annoying “Ten” to the new Windows 11 immediately increased, but a lot of them were faced with the error This PC can’t run Windows 11“, even though their computer seemed to meet the requirements fully. So what is the reason?
The main reasons for “This PC can’t run Windows 11” error?
Since data security in today’s world comes first, the new Windows 11 has paid quite a lot of attention to this issue. The company has fixed a lot of vulnerabilities which were in Windows 10, but the biggest innovation is the requirement to have a TPM 2.0 module in the computer.
TPM module (Trusted Platform Module) is a chip on computer’s motherboard, which is engaged in cryptographic data encryption and computer protection. The TPM version 2.0 is the most recent.
In our article, we talked about how you could encrypt your hard drive with a built-in tool called BitLocker (You can read about how to use BitLocker in the article “How to Encrypt your data with BitLocker“). So, if you have TPM chip in your computer – data encryption is performed not in the CPU, but with the help of TPM chip. This removes unnecessary load from the CPU. Besides data encryption, the TPM 2.0 chip can check the identity of the PC user, prevent unknowingly modified operating system configurations, prevent malware such as bootkit and rootkit (which can modify the MBR or GPT boot record), or identify the user on the network and in applications. The thing is — each TPM chip has its ID, which cannot be changed. Thus, if properly configured, the TPM module is a kind of “passport” for a computer, which cannot be faked.

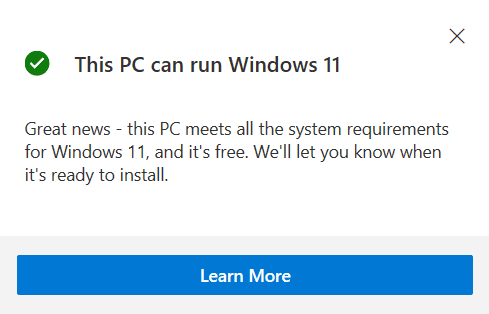
To check if Windows 11 can be installed on your computer, Microsoft suggests using the PC Health Check program. It analyzes all of your computer’s characteristics and shows the “This PC can run Windows 11“
…or “This PC can’t run Windows 11“
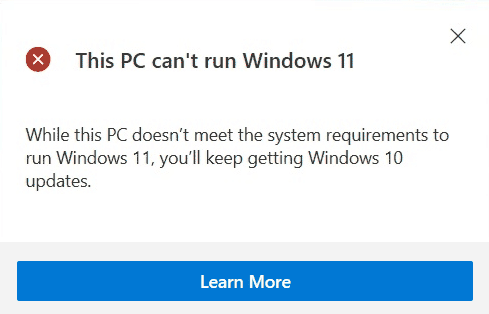
But quite often, the PC Health Check reports the inability to install Windows 11 on your computer, even if it meets all the requirements and the TPM 2.0 module is present.
In most cases, the reason is that the “TPM 2.0” chip is disabled, or the “Secure Boot” function is not activated in the BIOS/UEFI settings. The thing is that both of these functions should be used, as the entire data security in Windows 11 is based on them.
If you encounter the “This PC can’t run Windows 11” error, please follow the instructions in the following paragraphs of this article.
How to enable TPM 2.0 in the BIOS or UEFI settings?
As mentioned above, TPM 2.0 is a mandatory requirement to run Windows 11 on your computer. However, many users do not check whether it is activated, and if it is disabled, they get the error “This PC can’t run Windows 11“. To enable the TPM 2.0 module follows:
Step 1: Enter the BIOS or UEFI settings. To do this, reboot your computer and use the BIOS entry key during the next power-up. Depending on the model, it may be different, but most often it’s Del, F2, F1, or F12. Just watch the prompt on the screen when you turn on your computer.
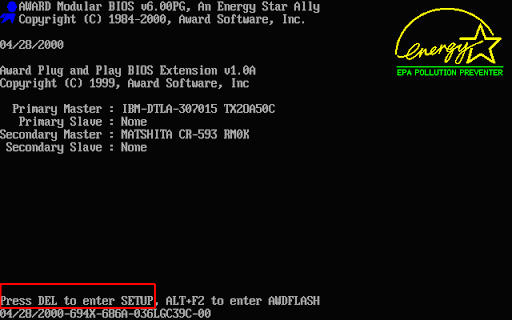
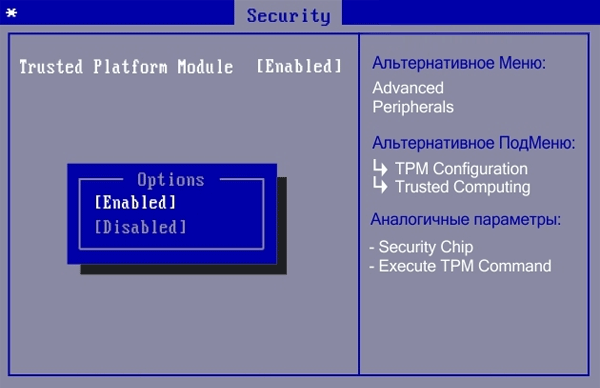
Step 2: In the BIOS (UEFI) settings, find the “Security” tab and check if TPM 2.0 is active. Make sure it says “Enabled” next to “Trusted Platform Module“.
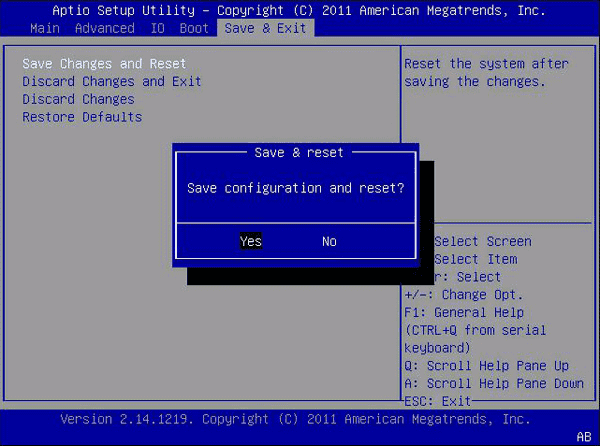
Step 3: After that you need to save the changes. To do this, go back to the BIOS/UEFI main menu using the “ESC” button, go to the “Save & Exit” tab, choosethe “Save Changes and Reset“, press “Enter“, and then press “Yes” to confirm saving the changes.
On UEFI the process of enabling TPM 2.0 may be slightly different but the essence is the same – look for the menu item responsible for security, and inside — enable the TPM 2.0 chip.
Now try again to run the PCHealthCheck utility to check if Windows 11 can be installed on your PC. If the error “This PC can’t run Windows 11” occurs again – follow the instructions in the next paragraph of this article.
How to enable the Secure Boot in BIOS or UEFI?
The Secure Boot option checks all components for the presence of malware before the operating system boots. That is, even before Windows 11 starts, each component of the computer must prove that it is not a virus. To identify components, it uses an electronic digital signature that is unique for each device. Thus, the risk of infecting your computer is minimized.
To enable Secure Boot follow these steps:
Step 1: Open the “Start” menu, and choose “Settings“

Step 2: In the window that appears, select “Update and Security“
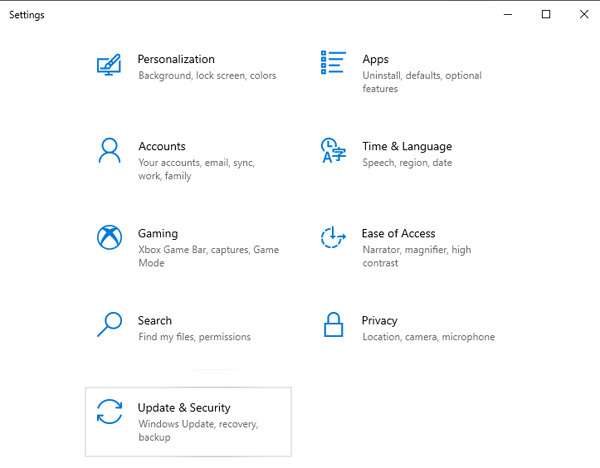
Step 3: Select the “Recovery” tab, and then on the right side of the window, in the “Advanced startup” field, click the “Restart Now” button.

Step 4: After rebooting, you will be presented with advanced options. Choose the “UEFI Firmware Settings“
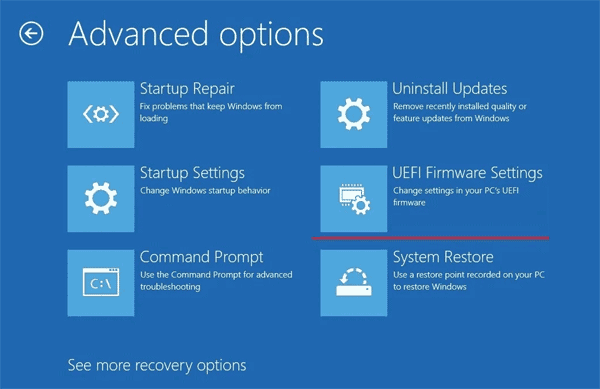
In this way, you will open the UEFI settings. This menu may look different from the one shown in the screenshots, but the logic behind enabling Secure Boot is the same: you need to find the section responsible for security(usually called “Security” or “Secure Boot“) and enable the Secure Boot function by checking the box next to “Enabled“. After that, you should save the configuration by clicking “Apply” (or “Save“, depending on the manufacturer of your computer).
After performing these steps, your computer will reboot normally again. You will now be able to install Windows 11 on your computer.
How to check if the TPM 2.0 module is installed on your computer?
Many users do not know if their computer has the TPM 2.0 security module, which is required for installing Windows 11, or if they cannot find its settings in the BIOS/UEFI.
Before proceeding to check the presence of the TPM module, it should be noted that the first version of this chip appeared in 2003, and the second (i.e. TPM 2.0) – in November 2019. Therefore, if your computer was introduced earlier – it will most likely be missing.
If you want to check if your computer has the TPM 2.0 chip – you don’t have to open it up. It is quite possible to check it by software means. To do this, proceed as follows:
Step 1: Open the “Start” menu and press “space” on your keyboard. The search window will open in front of you (you can also open it by clicking on the magnifying glass icon next to the “Start” icon).
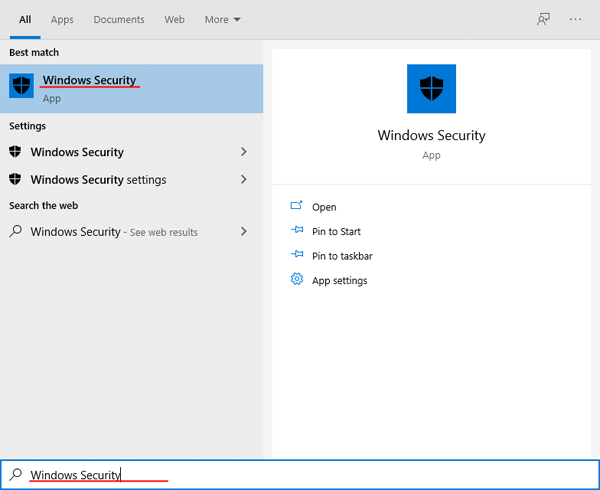
Step 2: On the right side of the window that opens, click on “Device Security“

You will see a window that is responsible for the device’s security. In the “Specifications” field, you can check the version of the TPM module built into your device. In our case it is TPM 2.0
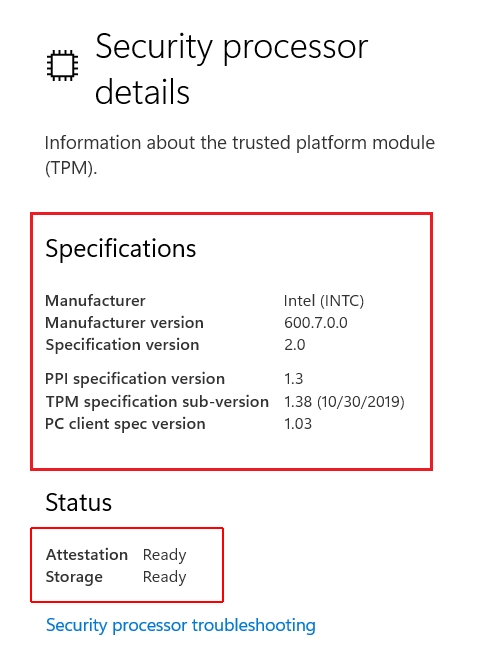
If you see the message “Standard hardware security is not supported” then there is no TPM module, or it is disabled in the BIOS settings.
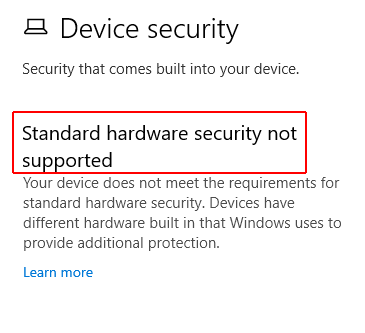
Try to enable it using the instructions from the second paragraph of this article. Look for items called TPM, PTT, Intel Platform Trust Technology, security chip, or fTPM (for AMD devices).
If you couldn’t find any of these signs, it is most likely that it is just missing in your device.
Can I add a TPM 2.0 chip to my computer?
Often users who have not found the TPM 2.0 module in their computer wonder if they can install it themselves or in a service center? Everything is somewhat ambiguous, and depends on whether there is a corresponding connector on the motherboard of your machine.
Most often, the possibility of installation is present in desktop computers, while laptops in 99% are deprived of such an opportunity. The reason for this is their mobility – almost all the parts are soldered onto the motherboard to make the computer thinner, lighter, etc.
However, even if your computer can install a security module, you have to keep in mind that such an upgrade will not be cheap since you will have to buy the TPM chip itself plus pay for the installing.
Even though the desktop computers often have a TPM header key slot LPC bus, which is used for connecting the TPM 2.0 – it is not recommended that you install the security module yourself, unless you have experience in such matters. You could end up damaging the computer.
If you want to install TPM 2.0 to upgrade to Windows 11, you have to read the next section of this article, as there are detailed instructions on how to install Windows 11 on computers without a security module.
How to install Windows 11 on a computer with no TPM?
Almost as soon as the beta version of Windows 11 was released and the requirements for installation were made public, it turned out that a large number of people were using not very new computers without a TPM 2.0 chip. Accordingly, almost immediately a lot of enthusiasts started to figure out how to bypass the requirement to have a security chip. After a while, it gave its result and today anyone can install Windows 11 on their PC or laptop.
This method is not prohibited, but it imposes some restrictions. For example, Windows 11 users who do not have TPM 2.0 chip on their computers will not receive updates, but, it is most likely that this restriction will be circumvented by editing the registry or deleting the files responsible for checking whether the computer contains a security chip. So there is a point in using this method.
This method is great if you want a clean Windows 11 and don’t want to mess with the BIOS, etc.
It is worth noting that this method is also suitable if the amount of RAM on your computer does not meet the minimum requirements stated on the developer’s website.
So, to install Windows 11 on a computer without a TPM module, follow these steps:
Step 1: Download a Windows 11 image from Microsoft’s website (or a different source you trust).
Step 2: Create a bootable flash drive using the Rufus utility. You can read about how to do this in the article “How to create a bootable Windows flash drive“, all the steps are similar to creating a Windows 10 flash drive.
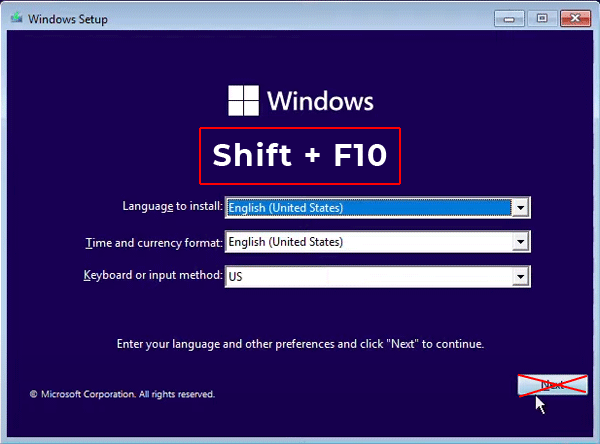
Step 3: Boot your computer from the flash drive (to do this, set your flash drive as a boot device in the BIOS/UEFI settings). The standard Windows installation window will appears front of you. Select the language and other settings you want, but do not click “Next”. Instead use the key combination “Shift + F10“
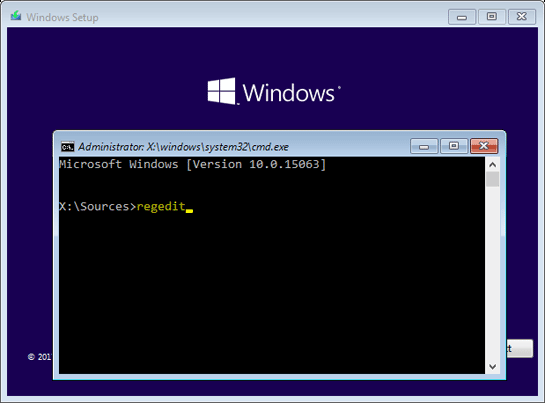
Step 4: The Windows command prompt will open in front of you. Enter the command “regedit” and press “Enter” to run it.
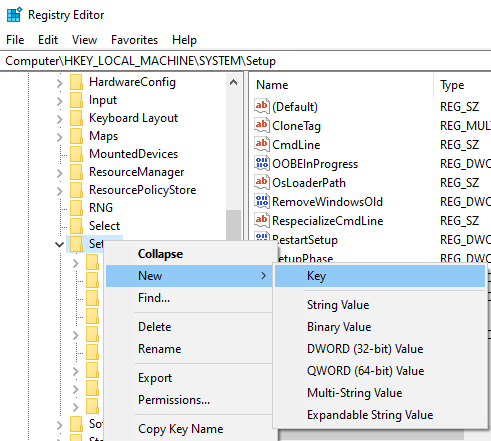
Step 5: In the Registry Editor window, go to “HKEY_LOCAL_MACHINESYSTEMSetup“, then right-click on the “Setup” folder and choose “Create” and then “Key“. Name the new partition “LabConfig“
You should get it as in the screenshot below:

Step 6: Open the “LabConfig” folder, then right-click on the empty space on the right side of the window, and select “New” and then click on “DWORD (32 bit) Value“. This operation must be repeated three times (that is, create three DWORD 32 keys).
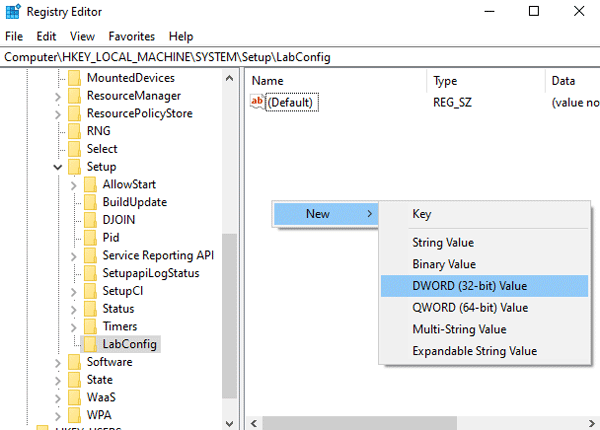
Step 7: Now you need to rename these files. To do this, right-click on the file for which you want to change the name and select “Rename“
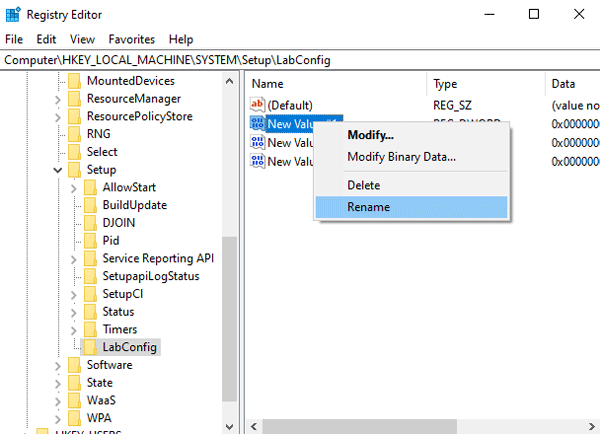
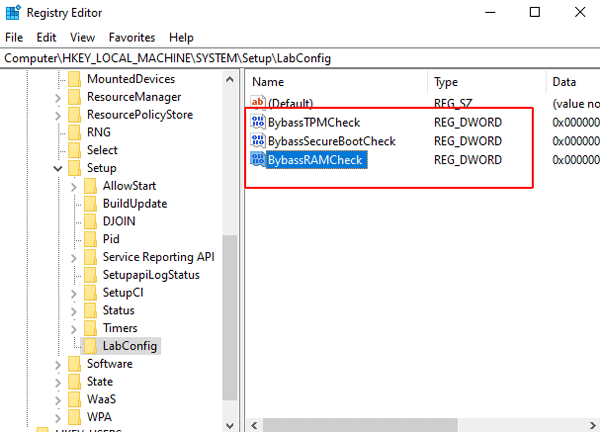
The just created parameters should be named as follows:
- The first parameter — BybassTPMCheck;
- The second parameter — BybassSecureBootCheck;
- The third parameter — BybassRAMCheck;
Please enter the names carefully, as the further installation of Windows 11 depends on them.
You should get it as shown in the screenshot below:
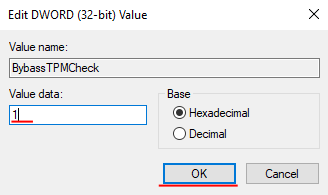
Step 8: Now each parameter must be set to “1“. To do this, double-click on the desired key, set the value to “1” and click “OK” to confirm. Repeat this action for all three keys.
After that, you can close the registry editor and the command prompt, click “Next” and continue with the installation as usual.

How to install Windows 11 on an unsupported computer through the Windows Update?
A few days ago, Microsoft officially announced a way to install Windows 11 on incompatible computers. This method is suitable for Windows 10 users whose computers have an older security chip TPM 1.2. It is also suitable for installing Windows 11 on computers with an unsupported processor.
It is worth noting that the company strongly recommends not using this method, but has to make concessions, as there were a lot of users with relatively old PCs and laptops.
So, to install Windows 11 on an unsupported computer, you should:
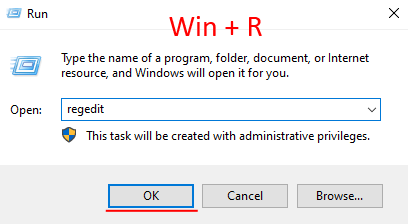
Step 1: Press the “Win + R“key combination, type the command “regedit” in the window that opens, and then press the “Enter” button to execute it.
Step 2: The registry window opens in front of you. Go to the “HKEY_LOCAL_MACHINESYSTEMSetupMoSetup“. Right-click in this folder, choose “New” and then “DWORD (32-bit) Value“

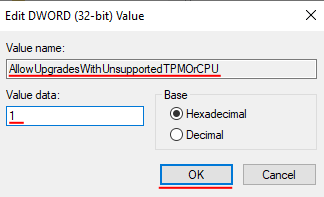
Step 3: Call the new parameter “AllowUpgradesWithUnsupportedTPMOrCPU“, then double-click it, enter the “1” value, and click “OK” to save changes.
Step 4: Reboot your computer.
After that, you can install Windows 11 either using the image downloaded from the Microsoft official website or using the Windows Update feature.
What ot do if important data was lost?
Every modern PC user stores valuable information. Some have financial reports, some have photos from weddings. It is all subjective. However, users often forget to move their data to a safe location and format the C: drive when installing Windows 11.
It’s also not uncommon for attempts to install Windows 11 to fail. Especially when it comes to pirated modifications.
If you find that important data has disappeared – immediately use a professional data recovery program called RS Partition Recovery. Otherwise, the data may be lost irretrievably. The reason is the high probability of overwriting files by other ones.
Usually, when Windows formats a drive or deletes a file – it does not physically delete it, but only marks it as deleted which allows the controller to overwrite it with other data if necessary. Thus, the file is physically present on the drive, it’s just that Explorer doesn’t display it. That is why the process of deletion is many times faster than the process of writing data to the disk. However, it is impossible to predict when exactly the deleted file will be overwritten by a different one since the controller distributes the data on the disk based on thousands of different factors. Therefore it is important not to waste time and to use RS Partition Recovery right away.
This program has an intuitive interface, so you will be able to recover lost data no matter how well you know your computer.
In addition, RS Partition Recovery supports ALL modern file systems – so it does not matter what operating system the drive was on, and the deep scan mode can recover even those files that were lost months ago.
Just connect the drive to a working computer or install a new copy of Windows on your PC and follow a few simple steps:
Step 1. Install and launch the RS Partition Recovery.

All-in-one data recovery software
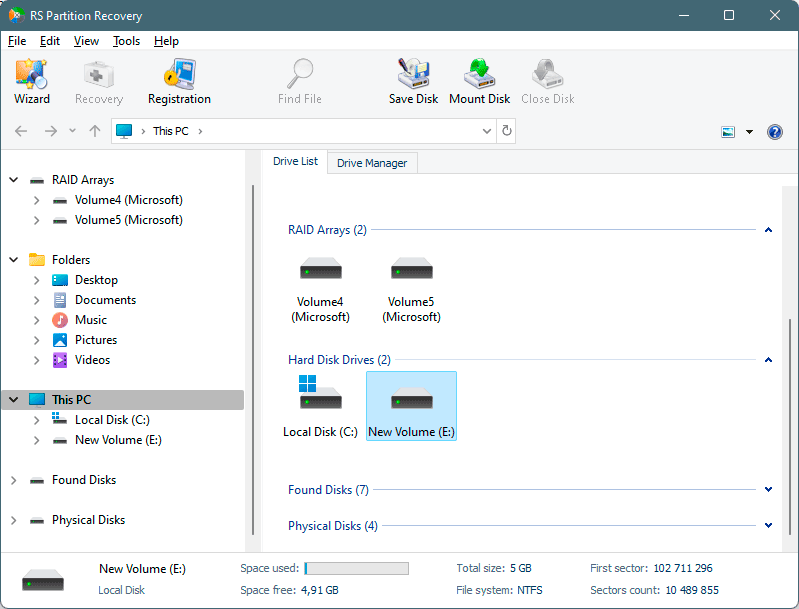
Step 2. Select the drive or partition from which you want to recover data.
Step 3. Choose the type of analysis.
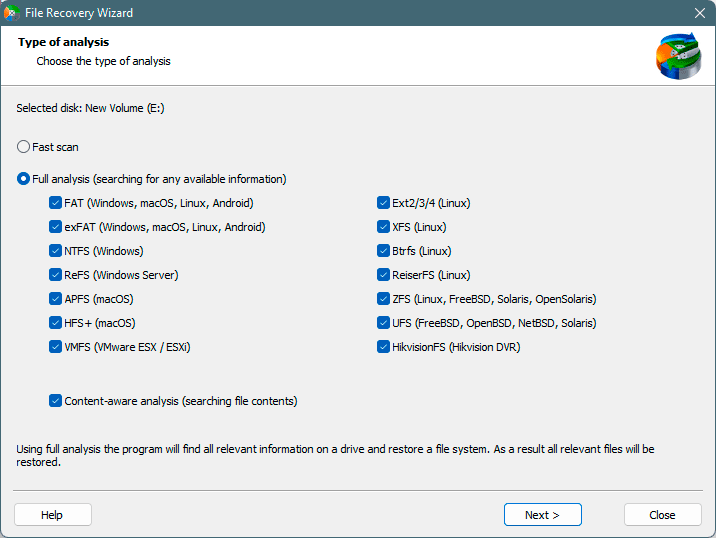
Fast scan you should use in case the file was lost recently. The program will scan the drive quickly and show the files available for recovery.
The Full analysis function allows you to find lost data, after formatting, disc resizing, or file structure corruption (RAW).
Step 4. Preview and select the files to recover it.
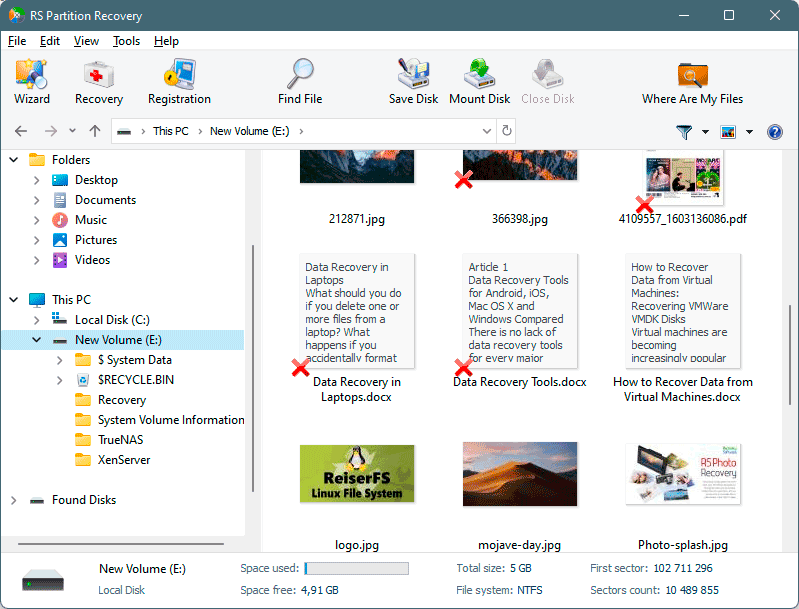
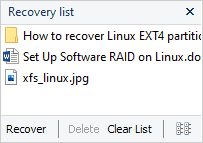
Step 5. Add the files you want to save to the "Restore list" or select the entire partition and click Recovery.
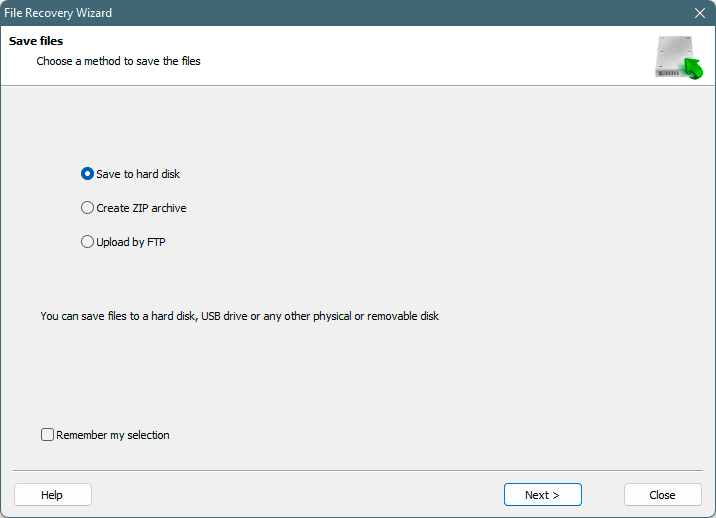
It should be noted that it is best to save the recovered file to an external hard drive or USB flash drive.


