How to Create a Hardware RAID on a Motherboard? Each motherboard manufacturer provides its own interface, organization, and BIOS functions. Therefore, the process of creating a disk array will vary depending on the motherboard. The hardware RAID itself—supported configurations (levels) and their capabilities—is determined by the RAID technology from the chipset manufacturer, namely Intel and AMD.
Below, we will examine in detail the implementation of RAID on an Asus motherboard using the AMD platform. We will explore the capabilities of modern AMD hardware RAID technology, how to create such a RAID, how to delete it, and what to do if you encounter issues.
Contents
- Hardware RAID Technologies
- RAIDXpert2 Technology
- Storage Configuration Setup
- Creating RAID
- RAID Initialization and Partition Creation in Windows Environment
- RAID Issues
- Deleting RAID
- Data Recovery in Case of RAID Collapse
Hardware RAID Technologies
Hardware RAID is slightly different from software RAID, such as that implemented by the Windows “Storage Spaces” system feature. Hardware RAID does not burden the CPU resources, although for modern processors, these loads may be negligible. In some disk operations, it might be slightly faster.
Hardware RAID is implemented by motherboards with an integrated RAID controller. Whether a specific motherboard supports RAID, and if so, which configurations, can be found on the specifications page on the manufacturer’s website.
Most motherboards are provided with hardware RAID by the chipset from Intel or AMD, along with the RAID implementation technologies from these companies. Intel’s modern technology is Intel Rapid Storage.
Note: How to create RAID using Intel Rapid Storage technology is detailed in the articles “How to Create RAID in BIOS on an Asus Motherboard with Intel Platform” and “How to Create Hardware RAID in Intel Optane Memory and Storage Management”.
AMD’s modern hardware RAID technology is RAIDXpert2.
RAIDXpert2 Technology
RAIDXpert2 technology is supported by AMD chipsets X670, X570, X470, X399, B450, X370, B350, A320. It works with HDD hard drives and SSD storage devices. It supports SATA, ATAPI, M.2 SATA, and M.2 PCI-E (NVMe) interfaces. It is compatible with Ryzen and Ryzen Threadripper processors.
Supported operating systems include 64-bit Windows 10 and Windows 11. For Ryzen Threadripper processors with sTRX4 socket, RAIDXpert2 also supports Ubuntu 20.04, RHEL 8.2, and Debian 10.3 operating systems.
RAIDXpert2 implements standard RAID configurations:
- RAID 0 (from 2 to 8 disks);
- RAID 1 (2 disks);
- RAID 5 (from 3 to 5 disks);
- RAID 10 (4 disks).
For detailed information on these configurations, refer to the article “What is RAID, and How Different Types of RAID are Used”.
RAIDXpert2 also offers proprietary configurations:
- Volume – essentially JBOD, an array of multiple disks combined into a single disk space (up to 8 disks). It lacks fault tolerance and performance improvement;
- RAIDable – previously known as RAID Ready, an array of a single disk that can later be converted into RAID 0 or RAID 1.
Not all of these configurations are widely implemented. For instance, RAID 5 is only supported with the exclusive Ryzen Threadripper processors with sTRX4 socket.
Notable features of RAIDXpert2 RAID implementation include fault-tolerant array recovery. If such an array is accidentally deleted, it can be restored by creating a new array with the same parameters as the deleted one.
Another notable feature of RAIDXpert2 is array hiding. This hides the array from the operating system and programs, preventing unauthorized users from accessing it.
Another significant feature is the ability to configure a spare disk for fault-tolerant RAID. If one of the disks fails, the array will automatically rebuild using the spare disk instead.
To create and manage RAID using RAIDXpert2, the technology provides an interface in the BIOS of motherboards. There is also the AMD RAIDXpert2 Utility, which operates in operating systems as a web console in a browser window. For Windows 10 and 11, this utility is available as an app in the Microsoft Store.
Storage Configuration Setup
To create RAID on an Asus motherboard with an AMD platform, enter the BIOS. To do this, press the Del key when the computer starts. Enter “Advanced Mode”, which is the advanced BIOS mode.
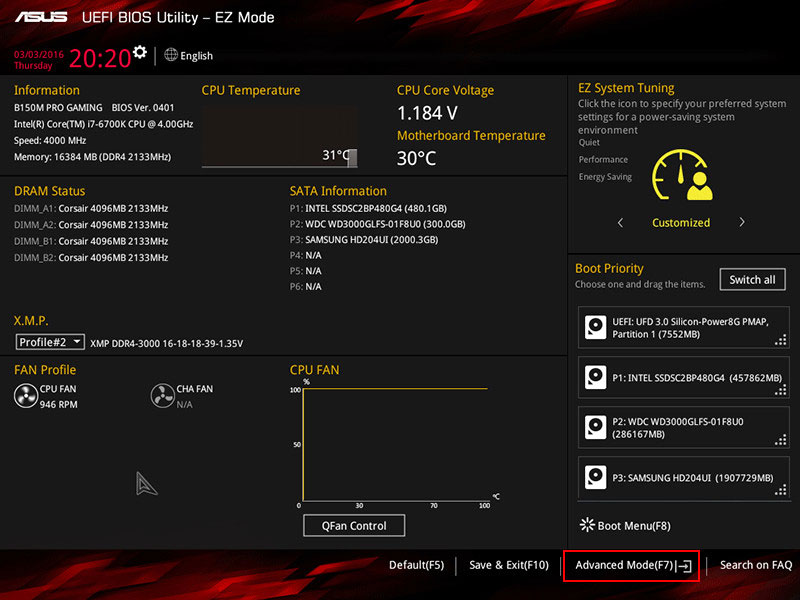
Before creating RAID in Asus BIOS, you need to perform settings related to the configuration of information devices.
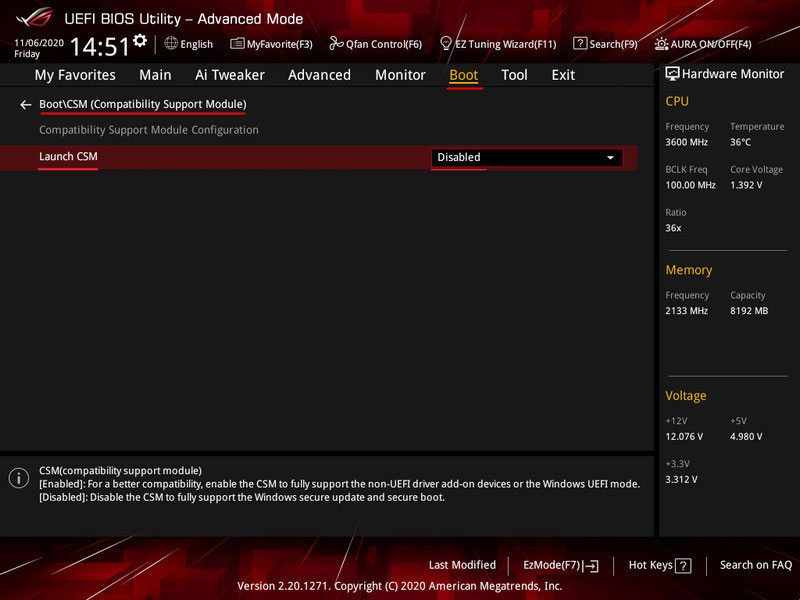
If you are creating RAID from SSD M.2 PCI-E (NVMe), the computer must be switched to UEFI-only mode. Disable CSM – the compatibility module for UEFI and Legacy. This is not necessary for RAID from SSD SATA or HDD.
Go to the “Boot” section, then “CSM (Compatibility Support Module)”. Set the “Launch CSM” parameter to “Disabled”.
Next, proceed to configure the information devices. In the “Advanced” section, go to “SATA Configuration”.
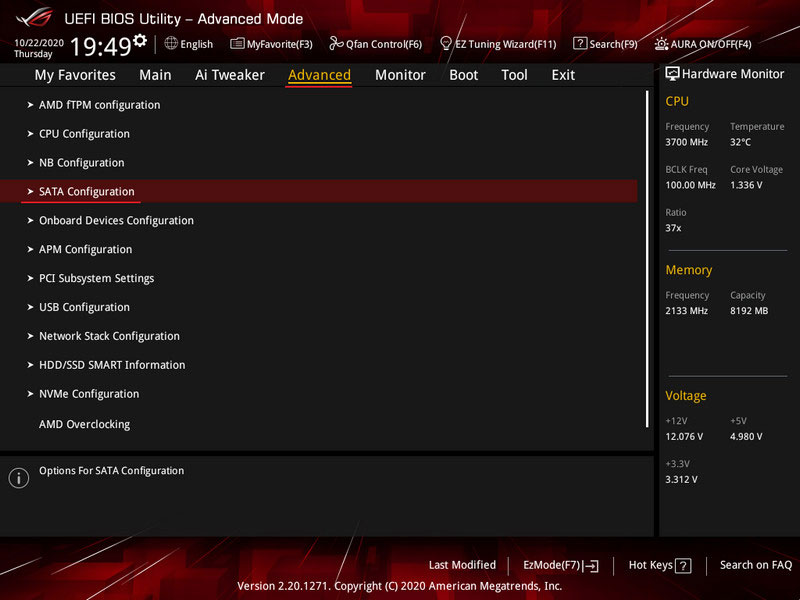
For HDD and SSD SATA, the “SATA Mode” parameter should be set to “RAID”. For SSD M.2 PCI-E, the “NVMe RAID mode” parameter should be set to “Enabled”. Press F10 to save the settings and restart the computer.
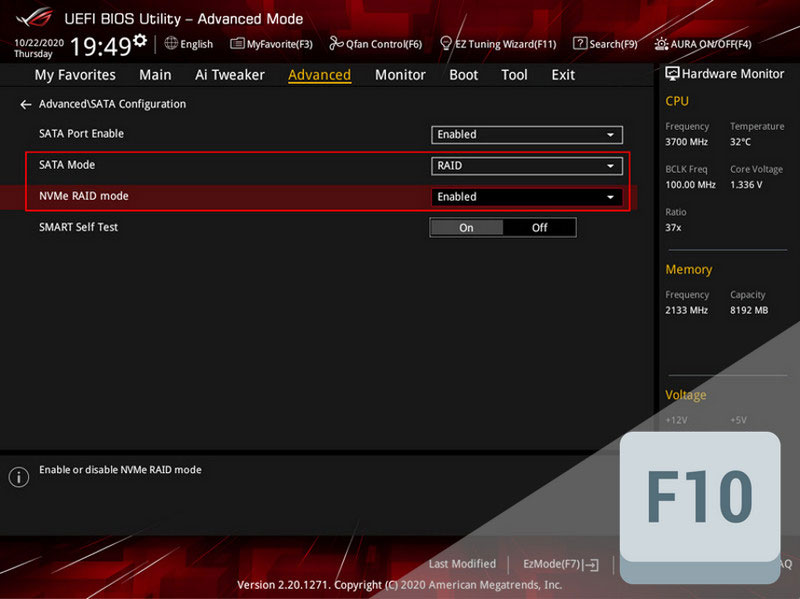
Important: If these RAID modes were not previously set and you switched from other modes (AHCI or others), the installed Windows on the computer will not be able to start. Due to the absence of drivers for the new RAID mode, you will encounter a blue screen of death. Windows will need to be reinstalled.
Creating RAID
Now let’s look at the RAID setup in Asus BIOS on the AMD platform. With the new computer start, enter the BIOS again. Enter “Advanced Mode” again.
Go to the “Advanced” section. Here, you need the “RAIDXpert2 Configuration Utility” subsection. This is the interface for AMD’s RAID implementation technology, integrated into the BIOS as the RAIDXpert2 utility. Here, you will create arrays, manage them, and delete them if necessary.
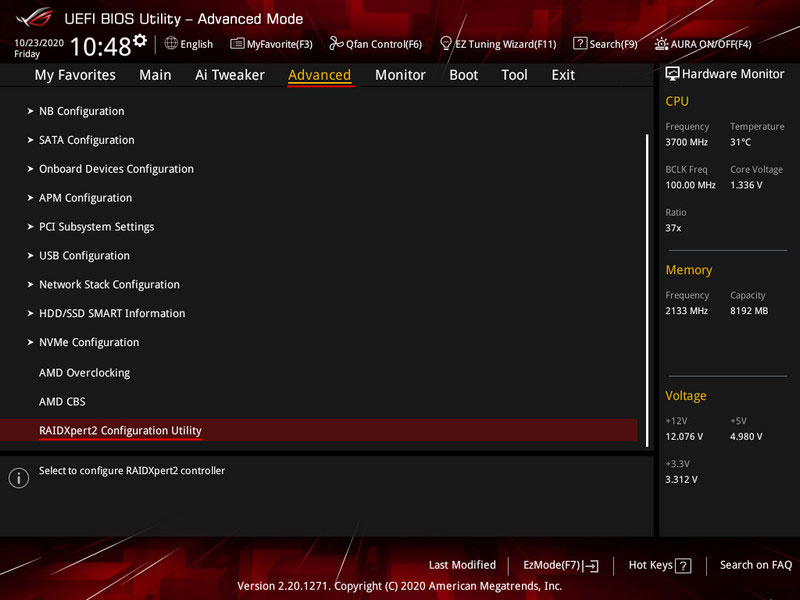
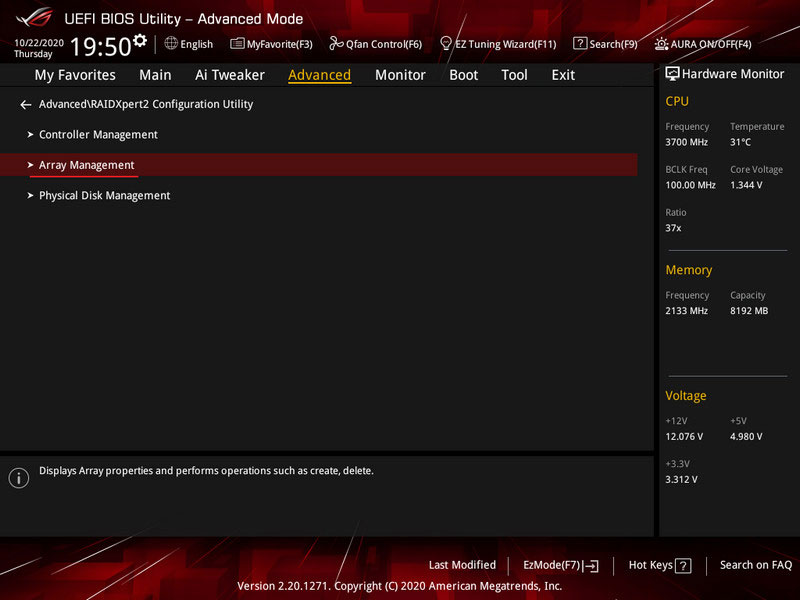
To create RAID, go to the utility’s “Array Management” section.
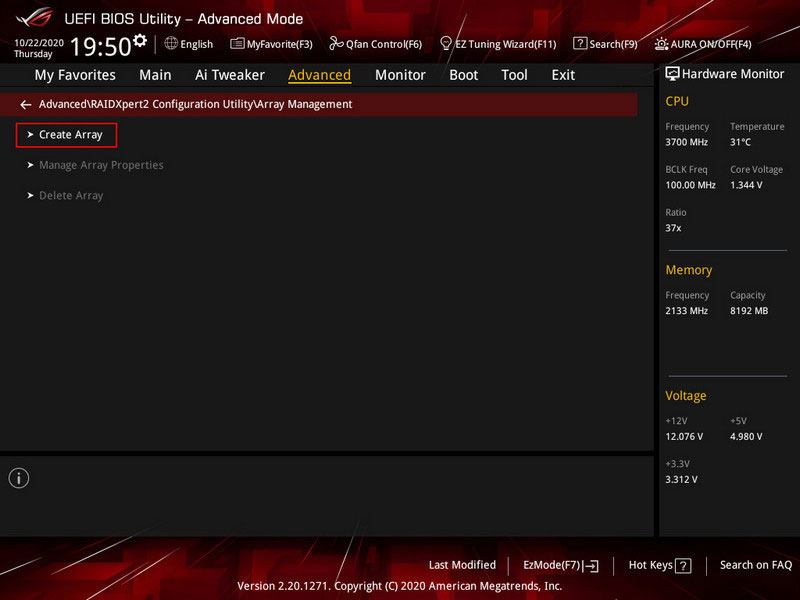
Select “Create Array”.
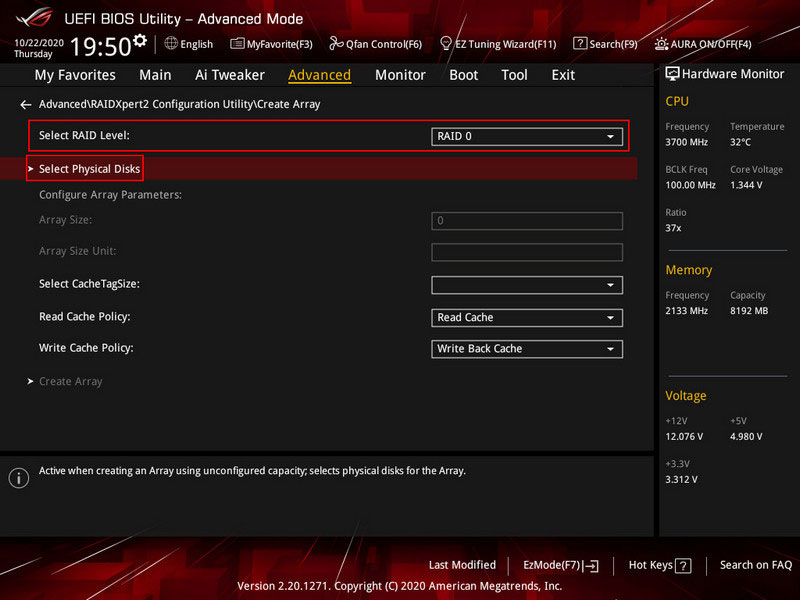
Select the RAID configuration in the “Select RAID Level” field. Click “Select Physical Disks”.
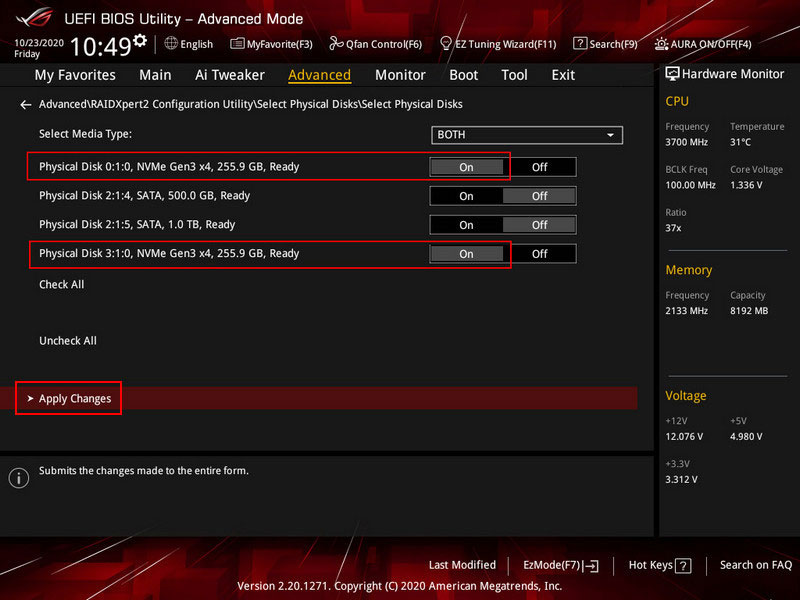
Here, specify the disks you want to include in the disk array. Mark them with the “On” switch. Click “Apply Changes”.
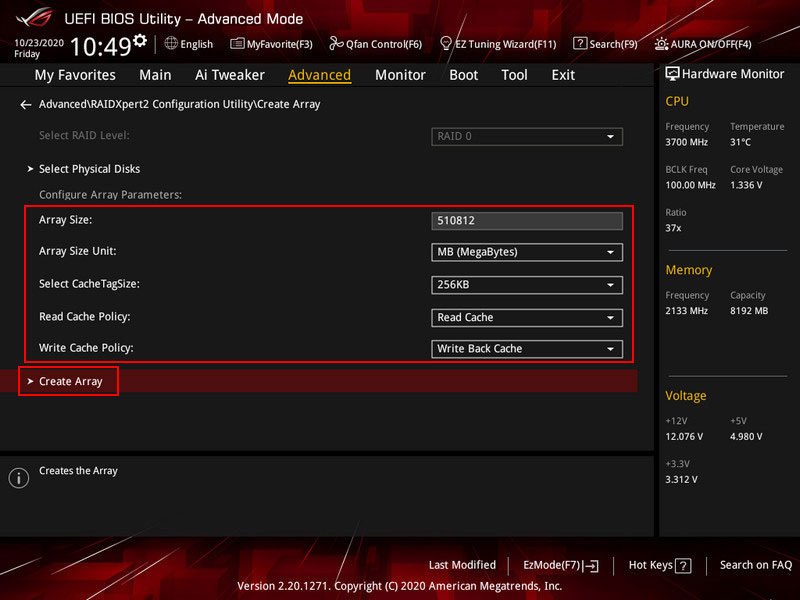
If necessary, adjust the default array parameters. Finally, click “Create Array”.
Important: When creating RAID, all data on the array disks will be deleted. The disks will undergo RAID initialization, and after such operations, data recovery, if possible, will require effective data recovery software, such as RS Partition Recovery.
RAID is created. Press F10 to save the settings and restart the computer. Now, the array needs to be configured in the Windows environment.
RAID Initialization and Partition Creation in Windows Environment
The created RAID needs to be initialized and partitioned for use. This can be done during the Windows installation process, at the stage of selecting the location for the operating system. Using the “Create” operation, you can create a partition for Windows and user partitions.
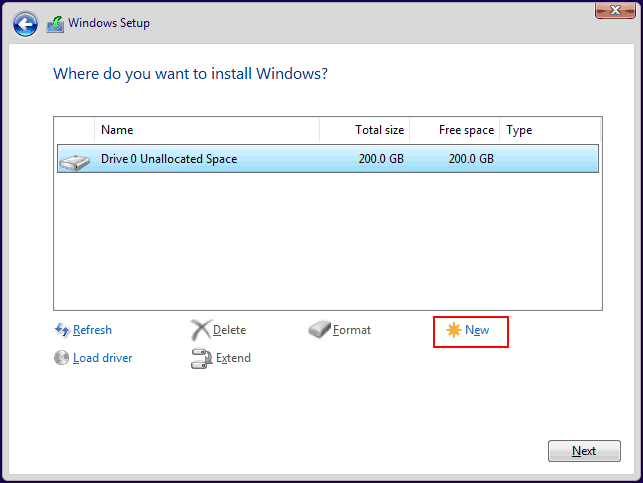
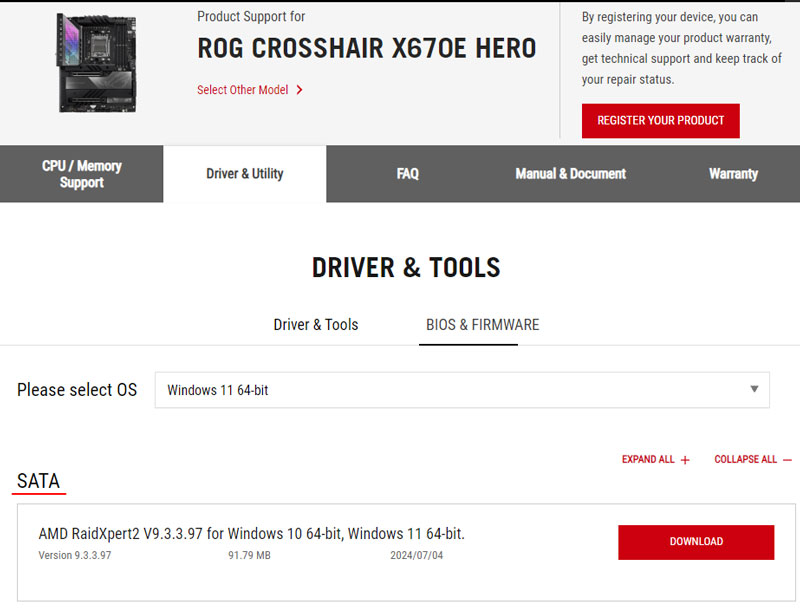
Note: If the RAID does not appear during Windows installation, download the drivers – AMD RAID Driver. This can be done on the motherboard’s specifications page, in the support section. Download the drivers for SATA, which include RAID drivers for both SATA and NVMe devices.
During installation, specify the downloaded drivers using the “Load” option.
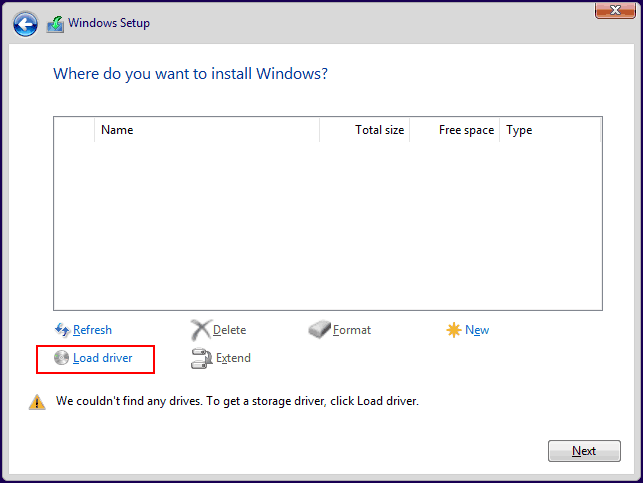
Manual installation of RAID drivers may also be required to detect the array in an existing Windows environment.
If the created RAID will be used for data storage, in an existing Windows environment, it can be initialized and partitioned using the disk management system. Launch it via system search or the Win+X menu.
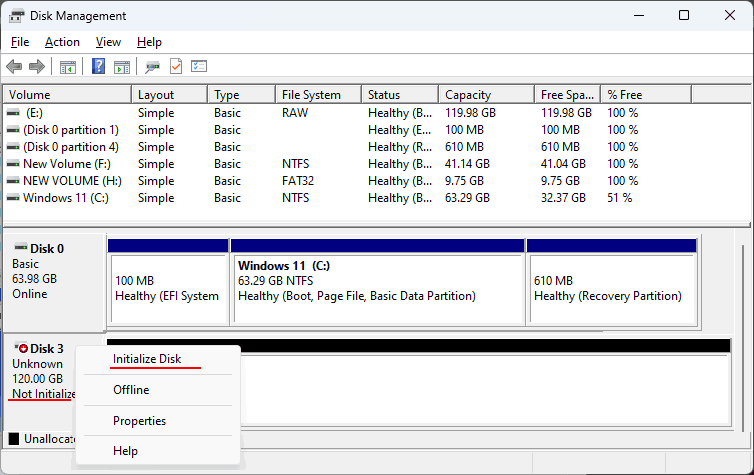
Initialization should start automatically. If it does not, right-click on the array disk and select “Initialize Disk”.
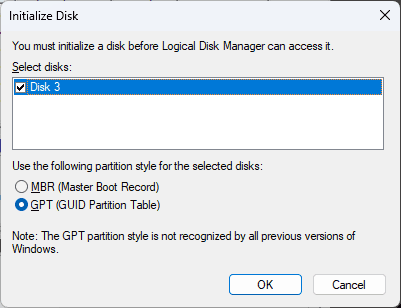
Select the partition style, which in most cases will be GPT.
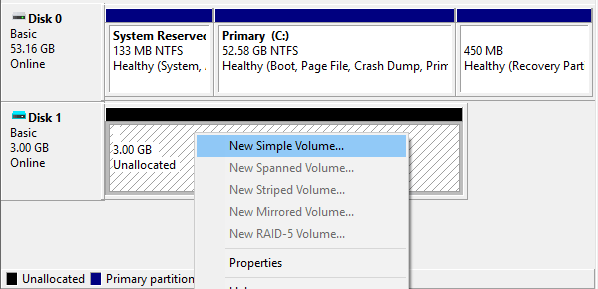
Next, create partitions on the RAID disk. In the context menu on the disk space, select “Create Simple Volume” and follow the step-by-step wizard.
RAID Issues
In the “RAIDXpert2 Utility” in BIOS, navigate to “Advanced > RAIDXpert2 Configuration Utility > Manage Array Properties” to monitor the array’s status. The “Array Status” field will display one of the following states:
- Ready – readiness state when the array is created;
- Normal – normal state, the array is functioning properly;
- Critical – critical state of fault-tolerant arrays when a disk fails or malfunctions;
- Offline – offline state when multiple disks in fault-tolerant arrays fail, or when a disk in non-fault-tolerant arrays like RAID 0 and Volume fails. Offline indicates the array has collapsed if reconnection with problematic disks is not possible.
RAID 0 and Volume arrays cannot be recovered if a disk fails; they need to be deleted and recreated. Only fault-tolerant arrays RAID 1, 5, 10 with a Critical status can be recovered after replacing a disk.
Note: What to do if a disk fails is detailed in the article “Hard Drive Failure”.
Deleting RAID
RAID can be deleted if no longer needed or to create a new one. How to do this in the BIOS of an Asus motherboard with an AMD platform? Enter the BIOS, switch to “Advanced Mode”. Go to the array management properties in the “RAIDXpert2 Utility” via “Advanced > RAIDXpert2 Configuration Utility > Manage Array Properties”. Select “Delete Array”.
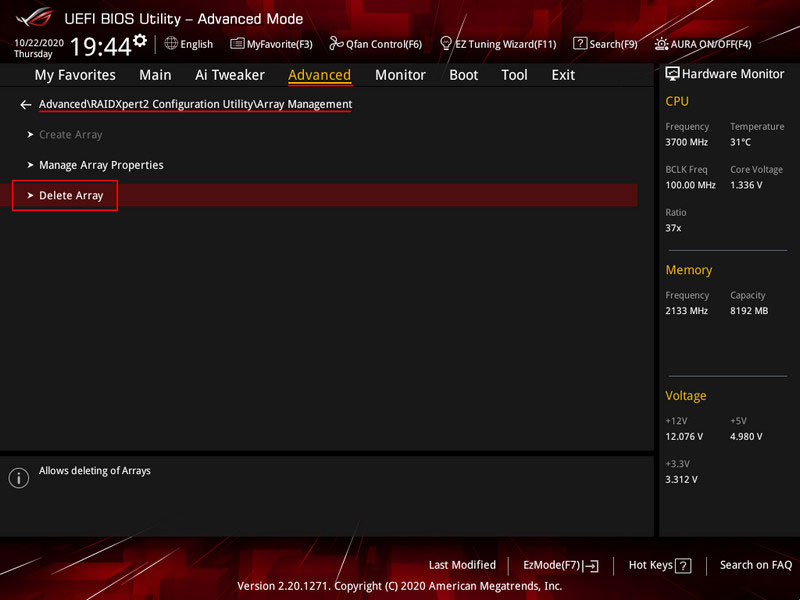
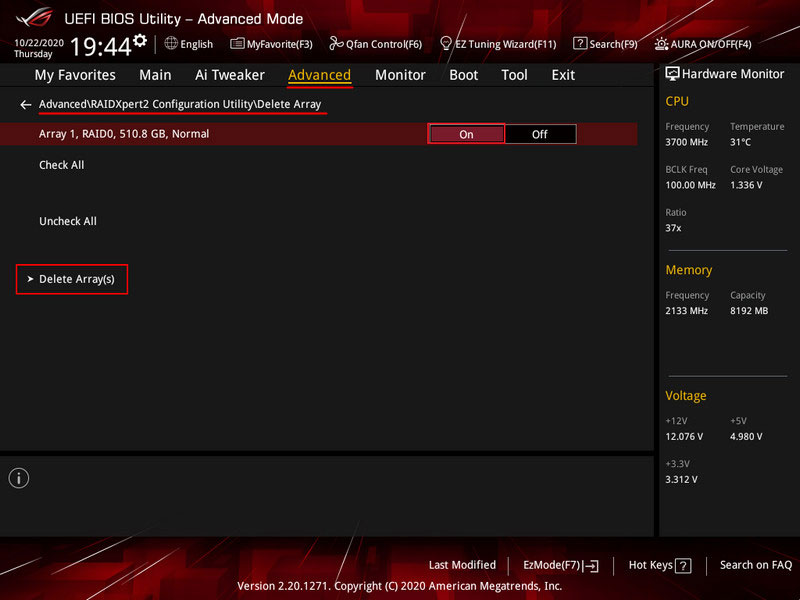
Mark the array to be deleted with the “On” switch. Click “Delete Array(s)”.
Confirm the action by setting the switch to “On”. Click “Yes”.
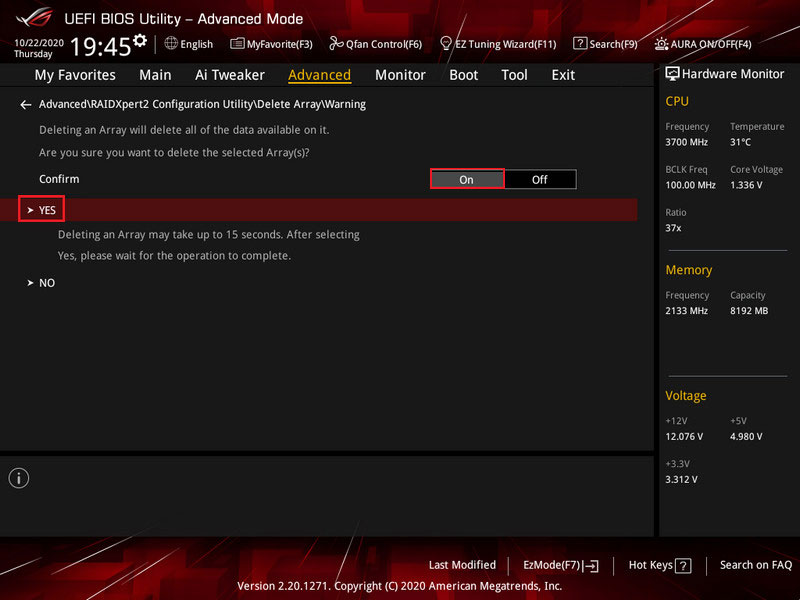
That’s it, the RAID is deleted.
Data Recovery in Case of RAID Collapse
How to recover data in case of RAID collapse? A collapse can occur due to disk failures in non-fault-tolerant arrays, unsuccessful recovery of fault-tolerant arrays, during motherboard replacement, transition to a hardware RAID controller, etc.
RAID collapse necessitates recreating the array and results in data loss. However, data can be recovered. For RAID 0 and Volume, all array disks must be recognized by the computer. For RAID 1, 5, 10, only disks significant for data recovery need to be recognized.
To recover a collapsed RAID, use a data recovery program that accounts for the array collapse and restores access to data for extraction. One such program is RS RAID Retrieve.
Working with it is detailed in the section on recovering data from a collapsed hardware RAID on the Intel platform. The actions for hardware RAID on the AMD platform will be similar.

